Bachelor Thesis Paper: Sparse Pose Estimation data collection, evaluation backend, frontend, as well as all resources for the creation of the Hidden Dataset using commodity sensors.
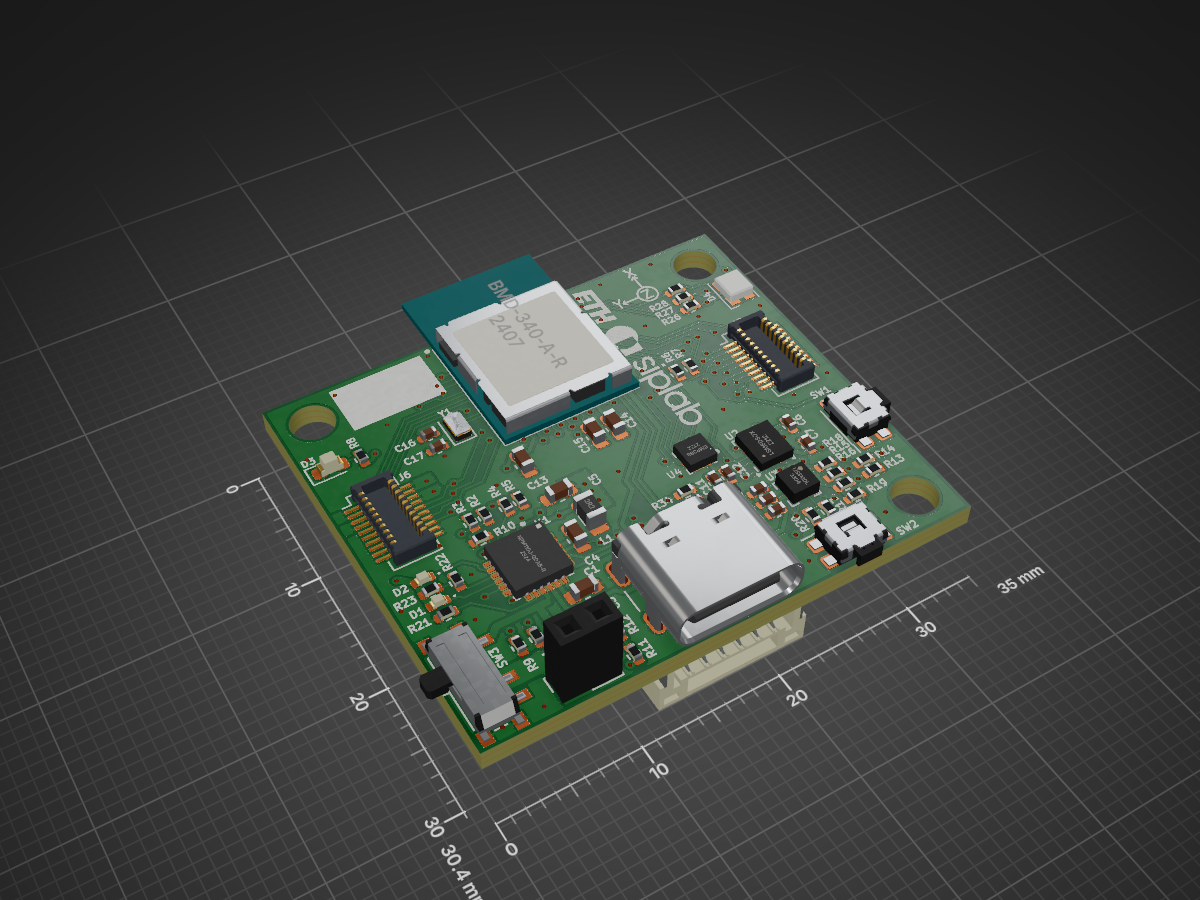
Siplab wristband is an open-source printed circuit board by bastocon, from the bastocon/sparse-pose-benchmark repository on GitHub, published under the MIT licence. It is a 4-layer board of 35 × 30.4 mm with 67 parts on 90 nets, routed with 934 tracks and 173 vias.
It is built around the BMD-340-A-R, BMP388 and LIS3MDL, with the LSM6DSOX, NPM1100-QDAB-R7 and CM8V-T1A-32.768KHZ-9PF-20PPM-TA-QC among its other parts. Its parts include 28 resistors, 17 capacitors, 7 connectors, 5 ICs and 4 diodes.
Contains all evaluated methods, and under /pip also the evaluate.py and preprocess.py used for the benchmark.
/src/platform
Contains the code for the platform, seperated in /frontend and /backend.
The server is located in /src/platform/backend/src/index.ts, and the default submissions directory in /src/platform/backend/submissions.
/src/tracking
Each subdirectory has its own README's.
/uwb_wearables/recording/processing. uwb_wearables in general contains all the code for hardware and firmware of the commodity sensors. The recording/processing directory in particular contains the code to process the raw uwb.csv and imu.csv, including the orientation estimator.
/processing contains all the post-processing. It also contains info.csv and shape.csv if you need the cut intervals, beta shape parameters or similar.
VirtualCaliper is the program used to generate the SMPL shape parameters.
Execution Environments
Docker for backend evaluation
Do one of these things:
Setup or rebuild:
docker-compose build
To create a non-persistent session to execute the evaluation:
docker-compose run --rm --remove-orphans pip-env
Optional: If you want to be sure, that it builds correctly after changes, do:
docker-compose build --no-cache
Docker for Visualization with aitviewer
Same as for the backend, but use vis-env. e.g. docker-compose run --rm --remove-orphans vis-env.
Note that the visualizer.py files need to be run with xvfb-run -s "-screen 0 1280x720x24" python path/to/visualizer.py, as the docker does not has access to the display.
Conda/Micromamba
We have the following environments: uip, pip-env, mocap.
You can find them under
/pip_env.yml. Please refer to /pip_env_README.md and worst case /docker/pip-env/Dockerfile in the comments for an installation guide. The setup for rbdl was not easy. Works with python 3.7.
/mocap_env.yml
/src/experimental/UIP/environment.yml. As this python version differs, rbdl might has to be re-build. Works with python 3.8.17.
Execution of Benchmark and Methods
Running evaluation of Benchmark
Use pip-env. Be in project root.
These scripts automatically evaluate all .pt files named as the datasets that are in a folder. You always have to provide the path of the folder and not the files for this evaluation.
Preparation:
Have the predictions ready, and files named uip_db.pt, totalcapture.pt, amass.pt, gip_person1.pt, gip_perspn2.pt, hidden.pt in folder/ - no substructure.
Have the files config.json (optional but recommended), submission_info.json (really optional, used for the display of information on the website).
If you also run GIP (as its predicted as two single person), or want to re-evaluate the overall scores, additionally do this to calculate the overall scores.
The result will be in folder/evaluation.json. The first part shows the results per dataset per sequence, and the last rows ("overall") have the final results. More details can be found in the Additional Information section.
Tip: If you only want to test things and run different versions, create an archive folder inside your actual evaluation folder. As the backend only searches for the exact files in the top level, they are not evaluated.
E.g. folder/totalcapture.pt will be evauated, but folder/archive/totalcapture.pt will not.
To change the UIP output from the per-sequence based file to one file for benchmark evaluation:
bash
python src/experimental/utils/change_pt_file.py correct_uip_output <path/to/uip-output-folder> <path/to/gt-file-for-betas-gender>

# Or specifically (notice that UIP creates folders with spaces, do not forget the "")
python src/experimental/utils/change_pt_file.py correct_uip_output "/local/home/**/data/processed/UIP/result/HiddenDataset/Ultra Inertial Poser" /local/home/**/data/processed/ground_truth_datasets/hidden_test_gt.pt
This produces an output, that has to be renamed and put into one submission folder for evaluation.
Check out the official UIP GitHub README for open questions.
Running PNP method
Use pip-env environment, same as in PIP method.
For a pleasant experience, start in project root. Comment the datasets you want to use in the process.py before execution.
Preprocessing
bash
python src/experimental/PNP/process.py
Prediction: Comment in/out the datasets you want to run in test.py before execution.
bash
cd src/experimental/PNP
python test.py
Get the output in a unified format. It creates an output file in the project root that has to be moved where desired.
This project is released under the MIT license. Our code is partially based on PIP.
Hidden Dataset
Recorded at SIP Lab, Computer Science Department, ETH Zurich, Switzerland.
General Information
The sequences are numbered AA01, AA02, AA03 where AA is the subject identifier.
Not all subjects have all three sequences.
File Structure
Main directory
In the main directory are the test.pt and train.pt, which contain the dataset with the synthetic magnetometer variant. This is the default version of this dataset. pose is stored in axis angle format. Note that tran does not start at origin to ensure compatibility for the camera feed.
This directory contains all the videos for each subject. Note that not the subject (TM**) does not have videos, and for some sequences only 3 of 4 cameras worked. The subfolders are front, back, left, right indicating from where you usually see the person from. As most participants looked at the instructor, front is the default viewing direction for most people, the other directions are derived from that. The videos are pre-cut, but you have to do the exact frame-synchronization.
Extras
In the Extras folder, one can find additional versions of the dataset, with more data access for advanced processing.
It contains test_no-mag.pt and train_no-mag with the same test and train data and keys, but where the orientation estimation is done without magnetometer readings. This leads to a significantly higher orientation error and more difficulty to estimate pose from.
It also contains the sequences with the following raw data. We recommend checking out the code and how it was generated, before using them. Wo = World frame of OptiTrack, so in which it was recorded. Wx= World frame of Xsens, where the pose originates. vis = Visualization/export frame (Y-up), this is the system in which everything like pose is exported by default if nothing is mentioned otherwise. Check out the paper "Benchmarking Deep Learning-Based Pose Estimation" for a more detailed definition of the coordinate systems etc.
python
"pose": to_numpy(pose_vis), # (N, 72)"pose_wo": to_numpy(pose_wo), # (N, 72) in wo frame"pose_unoptimized_vis": to_numpy(archive_pose_vis), # (N, 72) in vis frame, but no optimization""pose_raw_xsensframe": to_numpy(data1["poses"][begin_idx:end_idx+1]), # (N, 72) in Xsens frame"tran": to_numpy(tran_vis), # (N, 3), Optitrack Translation in vis frame"tran_wo": to_numpy(tran_wo), # (N, 3), Optitrack Translation in wo frame"tran_unoptimized_vis": to_numpy(archive_tran_vis), # (N, 3) OptiTrack translation in vis frame, but no optimization"tran_raw_xsensframe": to_numpy(data1["trans"][begin_idx:end_idx+1]), # (N, 3) in Xsens frame# sensor readings"rot": to_numpy(rot_vis), # (N, S, 3, 3) rotmat"rot_wo": to_numpy(rot_wo), # (N, S, 3, 3) rotmat in wo frame"acc": to_numpy(acc_vis), # (N, S, 3)"acc_wo": to_numpy(acc_wo), # (N, S, 3) in wo frame"acc_sensor": to_numpy(acc_sensor), # (N, S, 3) sensor frame acc"acc_gtrotated": to_numpy(acc_vis_opt), # (N, S, 3) # acc rotated with optitrack rot to remove sensor drift"uwb": to_numpy(uwb), # (N, S, S), sensor UWB, frame independant# OptiTrack ground truth'opt_rot': to_numpy(opt_rot_vis), # (N, S, 3, 3) rotmat'opt_rot_wo': to_numpy(opt_rot_wo), # (N, S, 3, 3) rotmat in wo frame'opt_rot_wo_raw': to_numpy(archive_opt_rot_wo), # (N, S, 3, 3) rotmat in wo frame, but no filtering'opt_acc': to_numpy(opt_acc), # (N, S, 3)
Bachelor Thesis Paper: Sparse Pose Estimation data collection, evaluation backend, frontend, as well as all resources for the creation of the Hidden Dataset using commodity sensors.
A submission for the AGV selection round tasks as can by found here https://drive.google.com/drive/folders/1egEmc1-yBnJ_g8xXa28QhqrrsOWX-JJO by Arjun Ghosh
It measures 35 × 30.4 mm and has 4 copper layers, 1.6 mm thick.
What parts does the Siplab wristband use?
67 parts, built around the BMD-340-A-R, BMP388, LIS3MDL and LSM6DSOX. The full list of its parts is on this page, with links to each part's symbol and footprint where PCBKit's library has them.
Where can I download the Siplab wristband KiCad files?
From the bastocon/sparse-pose-benchmark repository on GitHub, at the commit this page was made from: the board is src/tracking/uwb_wearables/hardware/siplab_wristband/siplab_wristband.kicad_pcb and its schematic src/tracking/uwb_wearables/hardware/UWB_adaptor/UWB_adaptor.kicad_sch. PCBKit opens the board in the browser, with nothing to install.
Can I use the Siplab wristband design in my own project?
Its repository publishes it under the MIT licence: you may reuse it on that licence's terms (keep the author's notice, and for a copyleft licence share your changes alike).