2 layers151.9 × 78.7 mm
WALL E Carrier Board
Acliad/WALL-E-Software
Software and some hardware files for a custom WALL-E robot.
23 parts
 Acliad/WALL-E-Software
Software and some hardware files for a custom WALL-E robot.
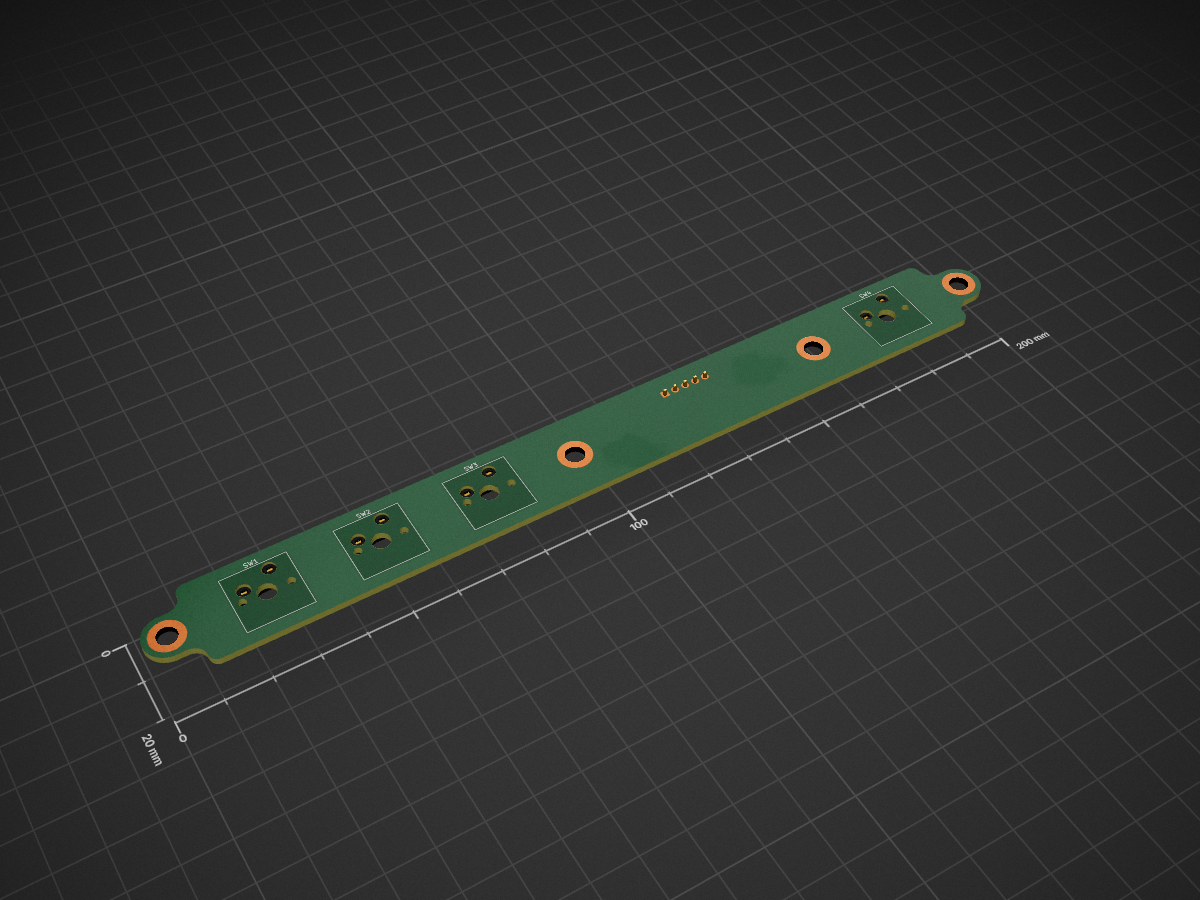
WALL E Button Board is an open-source printed circuit board by Acliad, from the Acliad/WALL-E-Software repository on GitHub. It is a 2-layer board of 200 × 20 mm with 10 parts on 5 nets, routed with 19 tracks and 0 vias.
Its parts include 4 switches and 1 connector.
This repo contains code, PCB files, and some 3D files for a WALL-E robot. The robot is controlled by an ESP32 microcontroller with PlayStation Navigation controllers. 3D files can be found under the Mechanical folder. The PCB files can be found under the PCB Files. The code can be found under the src folder.
This readme file contains information on setting up and using WALL-E, and there are several videos in the Docs folder that give examples.
The code is written as an Arduino sketch, but has many C++ files and classes. The custom library code is located in the src folder of the walle sketch and is organized into the following folders:
audio: Contains the code for the audio player.display: Contains the code for the display and animations.motion: Contains the code for the motion animations.button: Contains the code for the button handling.controller: Contains the code for the controller handling.stats: Contains a simple stats class mostly used for debugging.Additionally, the root of the src folder contains the main sketch file, walle.ino, which is the entry point for the program. It also contains several files to help configure WALL-E:
config.hpp: Contains the configuration for the audio player, display, and controller.display_animations.hpp and display_animations.cpp: Contains code for programatically defining display animations.motion_animations.hpp and motion_animations.cpp: Contains code for programatically defining motion animations.This image can be found in Docs/Images.
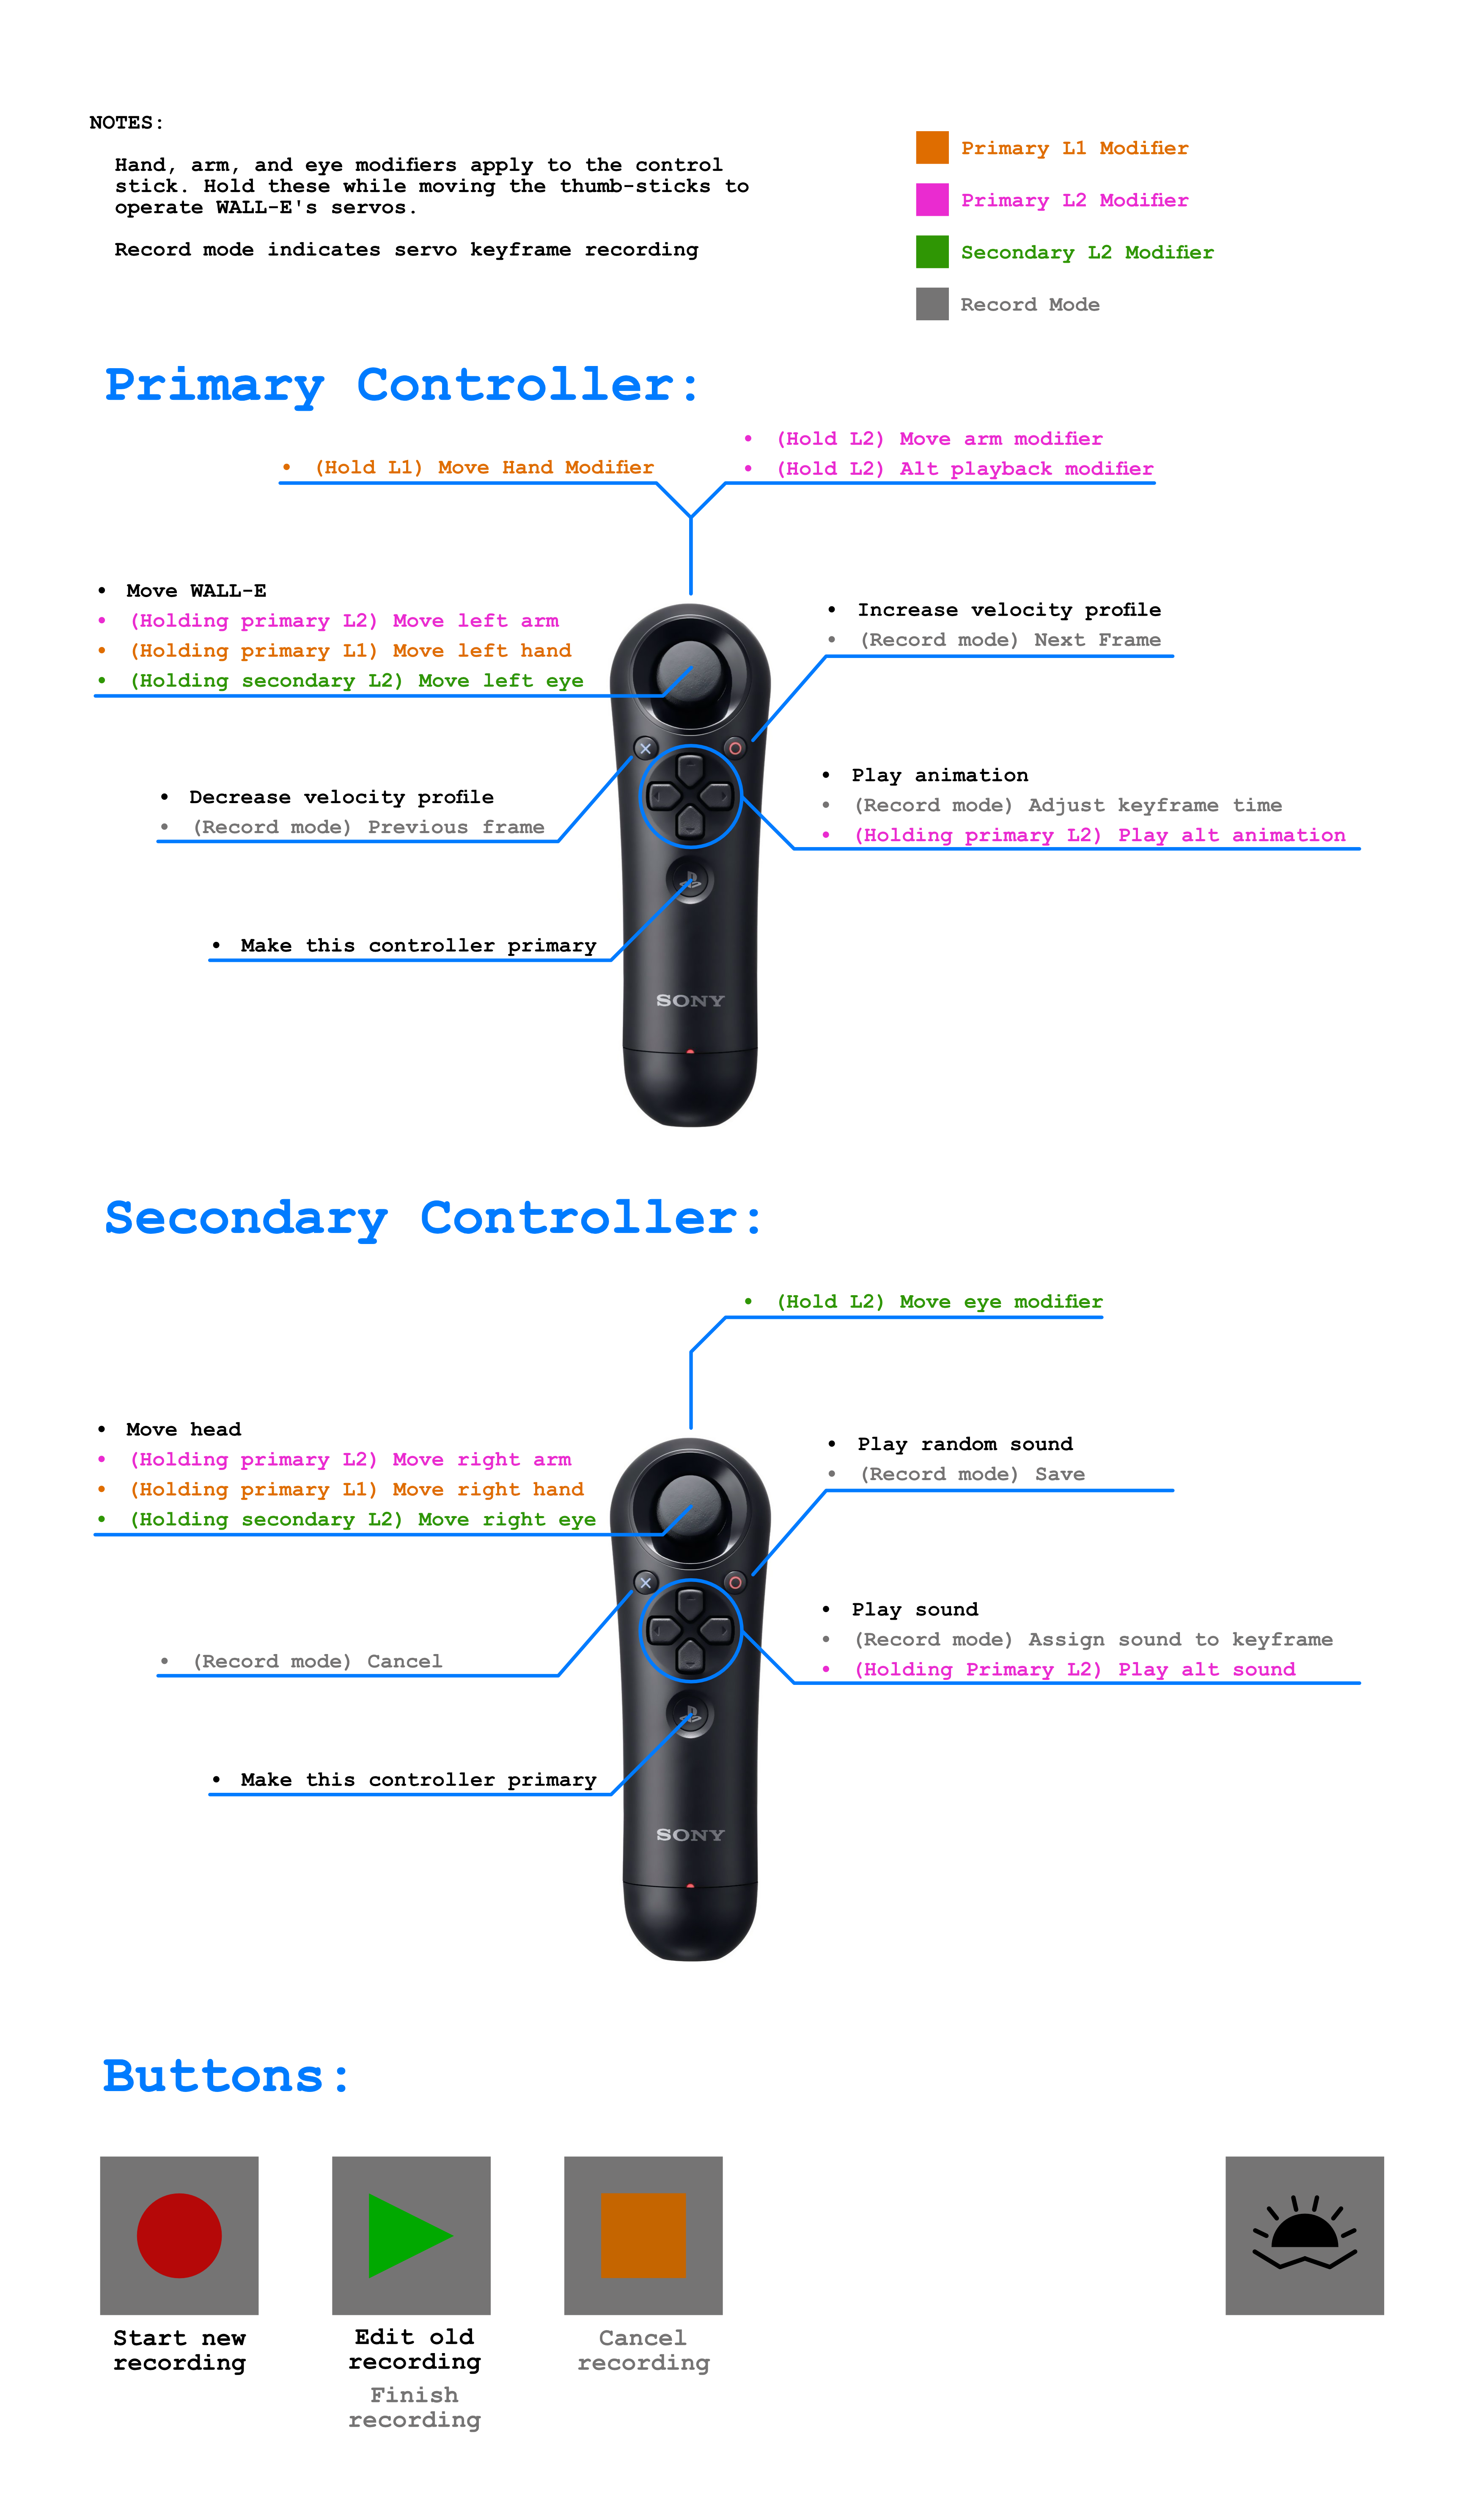
This project uses a special board package for the ESP32 called Bluepad32. To install it, you need to add this board to your Arduino IDE. The abreviated steps to do this are below. See this doc page for more detailed instructions.
https://raw.githubusercontent.com/espressif/arduino-esp32/gh-pages/package_esp32_index.json
https://raw.githubusercontent.com/ricardoquesada/esp32-arduino-lib-builder/master/bluepad32_files/package_esp32_bluepad32_index.jsonESP32-WROOM-DA Module from the Tools > Board > esp32_bluepad32 menu.You will also need to install the following libraries:
You will need to setup the TFT_eSPI library with the correct config. To do this, create a TFT_eSPI_Setups folder in your Arduino libraries folder (usualy in ~/Documents/Arduino/libraries/), then copy the TFT_eSPI_walle_setup.h file in src/display/ to this new folder. After that, open User_Setup_Select.h in the /TFT_eSPI/ library folder and comment out the current user config (User_Setup.h by default), then add the following line:
#include <../TFT_eSPI_Setups/TFT_eSPI_walle_setup.h>After this, you should be able to compile and upload the code to the ESP32. Make sure WALL-E is powered on before plugging in the USB cable to the ESP32, otherwise the USB port will attempt to power the servo motors and will likely trip your USB port's overcurrent protection.
Note that the Arduino IDE will throw some warnings related to "converting a string constant to 'char*'" as well as some bluepad and eSPI_TFT warnings. These can be ignored.
New sounds can be added to the audio player's SD card as .mp3 files. Audio tracks must be labeled as numbers with the format 0001.mp3, 0002.mp3, etc. The number of the audio track is the index that will be used to play the sound. You can configure the audio player sounds and keybindings in the config.hpp file. Here is what the folder structure on the SD card should look like:
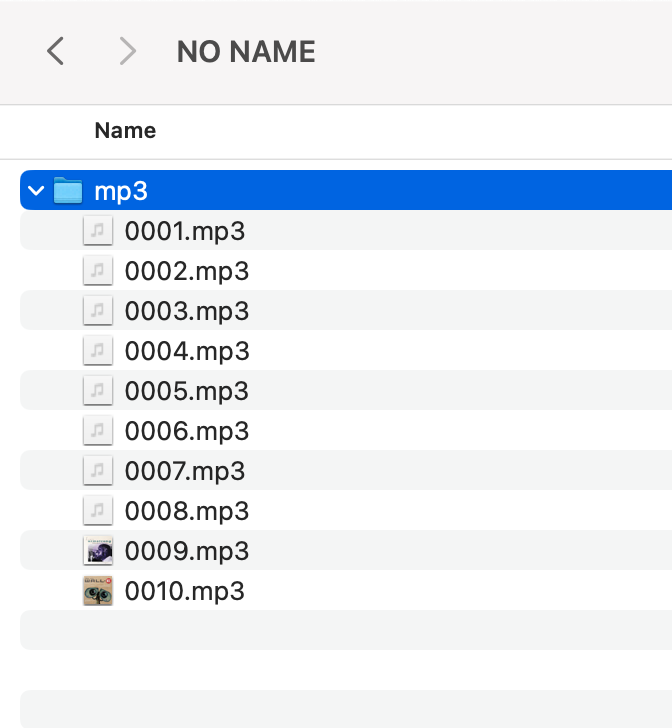
For instance, if you add a track 0011.mp3 and you wish to bind it to the L2 + Up button, you would add the following line to the config.hpp file:
const int audio_track_selection_list[] = {
    TRACK_INDEX_EVE_1, // Up
    TRACK_INDEX_TADA, // Right
    TRACK_INDEX_SCREAM, // Down
    TRACK_INDEX_WALLE_1, // Left
    11, // L2 + Up <<<<<<<<<<<<<<<<<<<<<<<< CHANGED TRACK
    TRACK_INDEX_EVE_3, // L2 + Right
    TRACK_DEFINE_DANCING, // L2 + Down
    TRACK_LA_VIE_EN_ROSE, // L2 + Left
};
Sounds which are bound to a button can be added to keyframes in motion animations.
Similarly, you could add it to the audio_track_random_list.
// Tracks in this array will be selected randomly by the playRandomTrack() function
const int audio_track_random_list[] = {
    TRACK_INDEX_EVE_1,
    TRACK_INDEX_EVE_2,
    TRACK_INDEX_EVE_3,
    TRACK_INDEX_WALLE_1,
    TRACK_INDEX_SCREAM,
    TRACK_INDEX_TADA,
    11 // <<<<<<<<<<<<<<<<<<<<<<<< ADDED TRACK
};The steps to add a solar animation are as follows:
extern AnimateLeve animate_display_startup;
...
// Add your variable name here
extern AnimateLevel my_animation;AnimateLevel animate_display_startup = AnimateLevel();
...
// Define your variable here
AnimateLevel my_animation = AnimateLevel();void setup_my_animation() {
my_animation.addKeyframe(0, 0);
my_animation.addKeyframe(1000, 1);
...
}void setup_animations() {
setup_startup();
...
// Add your setup_my_animation() function here
setup_my_animation();
}Now your variable my_animation will be available to use in the main sketch.
The steps to add a motion animation are as follows:
namespace MotionAnimations {
    // Add custom animations here:
    extern ServoAnimation my_animation;

    // Rest of namespace ...
}namespace MotionAnimations {
// Define new animations here
ServoAnimation my_animation = ServoAnimation();
// Rest of namespace ...
}ServoKeyframe *my_keyframe = new ServoKeyframe(duration_ms);. Add the servo positions to the keyframe with my_keyframe->add_servo_scaler(servo_ptr, position);. Add the keyframe to the animation with my_animation.addKeyframe(my_keyframe);. Servos are addressed by their name. There is a #define for each servo. E.g, to get the left eye servo you would use servos.map[SERVO_EYE_LEFT_NAME] For example:// Create setup functions for each animation.
// NOTE: Don't forget to call these functions in setup_animations().
void setup_my_animation() {
// Rotate eyes in opposite directions
ServoKeyframe *my_keyframe1 = new ServoKeyframe(1000);
my_keyframe->add_servo_scaler(servos.map[SERVO_EYE_LEFT_NAME], 0.75);
my_keyframe->add_servo_scaler(servos.map[SERVO_EYE_RIGHT_NAME], -0.75);
// Pause for 3 seconds
ServoKeyframe *my_keyframe2 = new ServoKeyframe(3000);
// Return the eyes to their original position
ServoKeyframe *my_keyframe3 = new ServoKeyframe(1000);
my_keyframe->add_servo_scaler(servos.map[SERVO_EYE_LEFT_NAME], 0);
my_keyframe->add_servo_scaler(servos.map[SERVO_EYE_RIGHT_NAME], 0);
// Add the keyframes to the animation
my_animation.add_keyframe(my_keyframe1);
my_animation.add_keyframe(my_keyframe2);
my_animation.add_keyframe(my_keyframe3);
}void setup_animations(ServoContext servos) {
// This function should get called in the main setup() function. It calls all animation setup functions for use in
// the main sketch.
// Add setup functions for new animations here
setup_my_animation();
// Rest of animation setups...
}servo_player.play(&MotionAnimations::my_animation);. Alternatively, you can add the animation to the head_animations array in the main sketch to bind it to a button press:ServoAnimation *head_animations[] = {
&MotionAnimations::my_animation, // Up
nullptr, // Right
nullptr, // Down
nullptr, // Left
nullptr, // L2 + Up
nullptr, // L2 + Right
nullptr, // L2 + Down
nullptr // L2 + Left
};| Qty | Value | Footprint | References |
|---|---|---|---|
| 4 | M4 | MountingHole:MountingHole_4.3mm_M4_DIN965_Pad | H1, H2, H3, H4 |
| 1 | Conn_01x05 | Connector_PinHeader_2.54mm:PinHeader_1x05_P2.54mm_Vertical | J1 |
| 1 | IREX_LOGO | irex_Aesthetic:Logo_irex_10.0x11.1mm_Copper | G*** |
| 1 | Play | PCM_Switch_Keyboard_Hotswap_Kailh:SW_Hotswap_Kailh_MX | SW2 |
| 1 | Record | PCM_Switch_Keyboard_Hotswap_Kailh:SW_Hotswap_Kailh_MX | SW3 |
| 1 | Solar | PCM_Switch_Keyboard_Hotswap_Kailh:SW_Hotswap_Kailh_MX | SW4 |
| 1 | Stop | PCM_Switch_Keyboard_Hotswap_Kailh:SW_Hotswap_Kailh_MX | SW1 |
It measures 200 × 20 mm and has 2 copper layers, 1.6 mm thick.
10 parts. The full list of its parts is on this page, with links to each part's symbol and footprint where PCBKit's library has them.
From the Acliad/WALL-E-Software repository on GitHub, at the commit this page was made from: the board is PCB Files/WALL-E Button Board/WALL-E Button Board.kicad_pcb and its schematic PCB Files/WALL-E Button Board/WALL-E Button Board.kicad_sch. PCBKit opens the board in the browser, with nothing to install.
Its repository states no licence, so its author keeps all rights: ask Acliad before reusing the design.
Acliad/WALL-E-Software
Software and some hardware files for a custom WALL-E robot.

gusmanb/logicanalyzer
24 channel, 100Msps logic analyzer hardware and software

byrantech/laptop
anyon_e, a highly integrated, high end, open source laptop. Attempt the impossible.

joeycastillo/Sensor-Watch
A board replacement for the classic Casio F-91W wristwatch


OLIMEX/OLINUXINO
OLINUXINO is Open Source / Open Hardware, low cost from EUR 24 Linux Industrial grade Single Board Computer capable to operate -25+85C

rusefi/rusefi
rusefi - GPL internal combustion engine control unit

VoronDesign/Voron-Hardware
Cool Hardware designed by the Voron Design group

hoglet67/RGBtoHDMI
Bare-metal Raspberry Pi project that provides pixel-perfect sampling of Retro Computer RGB/YUV video and conversion to HDMI