2 layers65 × 56.5 mm

 Sideous/kicad_old
This is a project template for a Raspberry Pi B+ Hat.
Pihat template is an open-source printed circuit board by Sideous, from the Sideous/kicad_old repository on GitHub. It is a 2-layer board of 65 × 56.5 mm with 60 parts on 65 nets, routed with 257 tracks and 23 vias.
It is built around the LM3489MM, CAT24C32HU4I-GT3 and DMMT5401, with the FDC5614P, LM1117IMPX-ADJ and MAX17205G+ among its other parts. Its parts include 23 resistors, 11 capacitors, 6 ICs, 6 diodes and 3 transistors.


% RPi B+ Hat
This is a project template for a Raspberry Pi B+ Hat.
This base project includes a PCB edge defined according to this specification. Both a thru-hole and a surface mount connector are provided, along with a different PCB edge for each. Just keep the PCB edge and connector type that you're using for your design and delete the others.
The component footprints used in this template are here.
The board outline looks like this:
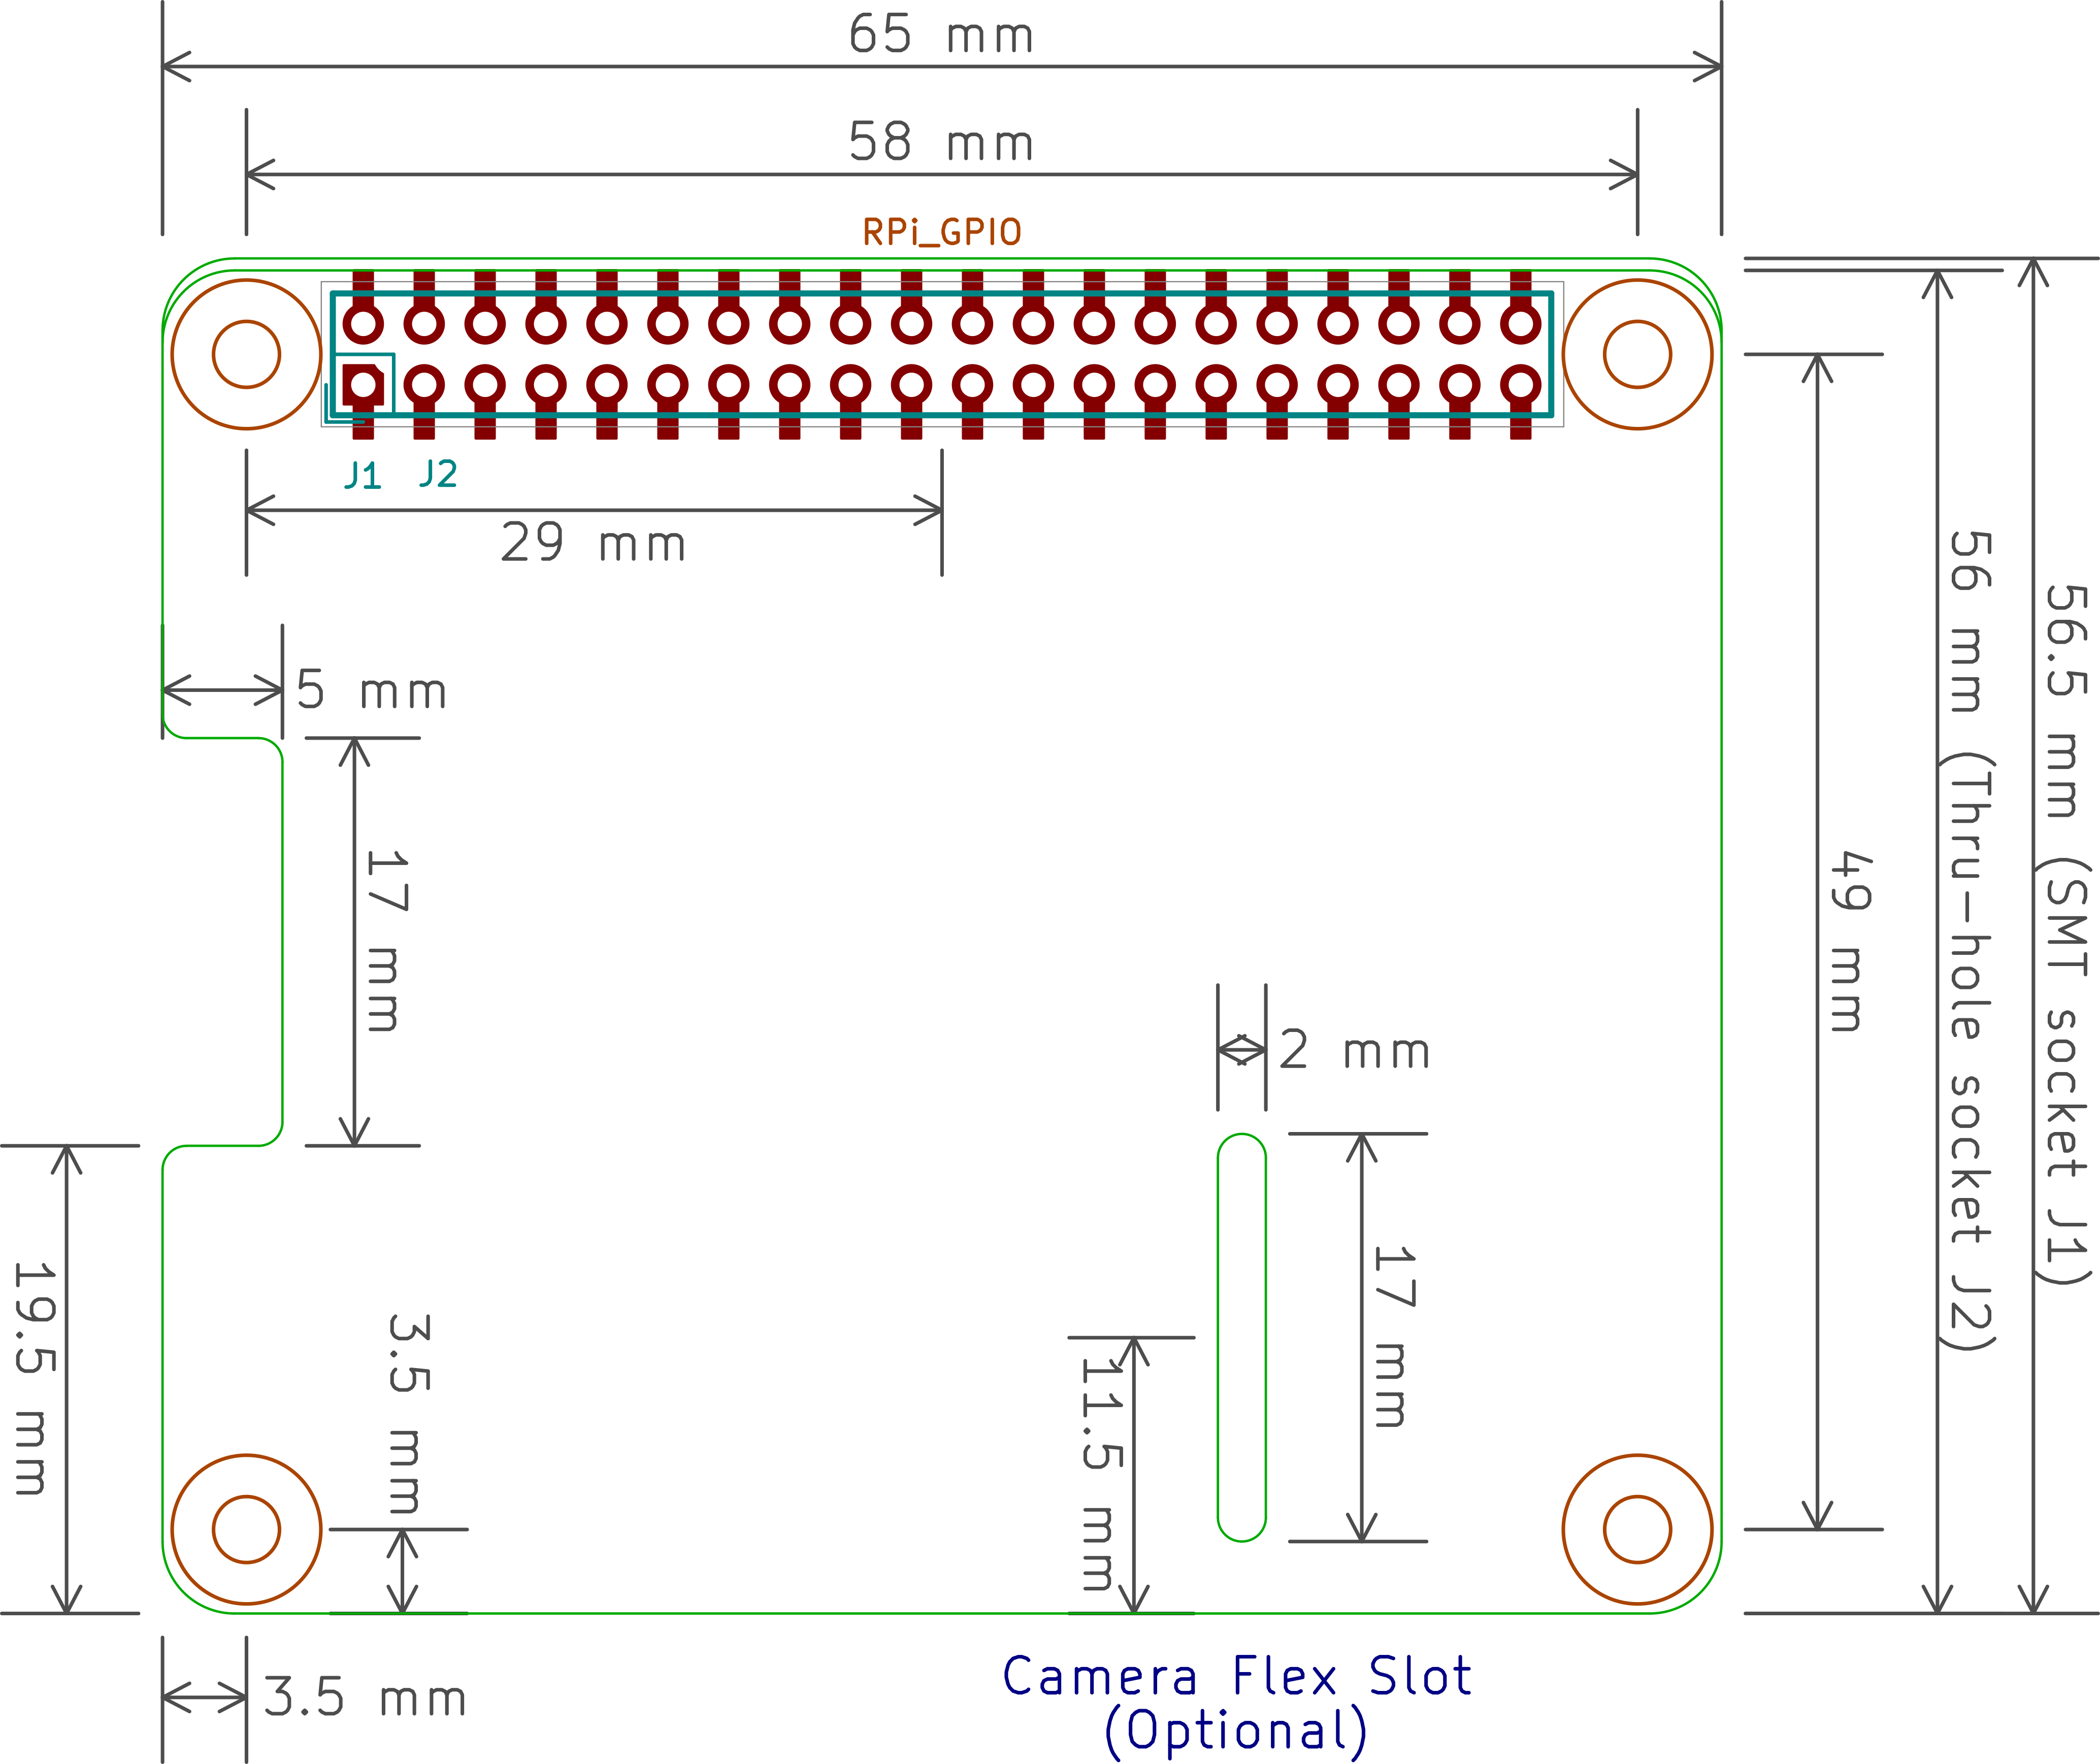
To use the Raspberry Pi Hat template with the through-hole connector, do the following:
To use the Raspberry Pi Hat template with the SMD connector, do the following:
(c)2015 XESS Corp.
| Qty | Value | Footprint | References |
|---|---|---|---|
| 4 | 0.1uf | w_smd_cap:c_0402 | C2, C4, C5, C7 |
| 3 | 5.6V | Diodes_SMD:SOD-323 | D4, D5, D6 |
| 2 | 0.47uF | Capacitors_SMD:C_0603_HandSoldering | C10, C11 |
| 2 | 10K | Resistors_SMD:R_0603_HandSoldering | R16, R17 |
| 2 | 10K NTC | Resistors_SMD:R_0402 | TH1, TH2 |
| 2 | 10k | w_smd_resistors:r_0402 | R7, R11 |
| 2 | 150 | Resistors_SMD:R_0603_HandSoldering | R22, R23 |
| 2 | 3.9k | w_smd_resistors:r_0402 | R3, R5 |
| 2 | BSS138 | TO_SOT_Packages_SMD:SOT-23 | Q2, Q3 |
| 1 | 0.01 | Resistors_SMD:R_0805_HandSoldering | R20 |
| 1 | 10uf/6.3V | w_smd_cap:c_elec_4x5.3 | C6 |
| 1 | 18V | Diodes_SMD:SOD-323 | D2 |
| 1 | 1K | Resistors_SMD:R_0603_HandSoldering | R21 |
| 1 | 1M | Resistors_SMD:R_0603_HandSoldering | R19 |
| 1 | 1k | w_smd_resistors:r_0402 | R1 |
| 1 | 1nf | w_smd_cap:c_0402 | C3 |
| 1 | 1uF | Capacitors_SMD:C_0603_HandSoldering | C9 |
| 1 | 1uf | w_smd_cap:c_0402 | C8 |
| 1 | 2.0M | Resistors_SMD:R_0805_HandSoldering | R13 |
| 1 | 200k | Resistors_SMD:R_0603_HandSoldering | R15 |
| 1 | 22uH | w_smd_inductors:inductor_smd_8x5mm | L1 |
| 1 | 240 | w_smd_resistors:r_0402 | R9 |
| 1 | 24k | w_smd_resistors:r_0402 | R2 |
| 1 | 270 | w_smd_resistors:r_0402 | R4 |
| 1 | 300K | Resistors_SMD:R_0603_HandSoldering | R14 |
| 1 | 30k | w_smd_resistors:r_0402 | R6 |
| 1 | 360 | w_smd_resistors:r_0402 | R10 |
| 1 | 390 | w_smd_resistors:r_0402 | R8 |
| 1 | 47k | w_smd_resistors:r_0402 | R12 |
| 1 | 50uf/50v | w_smd_cap:c_elec_6.3x7.7 | C1 |
| 1 | 510K | Resistors_SMD:R_0603_HandSoldering | R18 |
| 1 | BSS138 | w_smd_trans:sot23 | Q1 |
| 1 | CAT24C32HU4I-GT3 | w_smd_dil:tssop-8 | U2 |
| 1 | CONN_01X02 | w_conn_mkds:mkds_1,5-2 | P2 |
| 1 | CONN_01X02 | w_pin_strip:pin_strip_2 | P1 |
| 1 | DIODESCH | w_smd_diode:do214aa | D1 |
| 1 | DMMT5401 | w_smd_trans:sot23-6 | U5 |
| 1 | FDC5614P | w_smd_trans:sot23-6 | U3 |
| 1 | JUMPER | w_smd_resistors:r_0603 | JP1 |
| 1 | LED | w_smd_leds:Led_0603 | D3 |
| 1 | LM1117IMPX-ADJ | w_smd_trans:sot223 | U4 |
| 1 | LM3489 | w_smd_dil:msoic-8 | U1 |
| 1 | MAX17205 | Housings_DFN_QFN:DFN-14-1EP_3x4mm_Pitch0.5mm | U6 |
| 1 | Raspberry_Pi_+_Conn | w_pin_strip:pin_socket_20x2 | P3 |
The 56 most common of 60 parts.


Roboteurs/slushengine-modelx-lite
Slushehgine model x lite version hardware files

UMONS-GFA/kicad-projects
Open your .sch file -> Preferences -> Component libraries


flipdot/door
Scripts controlling our space access. Superseded by https://code.flipdot.org/flipdot/flipdoor.


NOAA-PMEL/EDD-LCP_PistonDriver
Repository for LCP Piston Driver PCB design and firmware

BrownSpaceEngineering/PVDX-EPS_V1
Avionics files related to new overhauled EPS schematics, pcb design, and documentation
It measures 65 × 56.5 mm and has 2 copper layers, 1.6 mm thick.
60 parts, built around the LM3489MM, CAT24C32HU4I-GT3, DMMT5401 and FDC5614P. The full list of its parts is on this page, with links to each part's symbol and footprint where PCBKit's library has them.
From the Sideous/kicad_old repository on GitHub, at the commit this page was made from: the board is projects/myhat/hardware/pihat_template.kicad_pcb. PCBKit opens the board in the browser, with nothing to install.
Its repository states no licence, so its author keeps all rights: ask Sideous before reusing the design.