2 layers52.2 × 52.2 mm
Base promicro
google/mozc-devices
Circuit diagrams and firmware source code for Gboard DIY keyboards
30 parts3kApache-2.0

 Roboy/tss18-robotsinmusicalimprovisation10
Robots in Musical Improvisation: Learning Algorithms Respecting Motion Constraints
Midi controller pcb is an open-source printed circuit board by Roboy, from the Roboy/tss18-robotsinmusicalimprovisation repository on GitHub, published under the BSD-3-Clause licence. It is a 2-layer board of 99.9 × 85.1 mm with 30 parts on 33 nets, routed with 142 tracks and 5 vias.
Its parts include 9 resistors, 7 capacitors, 5 switches, 2 diodes and 1 IC. It belongs with the audio and music and robots and motor control boards of this library.
Robots in Musical Improvisation: Learning Algorithms Respecting Motion Constrains
Master's Thesis in Robotics, Cognition, Intelligence - Technical University of Munich (TUM)
Humanoid robots have been exposed to increasingly challenging tasks since they steadily grow in resemblance to humans particularly in their skill to intelligently and socially interact with their environment. Recent developments in machine learning and control of musculoskeletal systems allow humanoid robots to perform creative tasks, e.g., drawing or playing instruments. For humans, it takes years of practice to develop creative skills in arts or music. Musical improvisation, the act of creating a spontaneous response to a currently presented musical sequence, demands high proficiency in an instrument. How would a humanoid robot learn to elaborately improvise on an instrument?
This work proposes an end-to-end framework for robotic improvisation with focus on machine learning algorithms in interaction with the control of a musculoskeletal robot. In spite of sophisticated sampling methods, variational autoencoders were chosen to be the basis for musical improvisation. A new framework that eases the control of musculoskeletal robots was applied to play musical sequences on the marimba.
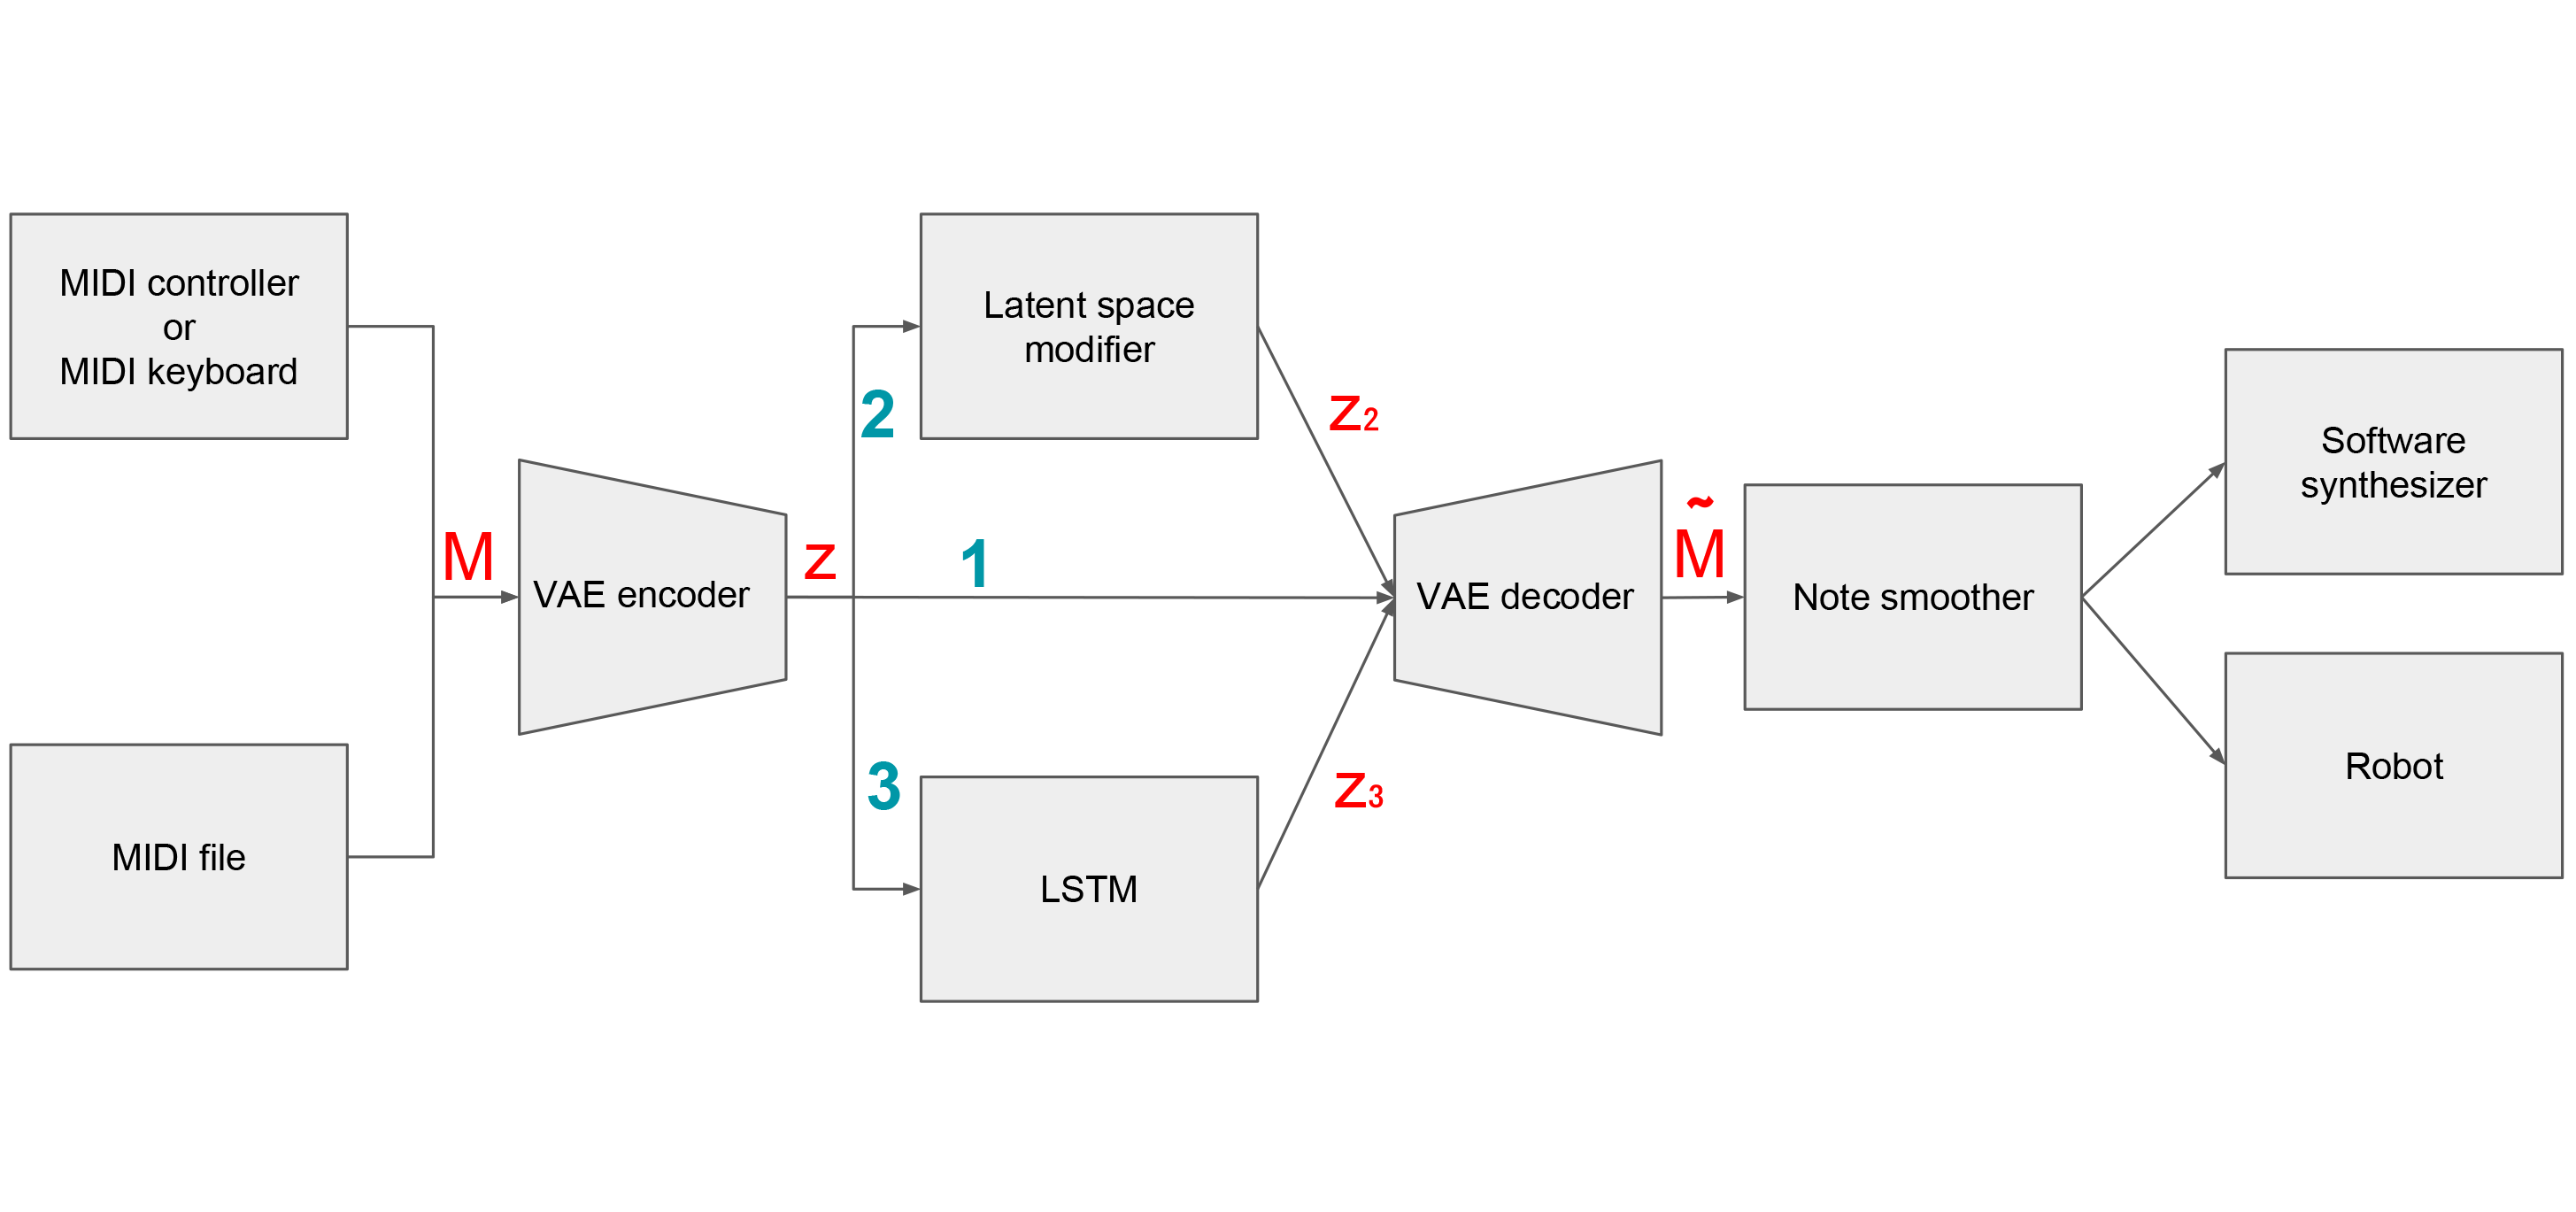
The systems input sequence is played with W-101 MIDI controller or any MIDI keyboard. The sequence is then parsed to matrix M which serves as the input to the encoder of the variational autoencoder (VAE). Next it can either be
Irrespective of the path, z gets decoded by the VAE decoder. After that, the new sequence can be smoothed by a Note smoother and then sent to the robot or to a software synthesizer.
Variational Autoencoder with Latent space modifier (GUI) - "Generate Mode"
Variational Autoencoder with Latent space modifier (GUI) - "Interact Mode"
Variational Autoencoder with Latent space modifier (GUI) - "Endless Mode"
Variational Autoencoder (GUI) with Roboy robot - "Interact Mode"
Variational Autoencoder (GUI) with Roboy robot - "Endless Mode"
To setup simulation please visit Roboy Control
Get pretrained models following this link and move the "pretrained_models" folder to /path/to/tss18-robotsinmusicalimprovisation/utils
virtualenv ../.rimi -p python3 --no-site-packages
source ../.rimi/bin/activateexport PYTHONPATH=$PYTHONPATH:/path/to/dirsudo apt-get install libasound-dev
sudo apt-get install libjack-devpip3 install -r requirements.txtIf you are working on Ubuntu with CUDA 9.0, try:
pip3 install torch torchvisionFor other systems or CUDA versions, please visit https://pytorch.org/
I added a clean repository containing the VAE with an updated GUI (to fit smaller screen sizes like 720x480, e.g. Raspberry Pi touchscreens), please follow this link to the repository.
| Qty | Value | Footprint | References |
|---|---|---|---|
| 7 | 100N | Capacitor_SMD:C_0402_1005Metric | C1, C2, C3, C4, C5, C6, C7 |
| 4 | 10k | Resistor_SMD:R_0402_1005Metric | R4, R5, R6, R7 |
| 3 | 100 | Resistor_SMD:R_0402_1005Metric | R1, R2, R3 |
| 3 | 10k | Potentiometer_THT:Potentiometer_Alps_RK09L_Single_Vertical | RV1, RV5, RV6 |
| 3 | 10k | Potentiometer_THT:Potentiometer_Bourns_PTA6043_Single_Slide | RV2, RV3, RV4 |
| 2 | 1k | Resistor_SMD:R_0402_1005Metric | R8, R9 |
| 2 | LED | LED_THT:LED_D1.8mm_W3.3mm_H2.4mm | D1, D2 |
| 1 | 2772 | 2772:2772 | IC1 |
| 1 | SW_Push1 | Connector_PinHeader_2.54mm:PinHeader_1x02_P2.54mm_Vertical | SW2 |
| 1 | SW_Push2 | Connector_PinHeader_2.54mm:PinHeader_1x02_P2.54mm_Vertical | SW3 |
| 1 | SW_Push3 | Connector_PinHeader_2.54mm:PinHeader_1x02_P2.54mm_Vertical | SW4 |
| 1 | SW_Push4 | Connector_PinHeader_2.54mm:PinHeader_1x02_P2.54mm_Vertical | SW5 |
| 1 | SW_SPST | Connector_PinHeader_2.54mm:PinHeader_1x02_P2.54mm_Vertical | SW1 |
google/mozc-devices
Circuit diagrams and firmware source code for Gboard DIY keyboards


VoronDesign/Voron-Hardware
Cool Hardware designed by the Voron Design group

hoglet67/RGBtoHDMI
Bare-metal Raspberry Pi project that provides pixel-perfect sampling of Retro Computer RGB/YUV video and conversion to HDMI

tenderlove/initial-v
It's a BMW shifter converted to a Bluetooth Keyboard that you use with Vim

hackclub/OnBoard
💡 Join 1,000 teenagers and make your first PCB with a $100 grant!


It measures 99.9 × 85.1 mm and has 2 copper layers, 1.6 mm thick.
30 parts. The full list of its parts is on this page, with links to each part's symbol and footprint where PCBKit's library has them.
From the Roboy/tss18-robotsinmusicalimprovisation repository on GitHub, at the commit this page was made from: the board is midi_controller/pcb/midi_controller_pcb.kicad_pcb. PCBKit opens the board in the browser, with nothing to install.
Its repository publishes it under the BSD-3-Clause licence: you may reuse it on that licence's terms (keep the author's notice, and for a copyleft licence share your changes alike).