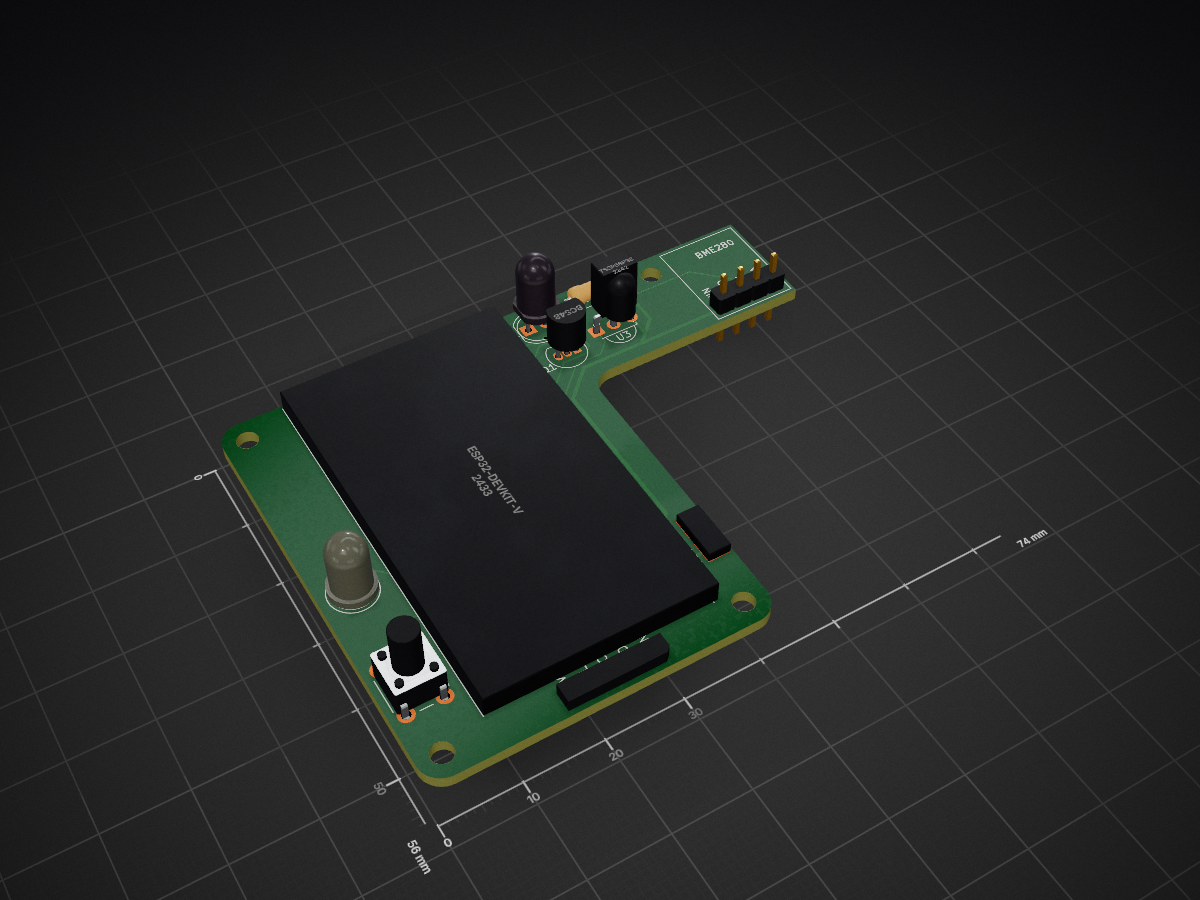
AC controller is an open-source printed circuit board by OPIN-Smart-Home, from the OPIN-Smart-Home/ACControl repository on GitHub, published under the Apache-2.0 licence. It is a 2-layer board of 74 × 56 mm with 14 parts on 32 nets, routed with 90 tracks and 5 vias.
It is built around the TSSP58P38 and BC548. Its parts include 5 ICs, 2 diodes, 1 resistor, 1 transistor and 1 switch. It belongs with the ESP32 boards of this library.
The OPIN AC Control is an innovative solution designed to enhance the comfort and convenience of managing air conditioning systems in homes and offices. Integrated with the OPIN Gateway, this device allows users to control their AC units remotely through the OPIN mobile app.
With the OPIN AC Control, users can easily turn their air conditioning units on or off, adjust temperature settings, manage swing and fan settings, and benefit from the auto-off feature for energy savings—all from anywhere, providing flexibility and control over their indoor environment. The device is compatible with various AC models, as it forwards received IR data to and from the gateway, ensuring up-to-date control across all devices.
The OPIN AC Control features real-time monitoring of room temperature and humidity, enabling users to maintain a comfortable atmosphere in their spaces. Additionally, notifications regarding system status ensure that users are always informed of their AC's performance and settings.
For developers, the OPIN AC Control utilizes the MQTT protocol for seamless communication, enabling easy integration with other smart devices within the OPIN ecosystem. With its user-friendly interface, reliable performance, energy-saving features, and advanced functionalities, the OPIN AC Control is the perfect solution for modern living.
Features
The OPIN AC Control offers a range of features to make managing air conditioners more convenient and efficient:
Remote Control via Mobile App:
Control your air conditioner from anywhere using the OPIN mobile app. Adjust temperature, change fan speed, and control swing settings with ease.
Real-Time Room Monitoring:
Equipped with a BME280 sensor, the device provides real-time monitoring of room temperature and humidity, giving you insights to optimize your indoor comfort.
Eco-Friendly Power Source:
Powered by a rechargeable 18650 battery, the device is both eco-friendly and cost-effective. With up to 18 hours of battery life on a single charge, the device ensures continuous operation without the need for disposable batteries.
Auto-Off Feature:
The OPIN AC Control supports an auto-off function, automatically turning off the air conditioner after a specified period of inactivity, reducing energy consumption and saving costs.
Sync with Original Remote:
Capable of reading IR data from the original remote control, the OPIN AC Control can update settings in the mobile app, ensuring that all configurations are synced with the user's preferences.
Battery and Charging Monitoring:
The device features LED indicators for charging and full-charge status, ensuring you always know when it’s time to recharge.
Seamless Integration:
Utilizes the MQTT protocol for smooth communication with the OPIN ecosystem, allowing for easy integration with other smart devices.
Components and Interface
The following components are used in the OPIN AC Control. The numbers correspond to the labels in the cover image:
ESP32 Devkit V1
The microcontroller responsible for managing the device's operations and communication via MQTT. It processes signals from the IR transmitter and receiver to control the AC unit.
IR Transmitter
This component sends infrared signals to the AC unit, allowing remote control of its functions, such as temperature settings, fan speed, and swing direction.
IR Receiver
The IR receiver captures signals from the original remote control, allowing the OPIN AC Control to send temperature settings, fan speed, and swing direction data to the app, ensuring that the information is synchronized and up to date.
LED
The device features an LED that indicates the Wi-Fi connection status, helping users verify whether the device is connected to the network.
Button
A button is provided for initiating the Wi-Fi configuration process, allowing users to connect the device to their network. This button can also be used to reset the Wi-Fi connection.
J5019 Charging Module
The J5019 charging module features a Micro USB input terminal, allowing direct connection to a phone charger for recharging lithium batteries. It supports charging and discharging protection for various lithium batteries, including 18650 and polymer batteries with a nominal voltage of 3.6V to 3.7V.
BME280 Sensor
This sensor measures temperature and humidity levels in the room, providing real-time data to users through the mobile app.
18650 Battery Flat Top Holder
A holder for the rechargeable 18650 battery flat top, ensuring safe and secure placement within the device.
Charging Port
This port allows users to recharge the built-in 18650 battery, ensuring continuous operation.
On/Off Switch
A switch that enables users to manually power the device on or off as needed.
MAX17048
A battery fuel gauge that monitors the battery level and provides information about the remaining power, enhancing the user experience.
Device Holder
The device holder is designed to resemble the original remote control, providing a familiar and ergonomic grip. It securely houses all components of the OPIN AC Control, ensuring stability and a clean aesthetic while facilitating easy handling and operation.
User Guide
This section provides step-by-step instructions on how to set up and use the OPIN kWh Meter effectively.
1. Initial Setup
Insert the Battery: Place a 18650 battery flat top into the battery holder. Ensure it is oriented correctly, following the polarity markings.
Power On the Device: Use the on/off switch to power on the OPIN AC Control.
Position the OPIN AC Control:
Mount or place the OPIN AC Control near the AC unit for optimal IR communication. The device should have a clear line of sight to the AC unit.
2. LED Indicator
Solid: The device is connected to the network.
Blinking continuously: The device is not connected to a network or in the process of connecting.
Off: The device is either not powered or in WiFi configuration mode.
3. WiFi Configuration
Add WiFi Configuration
Initiate WiFi Configuration
Press the button once to enter WiFi configuration mode. The LED will blink twice, indicating that the device is ready to connect to a network.
Connect to the Network
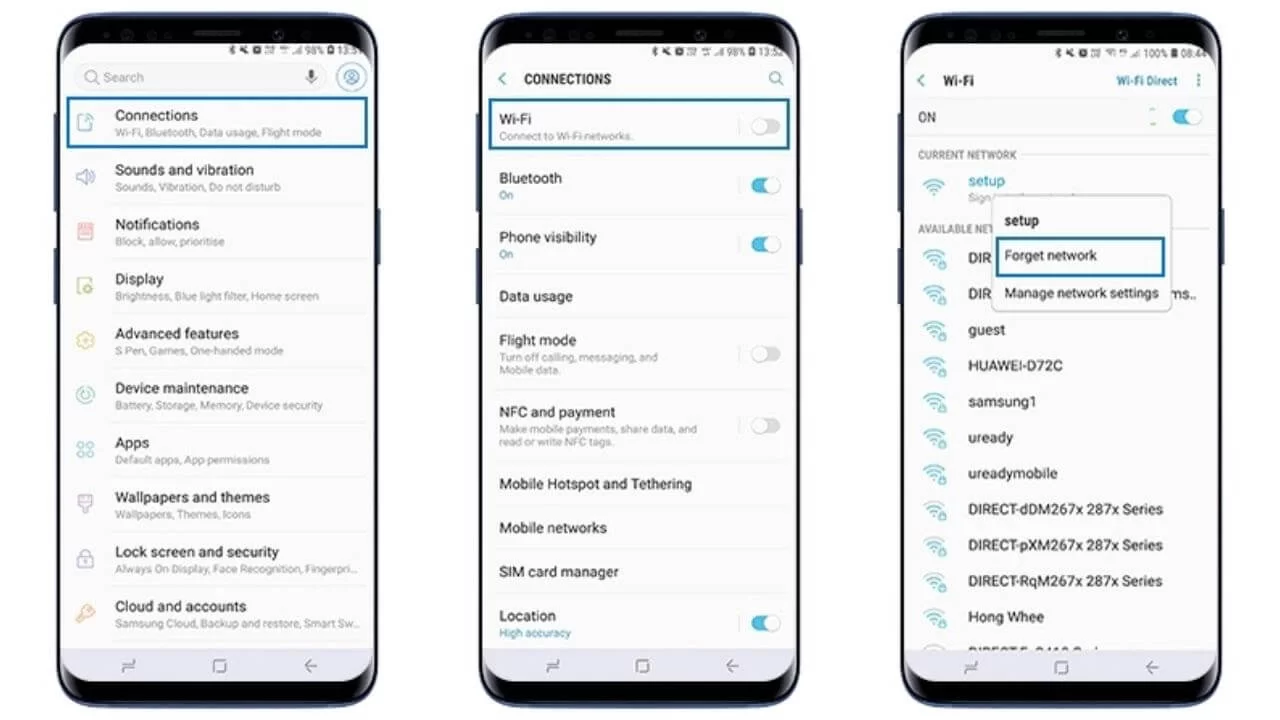
Open the WiFi settings on your mobile, laptop, or PC.
Connect to the AC Control SSID OPIN-ACControl-[device_id]. Your device should automatically redirect you to the WiFi configuration interface (captive portal).
Tips: If you're not redirected to the captive portal automatically, try the following:
(1) Look for a notification asking you to log in to the network,
(2) Go to WiFi settings and select something like Manage network settings,
(3) Manually access the captive portal by opening 192.168.4.1 in your browser.
Once inside the configuration interface, select Configure WiFi. Choose your home WiFi SSID from the list, enter the password, and click Save. (Refer to the provided images for detailed guidance.)
Confirm Connection
After the connection is established, the LED will turn solid, indicating that the AC Control is successfully connected to your WiFi network.
Reset WiFi Configuration
Initiate Reset
Press and hold the button for at least two seconds. The LED will blink three times (indicating reset) followed by two blinks (entering WiFi configuration mode), signaling that the WiFi settings have been reset. This action will erase all previously saved WiFi configurations.
Reconnect to the Network
After resetting the WiFi, follow step 2 "Connect to the Network" from the Add WiFi Configuration section to reconnect the AC Control to your WiFi.
Check IP Address of the AC Control
Initiate WiFi Configuration
Press the button once to enter WiFi configuration mode. The LED will blink twice, indicating that the device is ready for network configuration.
Connect to the Network
Open the WiFi settings on your mobile, laptop, or PC.
Connect to the AC Control SSID OPIN-ACControl-[device_id], and your device will be redirected to the WiFi configuration interface (captive portal).
Tip: If you're not redirected to the captive portal automatically, try the following:
(1) Look for a notification asking you to log in to the network,
(2) Go to WiFi settings and select Manage network settings,
(3) Manually access the captive portal by opening 192.168.4.1 in your browser.
The IP address of the AC Control will be shown in the connected WiFi details box. (Refer to the provided image for reference.)
Exit Configuration Mode
After checking the IP address, select Exit to complete the configuration process. The LED will turn solid, indicating that the AC Control is successfully connected to your WiFi network.
4. Connect AC Control to OPIN Mobile App
Add New Device
Open the OPIN mobile app and click the Add New Device option.
Select AC Control from the list of devices.
Enter the Device ID and IP Address of the AC Control.
Click Submit.
Note: Ensure that the Device ID and IP Address are accurate to avoid issues during the device setup.
Control the AC Unit
Use the Original IR Remote Control: Point your original AC remote at the AC unit and OPIN AC Control to set and send the current temperature settings, fan speed, and swing direction. The device will sync this information with the mobile app.
Adjust Settings via Mobile App: Use the OPIN mobile app to control your AC settings remotely, including turning the unit on or off and adjusting temperature preferences.
Auto Off Feature: The OPIN AC Control also supports an Auto Off feature, which automatically turns off the AC unit when no person is detected in the room, helping save energy. You can enable and manage this feature through the OPIN mobile app. For more details, refer to the Auto Off feature documentation.
Monitoring Room Conditions
View Real-Time Data: The OPIN AC Control provides real-time monitoring of room temperature and humidity via the app, allowing users to stay informed about their indoor environment.
Charging Instructions
Connect the Charging Module:
Use a Micro USB cable to connect the J5019 charging module to a power source (like a phone charger) to charge the 18650 lithium battery. While charging, the LED indicator will show red.
Charging Duration: Charging typically takes 4 hours. Check the battery indicator to monitor the charging status.
Fully Charged Indicator:
Once the battery is fully charged, the LED indicator will turn green.
Battery Life: The 18650 battery usually lasts for about 18 hours of continuous operation. Ensure to recharge it regularly to maintain functionality.
5. Troubleshooting
Device Not Connecting to Wi-Fi
Check Wi-Fi Credentials: Ensure that the correct Wi-Fi credentials (SSID and password) are entered during the setup.
Proximity to Router: Make sure the kWh Meter is within the range of your Wi-Fi router. Try moving it closer to the router for better signal strength.
Reboot the Device: Restart the OPIN AC Control by toggling the on/off switch.
App Not Displaying Data
Check Device ID and IP Address: Ensure that the correct Device ID and IP address are entered in the app. Incorrect entries can prevent data from being displayed.
For Developer
This section provides guidelines for developers looking to contribute to the OPIN Smart Home system. It's recommended to pay attention on For User section.
Installation
Prerequisites
Before you begin, ensure you have the following installed on your development environment:
Arduino IDE for uploading the firmware to the ESP32.
ESP32 Board Package for Arduino IDE. For Arduino IDE, you can install it by going to File > Preferences > Additional Board Manager URLs and adding https://dl.espressif.com/dl/package_esp32_index.json. Then, navigate to Tools > Board > Board Manager and search for "ESP32".
Required Libraries:
WiFi: For WiFi connectivity.
Wire: Provides communication over I2C between the microcontroller and sensors.
The OPIN AC Control communicates with the OPIN Gateway using the following MQTT topics:
Remote to User (r2u): opin/ACControl_[device_id]/r2u
This topic is used to send IR data captured from the original AC remote control back to the user. It ensures that the AC settings, such as temperature, fan speed, and swing direction, are up-to-date in the OPIN mobile app.
Device to User (d2u): opin/ACControl_[device_id]/d2u
The topic for sending device status, such as the current room temperature, humidity, and battery level, to the user via the OPIN mobile app.
User to Device (u2d): opin/ACControl_[device_id]/u2d
This topic is used for sending control commands from the user to the OPIN AC Control, allowing users to adjust the AC settings like turning it on/off, setting the temperature, or adjusting the fan speed and swing direction.
Device SSID: OPIN-ACControl-[device_id]
This SSID is used when connecting the OPIN AC Control to Wi-Fi during the initial configuration process.
Note: Each AC control device must have a unique device_id. This prevents conflicts when multiple devices are connected within the OPIN ecosystem.
Limitations
While the OPIN AC Control offers a range of convenient features for controlling air conditioners, it does have certain limitations that users should be aware of:
Limited Battery Life:
The 18650 rechargeable battery provides up to 18 hours of operation on a full charge. Users may need to recharge the device daily if used extensively. Additionally, battery performance may degrade over time, reducing operational hours between charges.
Dependent on Line of Sight:
Since the OPIN AC Control uses IR signals to communicate with the air conditioner, it requires a clear line of sight between the device and the AC unit. Obstructions may cause the signal to fail, preventing remote control of the AC.
Wi-Fi Configuration Required:
The device must be connected to the same local Wi-Fi network as the OPIN Gateway. If the device is moved to a different network, Wi-Fi configuration needs to be reset and reconfigured through the app.
Manual Battery Charging:
The device does not feature automatic charging capabilities. Users must manually plug the device into a power source via the charging port when the battery is low.
Future Development
The OPIN AC Control is designed to evolve with user needs and technological advancements. Several improvements and new features are planned for future releases to enhance functionality and user experience:
Longer Battery Life:
Efforts are being made to improve the efficiency of the device’s power consumption. Future iterations may include the use of more advanced battery technology or power-saving features to extend operational hours beyond the current 18-hour limit.
Voice Assistant Integration:
The OPIN AC Control is expected to integrate with popular voice assistants such as Google Assistant and Amazon Alexa. This would enable users to control their AC units using voice commands, adding another layer of convenience to the smart home experience.
Room Temperature and Humidity-Based Automation:
In the future, the device could be programmed to automatically adjust the AC settings based on room temperature and humidity, creating a more comfortable and energy-efficient environment.
It measures 74 × 56 mm and has 2 copper layers, 1.6 mm thick.
What parts does the AC controller use?
14 parts, built around the TSSP58P38 and BC548. The full list of its parts is on this page, with links to each part's symbol and footprint where PCBKit's library has them.
Where can I download the AC controller KiCad files?
From the OPIN-Smart-Home/ACControl repository on GitHub, at the commit this page was made from: the board is PCB/AC_controller/AC_controller.kicad_pcb and its schematic PCB/AC_controller/AC_controller.kicad_sch. PCBKit opens the board in the browser, with nothing to install.
Can I use the AC controller design in my own project?
Its repository publishes it under the Apache-2.0 licence: you may reuse it on that licence's terms (keep the author's notice, and for a copyleft licence share your changes alike).



 OPIN-Smart-Home/ACControl


