2 layers45.4 × 22.2 mm

 Matyas604/Voice-assistant-for-HA
A voice assistant that connects to Home Assistant, allowing you to send and receive voice commands through it. This enables Home Assistant to perform actions based on voice commands. It works in combination with Groq TTS, STT, and Groq AI. It can also provide any information from the internet, making it a great AI assistant.
Voice assistant for HA is an open-source printed circuit board by Matyas604, from the Matyas604/Voice-assistant-for-HA repository on GitHub. It is a 2-layer board of 75.1 × 44.6 mm with 34 parts on 54 nets, routed with 159 tracks and 20 vias.
It is built around the ESP32-S3-WROOM-1-N8, AMS1117-3.3 and TS-1088-AR02016. Its parts include 10 capacitors, 7 resistors, 6 connectors, 3 ICs and 2 switches. It belongs with the home automation and IoT boards and the ESP32 boards of this library.


A while back, I saw a YouTube video about a voice assistant for Home Assistant. I really liked that it activates when you say “Hey Jarvis” and can control various things via voice commands. And since I have Home Assistant set up, I thought, why not try building that assistant myself?
I found out that voice recognition can run on the ESP32-S3-WROOM-1-N16R8, so I decided to use it because it’s relatively inexpensive. Since I also wanted it to have a high-quality speaker for playing music, the total cost is quite high, but that’s because of the speaker, the custom PCB, and other components.
I really enjoyed working on this project because I learned a lot of new things. For example, I learned how to properly design a speaker enclosure, since sound quality depends more on the enclosure than on the speaker itself.
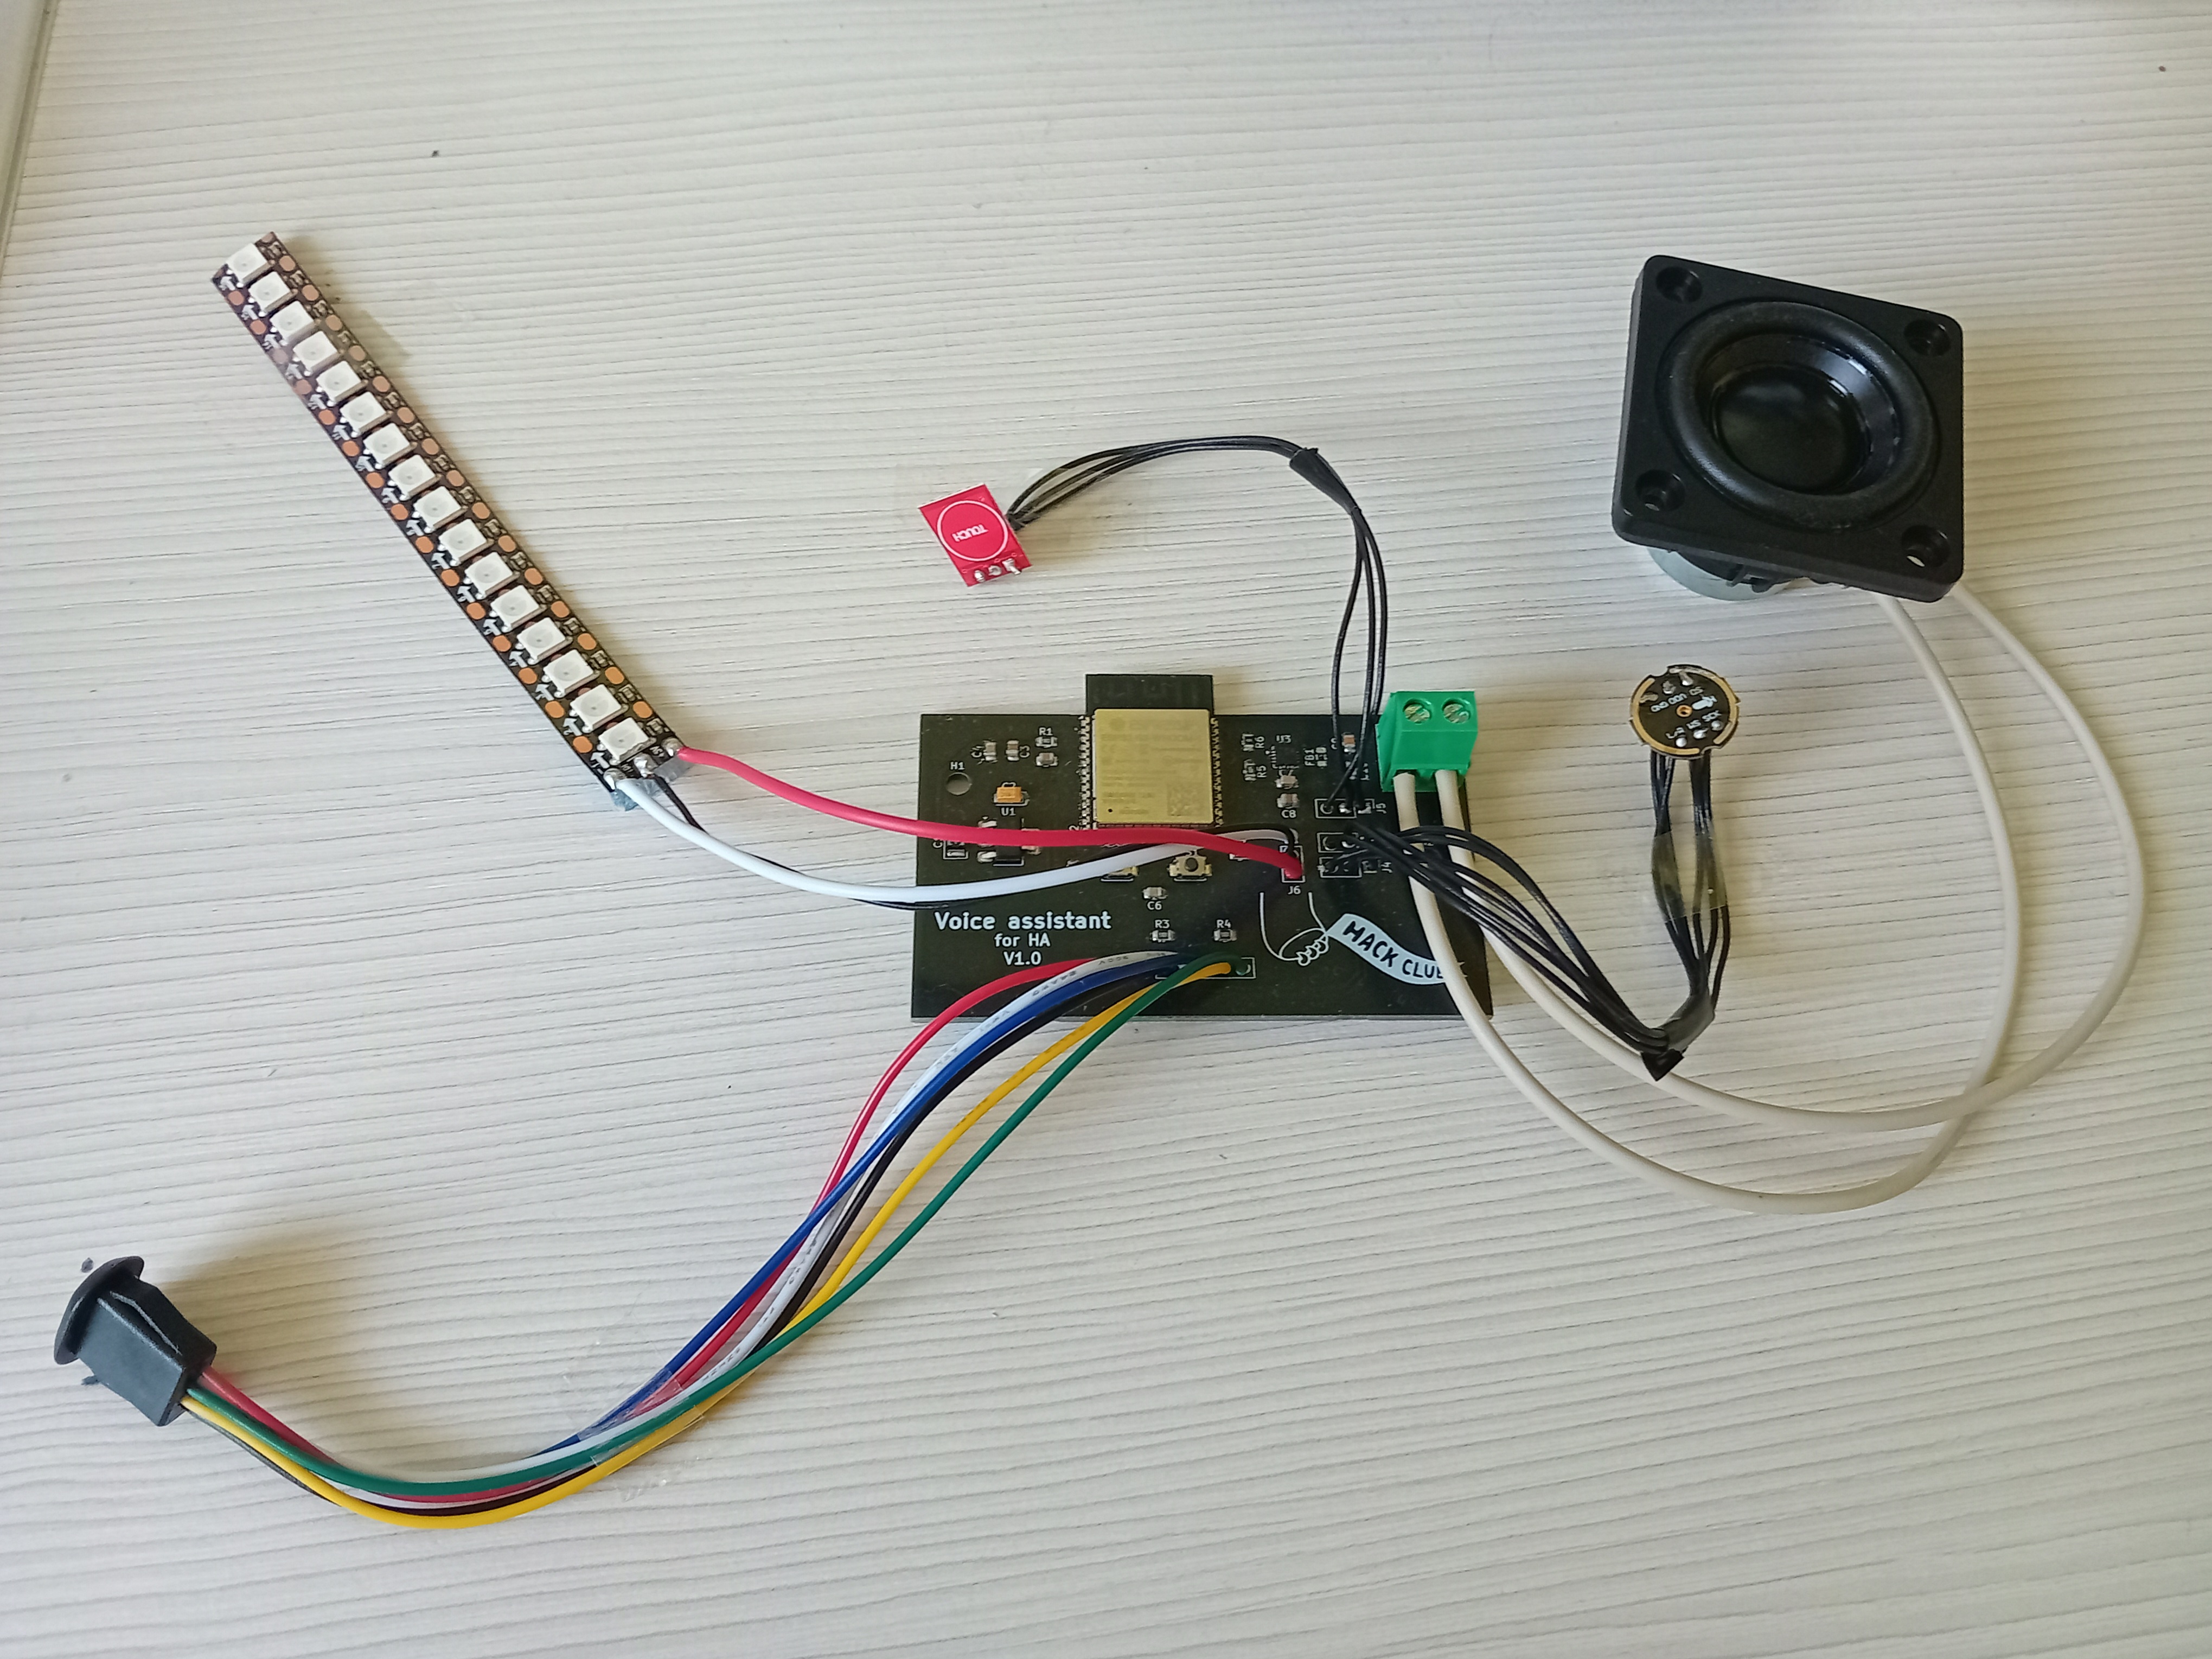
⚠️As you can see, the project is fully functional, but it’s missing the case because I had a few issues with the printer in printing legion and it didn’t arrive in time for the deadline. That’s why I’m submitting it to the build review like this for now, but as soon as the case arrives, I’ll document it again. Thank you
I really enjoyed designing and then building this project, especially because it works absolutely great. There was one error in the PCB (it’s already been corrected in the schematic and files), but fortunately it wasn’t a huge one and was easy to fix. This was actually my first project to include SMD components, and I soldered it by hand. The hardest part was soldering the amplifier chip, but luckily I managed to do it in the end!
Now, here's how it works: Once it's set up correctly, all you have to do is say "Hey Jarvis" and give your command or ask your question, and it will respond immediately or perform the action you requested. Here are the complete instructions on how to set it up.
Everything is housed in a box consisting of 5 parts (front panel, rear panel, top panel, body, and a tube connecting the outside to the inside chamber). The touch button is hidden in the top panel, so it can be activated by touch and is not visible from the outside. The interior space behind the speaker must be completely airtight at the front to function properly; it is connected to the outside only by a tube at the back. It is also a good idea to place a piece of cotton wool inside for better sound quality. The PCB is located separately from the space around the speaker; it is secured with M3 screws, just like the rear panel, while the top panel is held in place by magnets.
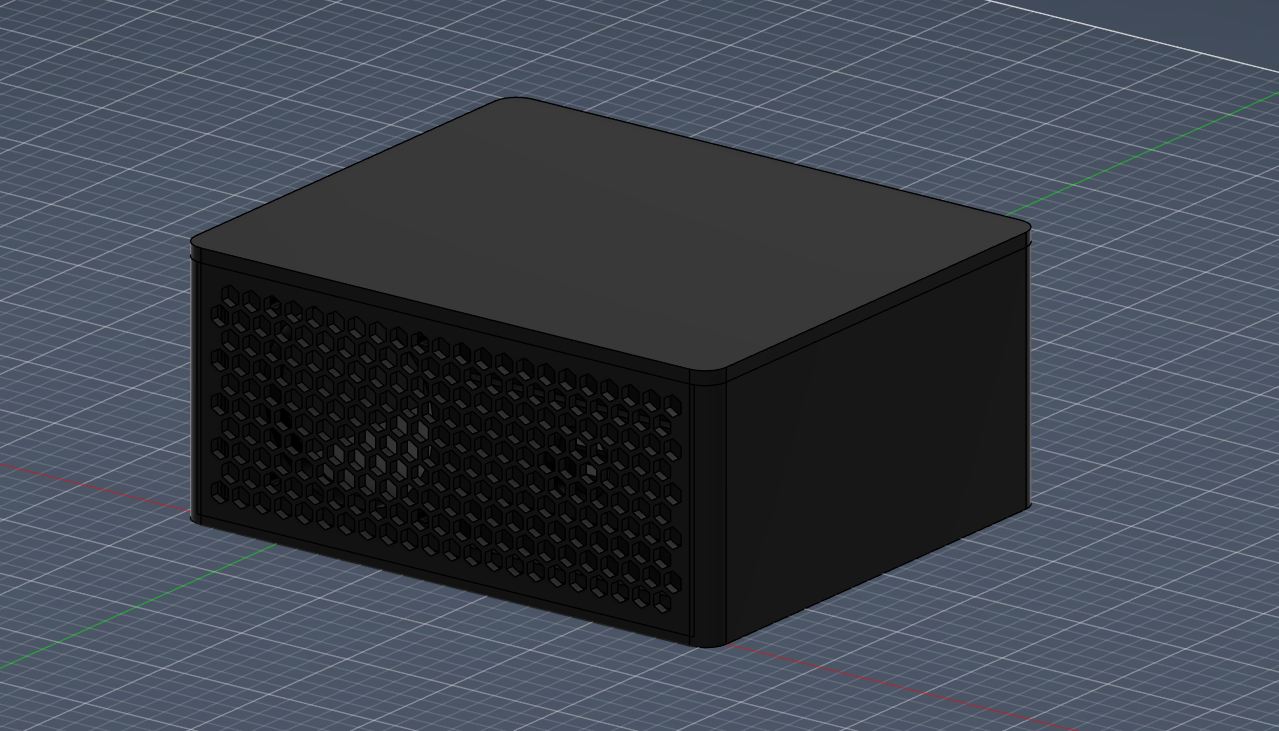
Made in Fusion360
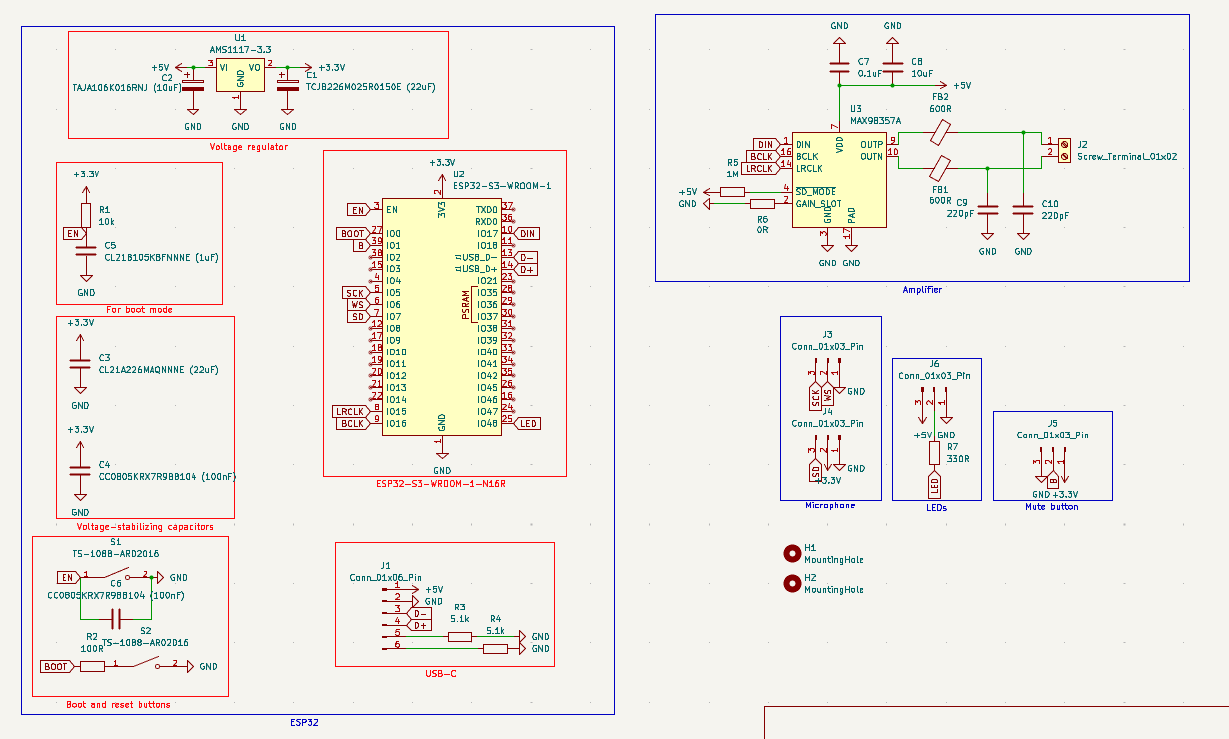
Schematic
PCB
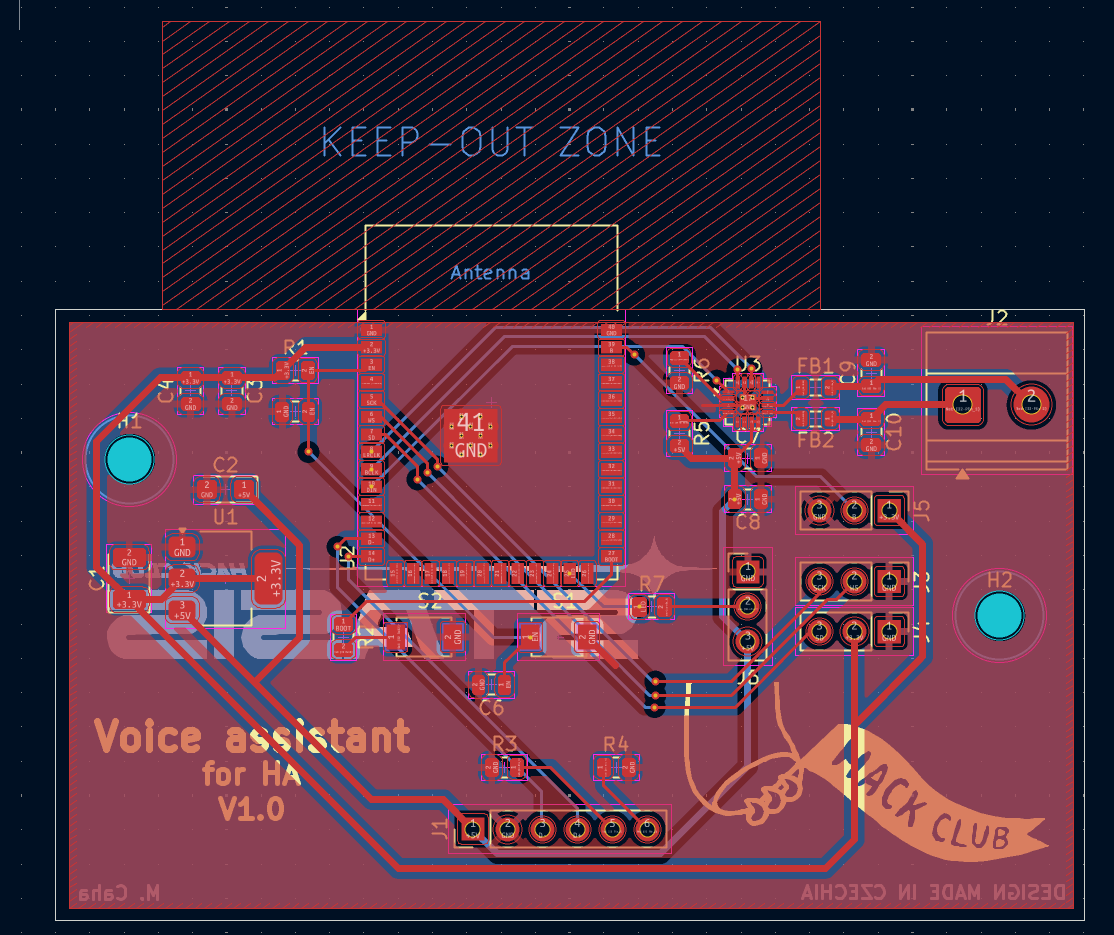
Made in KiCad
This voice assistant uses ESPHome firmware. It is programmed via the USB-C port. It is activated by saying "Hey Jarvis" and sends a recording of the command to the Home Assistant, where it is converted to text using Groq STT, then converted into a response using Groq AI, and then converted into a voice response using Groq TTS, the action is performed, and the response is spoken. You need to have the voice assistant pipeline set up correctly in Home Assistant tutorial here!
You can find it in .csv format here.
Made with ❤️ by @Matyas604
| Qty | Value | Footprint | References |
|---|---|---|---|
| 4 | Conn_01x03_Pin | Connector_PinHeader_2.54mm:PinHeader_1x03_P2.54mm_Vertical | J3, J4, J5, J6 |
| 2 | 220pF | Capacitor_SMD:C_0805_2012Metric | C9, C10 |
| 2 | 5.1k | Resistor_SMD:R_0805_2012Metric | R3, R4 |
| 2 | 600R | Inductor_SMD:L_0805_2012Metric | FB1, FB2 |
| 2 | CC0805KRX7R9BB104 (100nF) | Capacitor_SMD:C_0805_2012Metric | C4, C6 |
| 2 | LOGO | LOGO | G***, G*** |
| 2 | MountingHole | MountingHole:MountingHole_3.2mm_M3 | H1, H2 |
| 2 | TS-1088-AR02016 | footprints:SW_TS-1088-AR02016 | S1, S2 |
| 1 | 0.1uF | Capacitor_SMD:C_0805_2012Metric | C7 |
| 1 | 0R | Resistor_SMD:R_0805_2012Metric | R6 |
| 1 | 100R | Resistor_SMD:R_0805_2012Metric | R2 |
| 1 | 10k | Resistor_SMD:R_0805_2012Metric | R1 |
| 1 | 10uF | Capacitor_SMD:C_0805_2012Metric | C8 |
| 1 | 1M | Resistor_SMD:R_0805_2012Metric | R5 |
| 1 | 330R | Resistor_SMD:R_0805_2012Metric | R7 |
| 1 | AMS1117-3.3 | Package_TO_SOT_SMD:SOT-223-3_TabPin2 | U1 |
| 1 | CL21A226MAQNNNE (22uF) | Capacitor_SMD:C_0805_2012Metric | C3 |
| 1 | CL21B105KBFNNNE (1uF) | Capacitor_SMD:C_0805_2012Metric | C5 |
| 1 | Conn_01x06_Pin | Connector_PinHeader_2.54mm:PinHeader_1x06_P2.54mm_Vertical | J1 |
| 1 | ESP32-S3-WROOM-1 | RF_Module:ESP32-S3-WROOM-1 | U2 |
| 1 | MAX98357A | Package_DFN_QFN:TQFN-16-1EP_3x3mm_P0.5mm_EP1.23x1.23mm_ThermalVias | U3 |
| 1 | Screw_Terminal_01x02 | TerminalBlock_Phoenix:TerminalBlock_Phoenix_MKDS-1,5-2_1x02_P5.00mm_Horizontal | J2 |
| 1 | TAJA106K016RNJ (10uF) | Capacitor_Tantalum_SMD:CP_EIA-3216-18_Kemet-A | C2 |
| 1 | TCJB226M025R0150E (22uF) | Capacitor_Tantalum_SMD:CP_EIA-3528-21_Kemet-B | C1 |

FrWA14/KiCad8_ESP32S3_DevModule_wroom-1_DevelopementBoard
Contient tout les fichier KiCad nécessaire pour faire une carte ESP32S3 avec un module Wroom-1.

ANTowski-1/MIDI-Controller-PCB
This repo contains KiCad project files and gerbers for making an PCB for my MIDI-Controller — An ESP32-S3 based audio controller utilising MIDI protocol


JanClyde05/SHM-Capstone
On October 28, 2026, the user explicitly clarified that the only authoritative geometric reference is: PCB Files/Reference PCB (OLD Version)/Thesis/SHMPCBNew/SHMPCBNew.kicadpcb/Thesis/SHMPCBNew/SHMPCBNew.kicadpcb) (12…

alanrstalin2010/Drawing-robot
I want to create a drawing robot for my assignments. I think it will be helpful.This is my first project

atomic14/cube-display
I'm currently testing the first set of PCBs. There will be updates as I find issues!

LighthouseXy/VoxConductor
VoxConductor — ESP32-S3 desktop intelligent voice hub with LVGL, ASR, DeepSeek, streaming TTS, weather and microSD logging
It measures 75.1 × 44.6 mm and has 2 copper layers, 1.6 mm thick.
34 parts, built around the ESP32-S3-WROOM-1-N8, AMS1117-3.3 and TS-1088-AR02016. The full list of its parts is on this page, with links to each part's symbol and footprint where PCBKit's library has them.
From the Matyas604/Voice-assistant-for-HA repository on GitHub, at the commit this page was made from: the board is PCB/Voice assistant for HA.kicad_pcb and its schematic PCB/Voice assistant for HA.kicad_sch. PCBKit opens the board in the browser, with nothing to install.
Its repository states no licence, so its author keeps all rights: ask Matyas604 before reusing the design.