4 layers100 × 75 mm
OpenHW DevKit
openhwfoundation/core-v-mcu-devkit
This is the CORE-V MCU DevKit project, hosting the open-source artifacts for the CORE-V MCU Development Kit.
235 parts18

 FranTerrassa/Ardutester
Aparato a base de arduino para comprobar estado de componentes electrónicos
Ardutester is an open-source printed circuit board by FranTerrassa, from the FranTerrassa/Ardutester repository on GitHub. It is a 2-layer board of 85.7 × 54.4 mm with 17 parts on 39 nets, routed with 159 tracks and 35 vias.
It is built around the PJ-002B and T93YB203KT20. Its parts include 10 resistors, 2 connectors, 1 IC and 1 switch. It belongs with the AVR (ATmega, ATtiny) boards of this library.
Un comprobador de componentes Arduino basado en https://create.arduino.cc/projecthub/plouc68000/ardutester-v1-13-the-arduino-uno-transistor-tester-dbafb4
El autor original de este proyecto es plouc68000 quien hizo el diseño y el codigo ardutester v1.13, aquien le doy todo el agradecimiento por este proyecto para la comunidad. También se a consultado este otro link Mundo Yakara, gracias yakara por esos grandes videos. No es un proyecto propio, pero si he diseñado la PCB y fabricado siguiendo el esquema original.
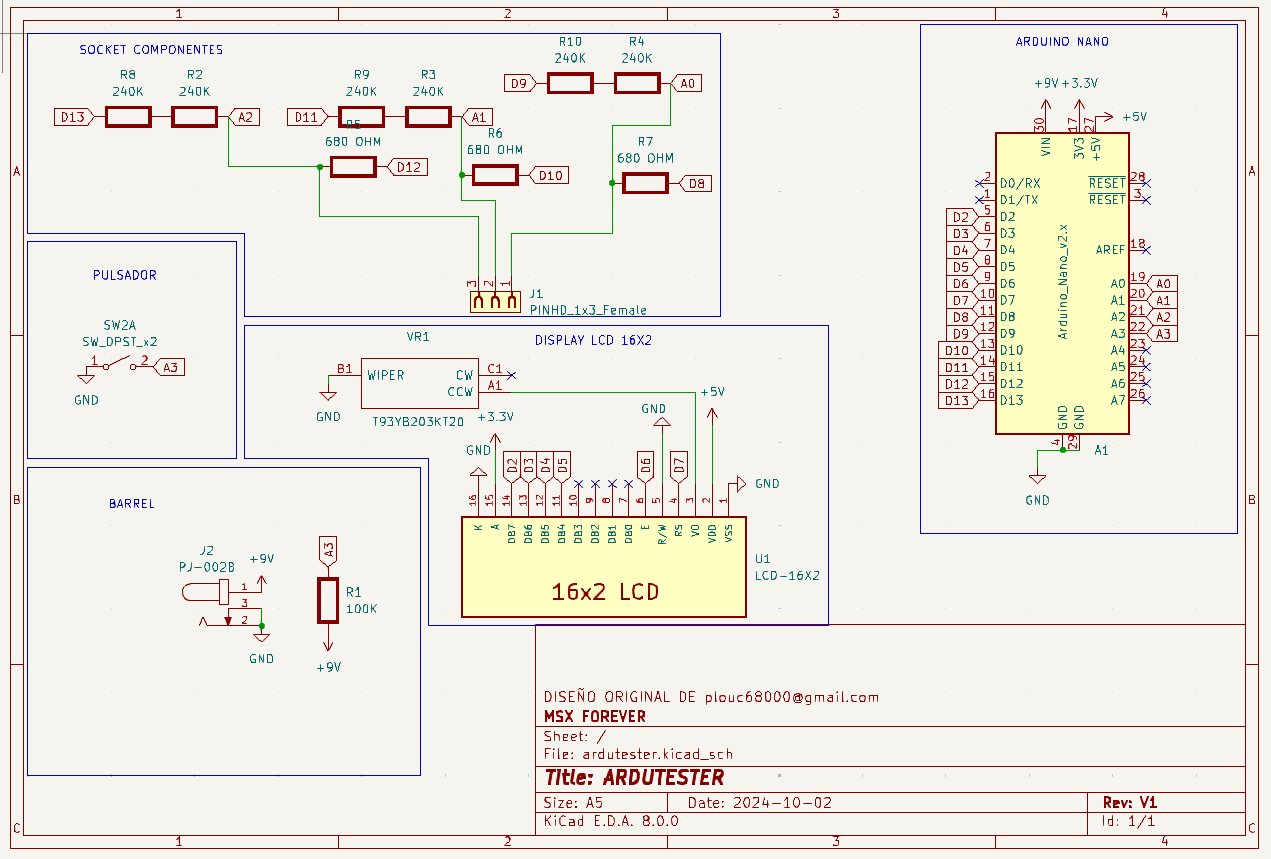
La pcb esta diseñada para ser lo más pequeña y manejable posible. Se alimenta de 9v, por debajo de ese voltaje podría dar malos resultados. Se a optado por resistencias SMD 1206 1/4w por el espacio que ocupan y no siendo muy dificiles de soldar para usuario medio y se a agregado una resistencia variable de 2k, (VR1) para ajustar el contraste de la pantalla.


El resultado lo vemos en las siguientes imagenes.


Ha sido diseñada desde tinkercad es un modelo sencillo, pero agradable en tamaño y sencillez. Yo la he impreso en PLA con una boquilla 0.2, con un relleno de 20% y una altura de capa de 0.14.


Aquí se puede ver como queda el modelo montado.


| ID | Part name | Part number | Quantity |
|---|---|---|---|
| Pin Header 1x06 2.54mm | 2 | ||
| A1 | Arduino Nano USB Mini | 1 | |
| U1 | LCD Module 16x2 | 1 | |
| R2-R4,R8-R10 | Resistor 680 Ohm SMD 1/4W | 3 | |
| R5-R7 | Resistor 240 kOhm SMD 1/4W | 6 | |
| R1 | Resistor 100 kOhm SMD 1/4W | 1 | |
| VR1 | Pot. 2 khm y tambien aquí* | T93YB 2K | 1 |
| SW | Test Button | TL2230EEF100 | 1 |
| J2 | Barrel | PJ-002B | 1 |
| J1 | Pin Socket 1x03 2.54mm | 1 |
*Las medidas deben ser iguales pero no lo aseguro.


=== License This project is released under a {OSHW} License.
=== Contributing To contribute to this project please contact plouc68000 plouc68000@gmail.com
=== Help This document is written in the AsciiDoc format, a markup language to describe documents. If you need help you can search the http://www.methods.co.nz/asciidoc[AsciiDoc homepage] or consult the http://powerman.name/doc/asciidoc[AsciiDoc cheatsheet]
| Qty | Value | Footprint | References |
|---|---|---|---|
| 6 | 240K | Resistor_SMD:R_1206_3216Metric | R2, R3, R4, R8, R9, R10 |
| 3 | 680 OHM | Resistor_SMD:R_1206_3216Metric | R5, R6, R7 |
| 1 | 100K | Resistor_SMD:R_1206_3216Metric | R1 |
| 1 | Arduino_Nano_v2.x | Module:Arduino_Nano | A1 |
| 1 | LCD-16X2 | footprints:MODULE_LCD-16X2 | U1 |
| 1 | LOGO | LOGOS:TRASERA HOMER 20X23 | G*** |
| 1 | PINHD_1x3_Female | Connector_PinSocket_2.54mm:PinSocket_1x03_P2.54mm_Vertical | J1 |
| 1 | PJ-002B | MISHUELLAS:CUI_PJ-002B | J2 |
| 1 | SW_DPST_x2 | MISHUELLAS:SW_TL2230EEF100 | SW2 |
| 1 | T93YB203KT20 | SamacSys_Parts:T93YB203KT20 | VR1 |
openhwfoundation/core-v-mcu-devkit
This is the CORE-V MCU DevKit project, hosting the open-source artifacts for the CORE-V MCU Development Kit.


ekatynski/WCS1700-Calibrator
A board designed to aid in calibrating six Winson WCS1700 hall effect sensors a the same time.

luispaulomr/alr3000z_firmware
Firmware for ALR3000z (development board based on PIC18F4550).

rhit-bouchemj/AnesthesiaSeniorDesign
The Repo for Senior Design project of creating an Open-Source Anesthesia Pump

neurorishika/MultiBiOS
High-precision, hardware-clocked olfactometer control system for behavioral neuroscience


It measures 85.7 × 54.4 mm and has 2 copper layers, 1.6 mm thick.
17 parts, built around the PJ-002B and T93YB203KT20. The full list of its parts is on this page, with links to each part's symbol and footprint where PCBKit's library has them.
From the FranTerrassa/Ardutester repository on GitHub, at the commit this page was made from: the board is KICAD/ardutester.kicad_pcb and its schematic KICAD/ardutester.kicad_sch. PCBKit opens the board in the browser, with nothing to install.
Its repository states no licence, so its author keeps all rights: ask FranTerrassa before reusing the design.