Skip to the content
PCBKitNew board
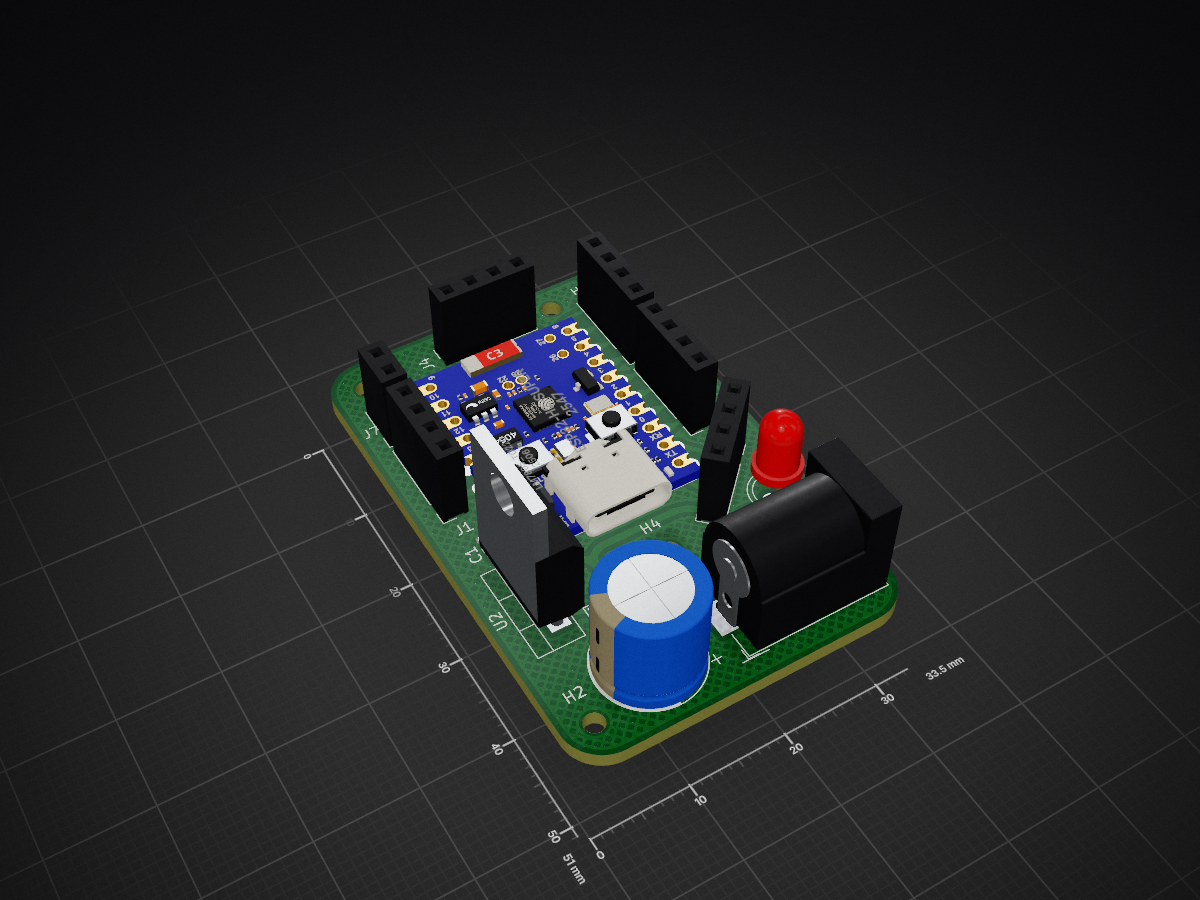
2 layers33.5 × 51 mmZigbee universal sensor kicad, the printed circuit board in 3D

Zigbee universal sensor kicad

Zektopic/universal-zigbee-sensor-kicad1

Universal Zigbee Sensor Board (ESP32-H2-Supermini): A KiCad 9.0 project for a versatile, low-power sensor platform using the ESP32-H2-Supermini, designed for easy integration of various sensors in IoT applications.

Size
33.5 × 51 mm
Copper layers
2
Thickness
1.6 mm
Parts
25
Nets
28
Pads
75
Tracks, vias
72, 0
Pours
22
Routed
Yes
KiCad
KiCad 9.0 (file 20241229)
Created
8 Mar 2025
Updated
8 Mar 2025

Overview

Zigbee universal sensor kicad is an open-source printed circuit board by Zektopic, from the Zektopic/universal-zigbee-sensor-kicad repository on GitHub, published under the MIT licence. It is a 2-layer board of 33.5 × 51 mm with 25 parts on 28 nets, routed with 72 tracks and 0 vias.

Its parts include 7 connectors, 5 capacitors, 2 ICs, 1 resistor and 1 diode. It belongs with the radio and wireless and sensors and measurement boards and the ESP32 and RISC-V boards of this library.

README

README.md

Universal Zigbee Sensor Board (ESP32-H2-Supermini)

Board Image

Introduction

This repository contains the KiCad 9.0 project files for a universal Zigbee sensor board based on the ESP32-H2-Supermini module. This board is designed to be flexible and adaptable for various sensor applications, providing a compact and low-power solution for Zigbee-based IoT projects.

Features

  • ESP32-H2-Supermini: Utilizes the Espressif ESP32-H2-Supermini module, offering robust Zigbee connectivity and low power consumption.
  • Universal Sensor Interface: Designed with multiple GPIO pins exposed for easy connection of various sensors (e.g., temperature, humidity, light, motion).
  • Power Supply Flexibility: Supports various power supply options (e.g., battery, external power).
  • Compact Design: Designed to be small and easily integrated into different enclosures.
  • KiCad 9.0 Project: Fully documented project in KiCad 9.0 for easy modification and customization.

Getting Started

Prerequisites

  • KiCad 9.0 or later installed.
  • ESP32-H2-Supermini datasheet and documentation.
  • Required sensor datasheets.
  • A computer running a compatible operating system (Windows, macOS, Linux).

Setup

  1. Clone the Repository:
    bash
    git clone https://github.com/manupawickramasinghe/universal-zigbee-sensor-kicad.git
    cd universal-zigbee-sensor-kicad
  2. Open the Project in KiCad:
    • Launch KiCad 9.0.
    • Click "File" -> "Open Project...".
    • Navigate to the cloned repository folder and select the .kicad_pro file.
  3. Explore the Project:
    • Schematic Editor: Open the schematic editor to view the circuit diagram. Examine the ESP32-H2-Supermini connections, sensor interfaces, and power supply circuitry.
    • PCB Layout Editor: Open the PCB layout editor to view the board layout. Inspect the component placement, routing, and board dimensions.
    • Symbol and Footprint Libraries: Ensure that the necessary symbol and footprint libraries are installed. The project should contain the needed libraries. However if you are missing any, they will need to be added.
  4. Review the Datasheets:
    • Refer to the ESP32-H2-Supermini datasheet to understand the pin functions and specifications.
    • Review the datasheets for the sensors you plan to use to ensure compatibility and proper connection.
  5. Customize the Design (Optional):
    • Modify the schematic and PCB layout to suit your specific sensor application.
    • Add or remove components as needed.
    • Adjust the routing and component placement for optimal performance.
  6. Generate Gerber Files:
    • Once you are satisfied with the design, generate Gerber files for PCB manufacturing.
    • In the PCB layout editor, click "File" -> "Fabrication Outputs" -> "Gerber Files...".
    • Configure the Gerber settings and generate the files.
  7. Order PCBs:
    • Use the generated Gerber files to order PCBs from a PCB manufacturer.
  8. Assemble the Board:
    • Solder the components onto the PCB.
    • Ensure proper orientation and soldering quality.
  9. Programming the ESP32-H2-Supermini:
    • Refer to the Espressif documentation for programming the ESP32-H2.
    • You will need a compatible development environment (e.g., ESP-IDF).
    • Develop and upload your firmware to the ESP32-H2-Supermini to control the sensors and manage Zigbee communication.
  10. Testing:
    • Connect your sensors to the board.
    • Power up the board and test the functionality of the sensors and Zigbee communication.

Parts

25
QtyValueFootprintReferences
5Conn_01x04_SocketConnector_PinSocket_2.54mm:PinSocket_1x04_P2.54mm_VerticalJ1, J2, J3, J4, J6
4CCapacitor_SMD:C_0805_2012Metric_Pad1.18x1.45mm_HandSolderC1, C2, C3, C4
4MountingHoleMountingHole:MountingHole_2mmH1, H2, H3, H4
2TestPointTestPoint:TestPoint_Pad_D4.0mmTP1, TP2
1Barrel_Jack_SwitchConnector_BarrelJack:BarrelJack_HorizontalJ8
1C_PolarizedCapacitor_THT:CP_Radial_D10.0mm_P3.80mmC5
1Conn_01x02_SocketConnector_PinSocket_2.54mm:PinSocket_1x02_P2.54mm_VerticalJ7
1ESP32-H2-SUPERMINIlibs:ESP32H2-SuperminiU1
1G***kibuzzard-67CC80C3kibuzzard-67CC80C3
1G***kibuzzard-67CC814Ekibuzzard-67CC814E
1LEDLED_THT:LED_D4.0mmD1
1LM7805_TO220Package_TO_SOT_THT:TO-220-3_VerticalU2
1RResistor_SMD:R_0805_2012Metric_Pad1.20x1.40mm_HandSolderR1
1SolderJumper_3_Bridged12Jumper:SolderJumper-3_P1.3mm_Bridged12_Pad1.0x1.5mmJP1

Questions

How big is the Zigbee universal sensor kicad PCB?

It measures 33.5 × 51 mm and has 2 copper layers, 1.6 mm thick.

What parts does the Zigbee universal sensor kicad use?

25 parts. The full list of its parts is on this page, with links to each part's symbol and footprint where PCBKit's library has them.

Where can I download the Zigbee universal sensor kicad KiCad files?

From the Zektopic/universal-zigbee-sensor-kicad repository on GitHub, at the commit this page was made from: the board is zigbee-universal-sensor-kicad.kicad_pcb and its schematic wireless_module.kicad_sch. PCBKit opens the board in the browser, with nothing to install.

Can I use the Zigbee universal sensor kicad design in my own project?

Its repository publishes it under the MIT licence: you may reuse it on that licence's terms (keep the author's notice, and for a copyleft licence share your changes alike).

Similar boards

  • 2 layers159.5 × 30 mmType f, the printed circuit board in 3D

    Type f

    google/mozc-devices

    Circuit diagrams and firmware source code for Gboard DIY keyboards

    25 parts3kApache-2.0
  • 2 layers113.5 × 95.1 mmSweep high, the printed circuit board in 3D

    Sweep high

    davidphilipbarr/Sweep

    Sweep - a small promicro based keyboard inspired by the Ferris.

    25 parts2.1k
  • 2 layers58.4 × 114.3 mmPicoPedal, the printed circuit board in 3D

    PicoPedal

    hackclub/OnBoard

    💡 Join 1,000 teenagers and make your first PCB with a $100 grant!

    25 parts915
  • 2 layers54 × 15 mmXyp gpib, the printed circuit board in 3D

    Xyp gpib

    xyphro/UsbGpib

    Versatile, cheap and portable USB to GPIB converter (USBTMC class based)

    25 parts690MIT
  • 2 layers50 × 76 mmVoron 0, the printed circuit board in 3D

    Voron 0

    dennisss/dacha

    Monorepo for awesome tools/projects/libraries

    25 parts397Apache-2.0
  • 2 layers237.5 × 102.9 mmStorage, the printed circuit board in 3D

    Storage

    jes/scamp-cpu

    A homebrew 16-bit CPU with a homebrew Unix-like-ish operating system.

    25 parts301Unlicense
  • 2 layers43.3 × 21 mmNanoS3 Carrier, the printed circuit board in 3D

    NanoS3 Carrier

    UnexpectedMaker/esp32s3

    Assorted files for my ESP32-S3 development boards

    25 parts296