Skip to the content
PCBKitNew board
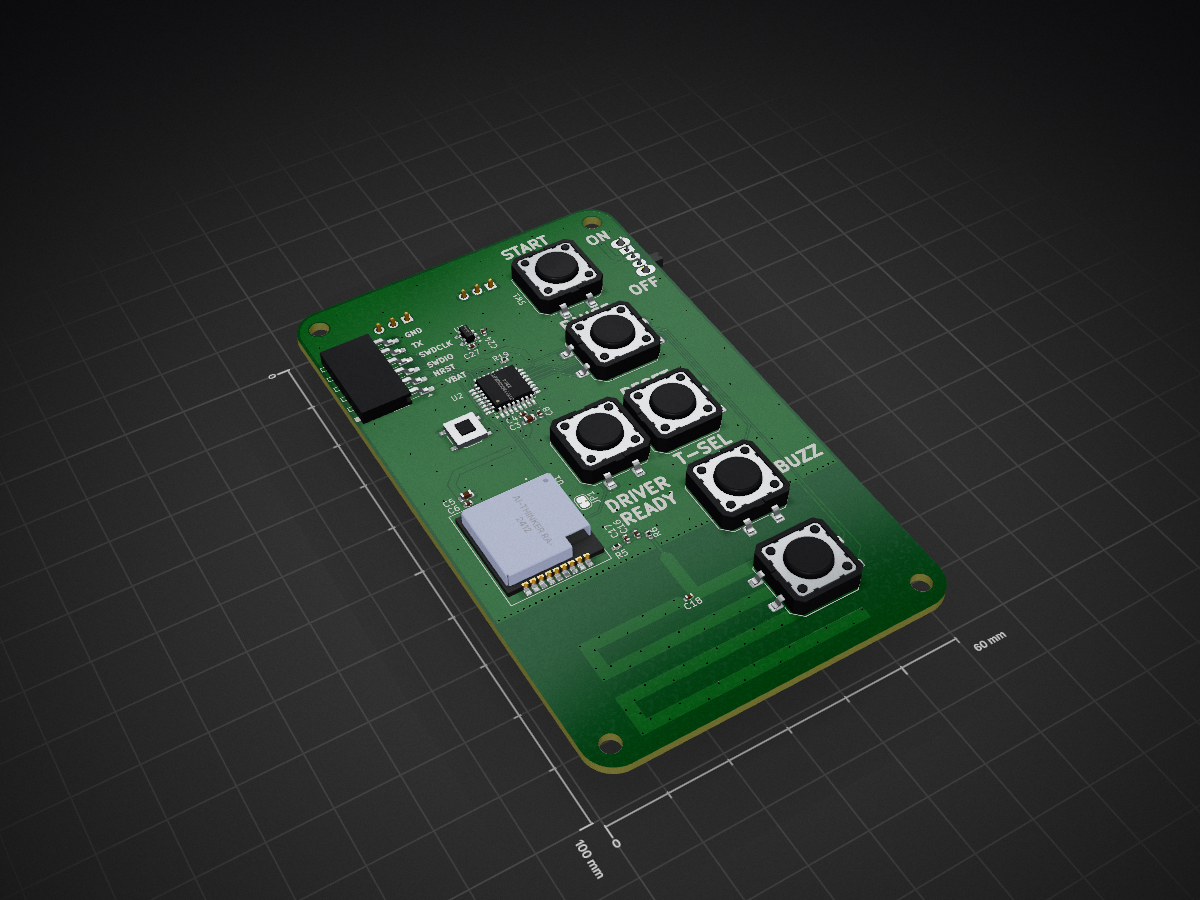
2 layers60 × 100 mmTimerRemote, the printed circuit board in 3D

Open Source Area Timer for combat robotics

Size
60 × 100 mm
Copper layers
2
Thickness
1.6 mm
Parts
33
Nets
51
Pads
136
Tracks, vias
202, 251
Pours
6
Routed
Yes
KiCad
KiCad 10.0 (file 20260206)
Created
26 Nov 2024
Updated
22 Oct 2026

Overview

TimerRemote is an open-source printed circuit board by WannaBAcoder, from the WannaBAcoder/ArenaTimer repository on GitHub. It is a 2-layer board of 60 × 100 mm with 33 parts on 51 nets, routed with 202 tracks and 251 vias.

It is built around the AP2112K-3.3 and GRM0335C1H4R3CA01D. Its parts include 10 capacitors, 8 switches, 4 connectors, 3 resistors and 3 ICs. It belongs with the STM32 boards of this library.

Main components

2

README

readme.md

⏱️ Event Match Timer & Lockout System

An open-source, ESP32-based event and match timer platform featuring wireless remote integration, with web interface.


🚀 Getting Started

1. Hardware Orientation & Powering

  • Orientation Flexibility: The timer can be configured to operate in either horizontal orientation. If your mounting or power cable strategy requires it, you can flip the included hanging bracket to the opposite side and enable Invert Display in the web settings to route the power cable from above.
  • Power Requirements: Connect the timer using the provided power supply.

⚠️ CRITICAL: Only use 5V power supplies capable of delivering at least 60W. Applying a voltage higher than 5V will permanently damage the hardware.

2. Initial Wi-Fi & Web UI Setup

  1. Boot Sequence: Upon power-up, the display initializes with dashes (--:--) and the border will blink, indicating it is attempting to connect to the last saved Wi-Fi network.
  2. Access Point (AP) Mode: If the network is unavailable (or during first-time setup), the timer switches to AP mode, broadcasting its own network:
    • SSID: TimerSetup
    • Password: 12345678
  3. Connecting to the UI: * Connect your phone, tablet, or computer to the TimerSetup network.
    • Locate the timer's IP address in your device's network connection settings (this process varies by operating system).
    • Open a web browser and enter the IP address to access the control interface.

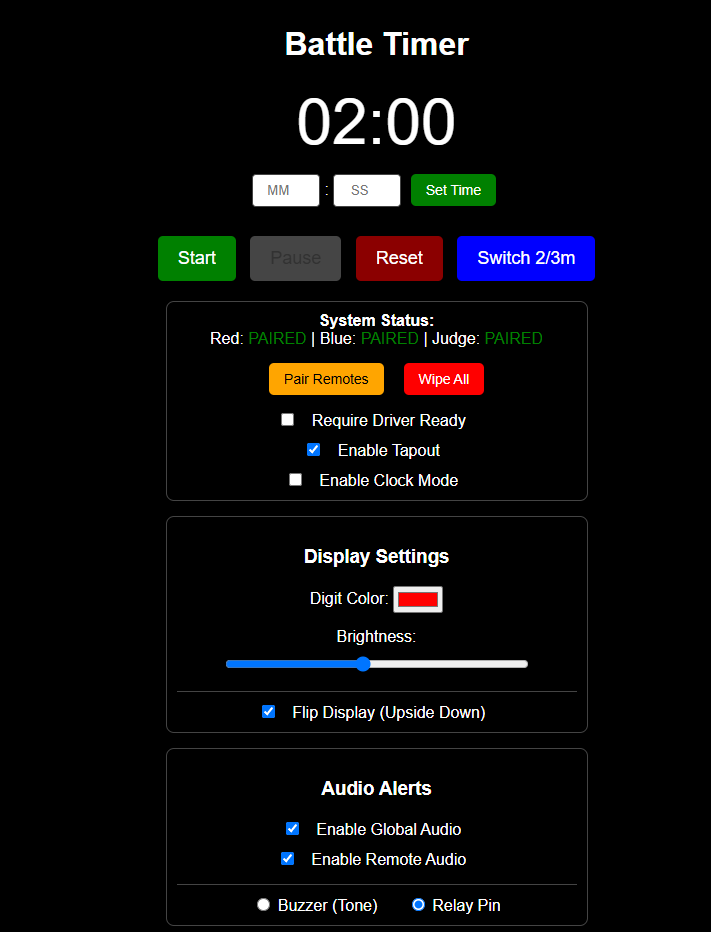
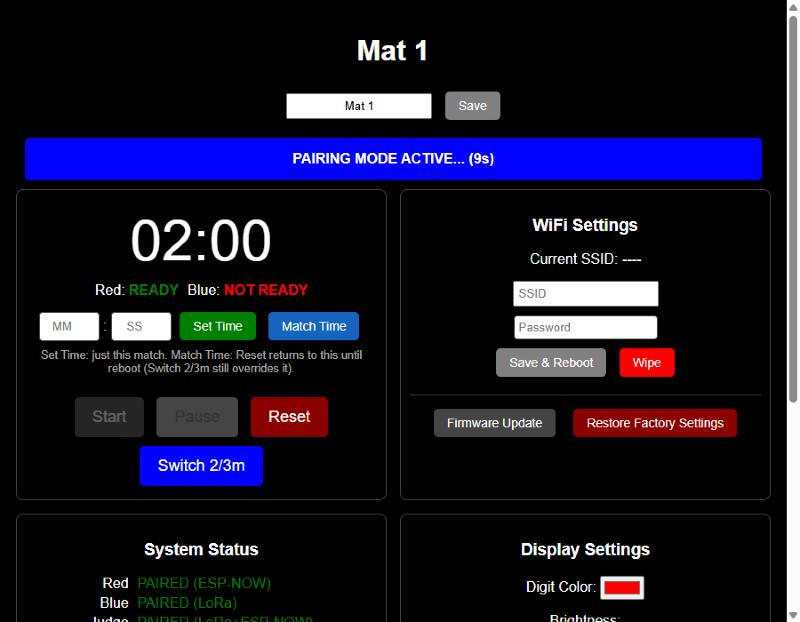
Web Control Interface Dashboard

Note: The local AP interface is identical to the network interface. If no external Wi-Fi network is available at your venue, you can run the timer in this standalone mode completely offline.

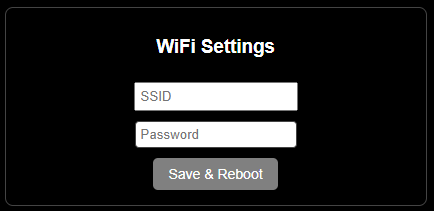
  1. Station Mode (Optional): To connect the timer to an existing venue Wi-Fi network, use the configuration section at the bottom of the webpage to save your local SSID and Password.

Wireless Remotes Layout


⚙️ Configuration & Features

🎮 Wireless Remotes & Pairing

The system supports three battery-powered wireless remotes: one Main Controller and two Driver Ready/Tap-Out buttons (Red vs. Blue).

Wireless Remotes Layout

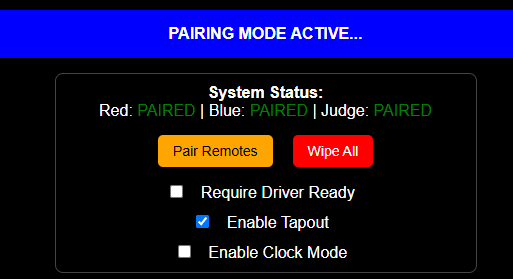
  • Pairing Procedure: Remotes must be paired before deployment. Click Pair Remote in the Web UI to enter binding mode, turn on the remote, and press any button. The timer will automatically exit binding mode, and the Web UI status will update to Paired. Repeat independently for each remote.
    • Pairing Timeout: Binding mode automatically cancels itself after 15 seconds if no remote responds (with a live countdown shown on screen), rather than hanging indefinitely until a reboot.
  • Driver Ready Lockout: Enabling the Require Driver Ready checkbox prevents a match from starting until both driver remotes register a "Ready" state - the Start button itself grays out while waiting, and the ready state for each side is shown directly under the countdown.
    • Visual Indicators: The physical white border indicates overall readiness. Individual Red/Blue illumination confirms when each respective driver has ready-ed up.
  • Tap-Out Functionality: Even if the pre-match lockout is disabled, the driver remotes function by default as tap-out indicators. Pressing them during a match triggers a unique tap-out animation and audio effect (can be toggled off via the checkbox).

Pairing countdown, ready status, and per-timer naming

📻 ESP-NOW and LoRa Remotes, Side by Side

Newer timer boards carry an onboard LoRa radio alongside the original ESP-NOW remote support - both run at the same time, in the same firmware image. That means a single timer can have, say, Red paired to an older ESP-NOW remote while Blue and Judge are paired to newer LoRa remotes, so a LoRa-capable board can go into service before every remote in the field is replaced.

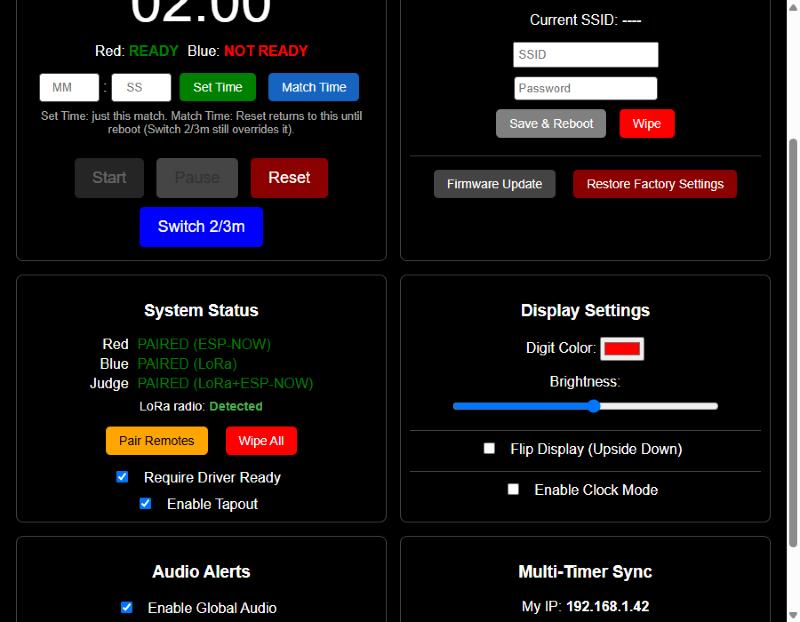
  • Per-Role Binding: Each of Red, Blue, and Judge is paired independently, and the System Status panel shows exactly which radio each one is bound through - PAIRED (ESP-NOW), PAIRED (LoRa), or PAIRED (LoRa+ESP-NOW) if the same role has been bound on both.
  • Automatic Hardware Detection: On boards without the LoRa radio installed, the firmware detects its absence at boot (shown as LoRa radio: Not detected) and simply runs ESP-NOW only, rather than wasting startup time retrying a radio that isn't there.

Dual ESP-NOW/LoRa pairing status, Match Time, and WiFi management

🔗 Multi-Timer Sync (Web-Based)

Running several mats off one set of remotes already works by pairing the same remote to each timer directly (above) - but for anything triggered from the web page (start/pause/reset, time-select, colors, brightness, audio, ready/tapout settings), pair two timers together over WiFi so clicking a button on one applies to both.

  • Setup: Open the Multi-Timer Sync panel, enter the other timer's local IP address (shown on its own page as My IP), and click Sync. Everything that timer currently has configured pushes over immediately, so both units start in agreement instead of drifting until the next change.
  • What Syncs: Match control, match time, display color/brightness/flip, audio settings, ready-required, tap-out, and clock mode. Remote button presses are not relayed this way - they already reach every timer that remote is directly paired to, with no extra setup needed.
  • One-Directional by Default: Sync only pushes outward from whichever timer's web page you clicked on - pair both timers to each other's IP if you want either one to be able to drive the other.
  • Naming Timers: Give each unit a short label (e.g. "Mat 1") at the top of its page - shown in the browser tab too - so it's obvious which page you're looking at when several are open side by side.

⏱️ Match Time vs. Set Time

Two different buttons next to the manual MM:SS entry handle two different needs:

  • Set Time: A one-off override for just the upcoming match. Pressing Reset afterward falls back to whatever the standing default already was (the 2/3-minute preset, or a previously-set Match Time).
  • Match Time: Sets a new standing default - Reset keeps returning to this duration until the unit reboots (it isn't saved permanently, so a custom one-off event length doesn't silently become the new default forever). The Switch 2/3m button still overrides it either way.

🕐 Clock Mode

Toggle Enable Clock Mode (in Display Settings) to repurpose the digit display as a wall clock when the timer is idle between matches. The web page itself keeps showing whatever match time was last active (dimmed, since it isn't live) - the physical display is what shows the actual time.

🔊 Audio Options

  • Global Toggle: Easily enable or disable all system audio via the web panel.
  • Output Routing: Switch between the onboard piezo beeper or a dedicated relay output used to switch larger external horn circuits, PA systems, or specialized lighting.
  • Attention Horn: The Main Controller features a dedicated button to manually trigger the sound effects to grab the attention of competitors or spectators.

🔒 Operational Lockout

To prevent accidental mid-match disruption, most configuration options, adjustments, and web buttons are automatically disabled while the timer is actively running.


🛠️ Assembly Process (Electronics Kits)

For users assembling the hardware from the DIY electronics kits, follow this general framework. Refer to the project BOM.md for exact hardware sizing, screw counts, and component sourcing links.

1. 3D Printed Frame Selection

Choose the frame variant that best fits your 3D printer's build volume:

  • Small Printers: Cut down to fit standard build plates. Requires more assembly hardware and time but maximizes accessibility.
  • Medium Printers (H2s/H2d Optimized): A balanced approach featuring lower part counts and optimized print times.
  • Large Printers: Designed specifically for large-format platforms like the Elegoo Orange Storm Giga.

2. Print Settings & Materials

  • Main Frame: Print in PETG for superior mechanical strength and thermal resilience during high-temperature transport or storage.
    • Walls: 4–6 perimeters
    • Infill: 15–25% Gyroid
  • Lenses: All frame variations share the same lens files. Print them with enough top/bottom layers to ensure the front face prints completely solid to optimize light diffusion and visual clarity.

🧠 Advanced Development & Limitations

📡 RF Limitations & Best Practices

The timer utilizes an ESP32 module with a printed trace antenna; remotes utilize ESP8266 modules over ESP-NOW, or on newer timer boards, dedicated LoRa radios (see ESP-NOW and LoRa Remotes, Side by Side above) - both with printed antennas.

  • Range & Interference: While highly reliable in tested arena layouts (e.g., SEMO), performance can degrade at extreme distances or in environments experiencing heavy 2.4 GHz spectrum congestion (crowded Wi-Fi, heavy radio traffic).
  • Upgrades: If your venue demands extreme range, the hardware can be modified to use variants featuring external SMA antennas. Reach out if you need assistance engineering a solution.
  • Running Multiple Timers: Pair a single set of remotes to multiple timers by repeating the pairing process on each one (above), and/or bind timers to each other for web-triggered actions - see Multi-Timer Sync above.

💻 Firmware Upgrades & Exposed I/O

  • Over-The-Air (OTA) Updates: Firmware updates can be flashed seamlessly without opening the enclosure. Navigate to http://<your-timer-ip>/update to access the ElegantOTA interface, where you can drag-and-drop compiled .bin updates.
  • Restore Factory Settings: A dedicated button wipes all remotes, WiFi credentials, sync target, and display/audio settings in one step, then reboots - useful for repurposing a unit or ruling out a stale setting during troubleshooting. WiFi credentials alone can also be wiped independently (Wipe, next to Save & Reboot) without touching anything else.
  • Hardware Expansion: Additional I/O pins are deliberately exposed near the internal ESP32 module. Advanced users can open the case and solder directly to these lines to integrate custom addressable LED strips, sensors, or physical inputs.

⚡ ESD Precautions & LED Repair

⚡ CAUTION: The internal PCBs contain components sensitive to Electrostatic Discharge (ESD). Handle bare board assemblies with care during assembly or modifications.

  • Common Failure Mode: If an ESD event occurs, a single addressable LED in the display chain may burn out. Because the LEDs are wired in series, if one LED fails, all subsequent data down the chain is blocked, causing the rest of the display past that point to drop out.
  • Support: If you experience an LED failure during assembly or firmware hacking, reach out—these are repairable, and I can guide you through jumping or replacing the compromised pixel. Note that failures have only occurred during loose bench development; fully enclosed units have proven resilient during regular live event usage.

Parts

33
QtyValueFootprintReferences
4MountingHoleMountingHole:MountingHole_3.2mm_M3H1, H2, H3, H4
3100nFCapacitor_SMD:C_0402_1005MetricC4, C6, C8
20 ohmResistor_SMD:R_0402_1005MetricR5, R6
210uF, 25VCapacitor_SMD:C_0603_1608MetricC3, C5
21uF, 25VCapacitor_SMD:C_0402_1005MetricC24, C27
2BUZZERButton_Switch_SMD:SW_Push_1P1T_NO_CK_PTS125Sx43SMTRSW5, SW6
110k, 1%Resistor_SMD:R_0402_1005MetricR19
12pFCapacitor_SMD:C_0402_1005MetricC18
14.7pFCapacitor_SMD:C_0402_1005MetricC17
1AP2112K-3.3Package_TO_SOT_SMD:SOT-23-5U5
1Ai-Thinker RA-08HRA-08H:RA-08HU1
1CCapacitor_SMD:C_0402_1005MetricC16
1GNDConnector_PinHeader_2.54mm:PinHeader_1x03_P2.54mm_VerticalJ5
1Jumper_2_BridgedJumper:SolderJumper-2_P1.3mm_Bridged_RoundedPad1.0x1.5mmJP1
1PAUSEButton_Switch_SMD:SW_Push_1P1T_NO_CK_PTS125Sx43SMTRSW2
1PROGConnector_Harwin:Harwin_M20-89006xx_1x06_P2.54mm_HorizontalJ2
1RESETButton_Switch_SMD:SW_Push_1P1T_NO_CK_PTS125Sx43SMTRSW3
1STARTButton_Switch_SMD:SW_Push_1P1T_NO_CK_PTS125Sx43SMTRSW1
1STM32G030K6TxPackage_QFP:LQFP-32_7x7mm_P0.8mmU2
1SW_PushButton_Switch_SMD:SW_Push_1P1T_XKB_TS-1187ASW8
1SW_SPDTButton_Switch_THT:SW_Slide_SPDT_Angled_CK_OS102011MA1QSW7
1TIME_SELButton_Switch_SMD:SW_Push_1P1T_NO_CK_PTS125Sx43SMTRSW4
1VBATConnector_PinHeader_2.54mm:PinHeader_1x03_P2.54mm_VerticalJ3
1WAGOWAGO_2060-452_998-404:2060-452_998-404J13

Questions

How big is the TimerRemote PCB?

It measures 60 × 100 mm and has 2 copper layers, 1.6 mm thick.

What parts does the TimerRemote use?

33 parts, built around the AP2112K-3.3 and GRM0335C1H4R3CA01D. The full list of its parts is on this page, with links to each part's symbol and footprint where PCBKit's library has them.

Where can I download the TimerRemote KiCad files?

From the WannaBAcoder/ArenaTimer repository on GitHub, at the commit this page was made from: the board is PCB Files/TimerRemote/TimerRemote.kicad_pcb and its schematic PCB Files/ButtonBoard/ButtonBoard.kicad_sch. PCBKit opens the board in the browser, with nothing to install.

Can I use the TimerRemote design in my own project?

Its repository states no licence, so its author keeps all rights: ask WannaBAcoder before reusing the design.

More from WannaBAcoder/ArenaTimer

5
  • 2 layers262.2 × 230 mmArenaTimer, the printed circuit board in 3D

    ArenaTimer

    WannaBAcoder/ArenaTimer

    Open Source Area Timer for combat robotics

    224 parts3
  • 2 layers86.6 × 54.5 mmESP32 Lora, the printed circuit board in 3D

    ESP32 Lora

    WannaBAcoder/ArenaTimer

    Open Source Area Timer for combat robotics

    42 parts3
  • 2 layers60 × 100 mmButtonBoard, the printed circuit board in 3D

    ButtonBoard

    WannaBAcoder/ArenaTimer

    Open Source Area Timer for combat robotics

    19 parts3
  • 2 layers60 × 100 mmReadyButtonBoard, the printed circuit board in 3D

    ReadyButtonBoard

    WannaBAcoder/ArenaTimer

    Open Source Area Timer for combat robotics

    11 parts3
  • 2 layers41.9 × 44.5 mmOldReadyButtonBoard, the printed circuit board in 3D

    OldReadyButtonBoard

    WannaBAcoder/ArenaTimer

    Open Source Area Timer for combat robotics

    7 parts3

Similar boards

  • 2 layers26 × 30 mmMicrocontroller, the printed circuit board in 3D

    Microcontroller

    FrameworkComputer/ExpansionCards

    Reference designs and documentation to create Expansion Cards for the Framework Laptop

    34 parts1.1kCC-BY-4.0
  • 2 layers53.2 × 24.8 mmPicoLink, the printed circuit board in 3D

    PicoLink

    ErichStyger/mcuoneclipse

    McuOnEclipse projects and examples

    46 parts765
  • 2 layers36 × 20 mmCombined, the printed circuit board in 3D

    Combined

    adamb314/ServoProject

    Getting the most out of your hobby servo

    24 parts545
  • 2 layers25 × 25 mmSmallEncoder, the printed circuit board in 3D

    SmallEncoder

    DDeGonge/OS-ARM

    This arm is not industrial and it will not be fast, but that is not my goal. But it will hopefully be a very nice looking arm fully capable of 6dof motion, cheap enough to keep it accessable but capable enough to…

    17 parts498MIT
  • 4 layers70 × 72 mmSPINC AA Charger, the printed circuit board in 3D

    SPINC AA Charger

    CoretechR/SPINC

    DIY Automatic Battery Charger Using RP2040

    101 parts467GPL-3.0
  • 4 layers60.8 × 61.3 mmOS3M Mouse, the printed circuit board in 3D

    OS3M Mouse

    spoter368/os3m-hardware

    All the hardware needed to build your own OS3M Mouse!

    51 parts399
  • 4 layers74 × 104 mmBeepy, the printed circuit board in 3D

    Beepy

    sqfmi/beepy-hardware

    Beepy Hardware

    160 parts348MIT