Skip to the content
PCBKitNew board
6 layers64.8 × 69.9 mmEzDV, the printed circuit board in 3D

A FreeDV device based on the ESP32.

Size
64.8 × 69.9 mm
Copper layers
6
Thickness
1.58 mm
Parts
130
Nets
121
Pads
468
Tracks, vias
964, 591
Pours
5
Routed
Yes
KiCad
KiCad 6 (file 20211014)
Created
5 May 2022
Updated
6 Nov 2026

Overview

EzDV is an open-source printed circuit board by tmiw, from the tmiw/ezDV repository on GitHub. It is a 6-layer board of 64.8 × 69.9 mm with 130 parts on 121 nets, routed with 964 tracks and 591 vias.

It is built around the ESP32-S3-WROOM-1-N16R8, ESD122DMXR and MAX17048G+T10, with the TP4056, TPD1E10B06DPYR and MBT3904DW1T1 among its other parts. Its parts include 39 resistors, 30 capacitors, 23 diodes, 10 connectors and 8 ICs. It belongs with the ESP32 boards of this library.

Main components

11

README

README.md

ezDV

This repository contains both the hardware and firmware for a portable battery-powered device that can (de)modulate FreeDV from an attached radio. The board is centered around the following components:

User's guide

See here for the latest copy of the user manual for ezDV, which describes its general use and operation.

Building the firmware

Install ESP-IDF v5.3 and then run the following:

text
. /path/to/esp-idf/export.sh
git submodule update --init --checkout --recursive
cd firmware
idf.py build

Flashing the firmware

Using ESP-IDF

Turn on ezDV (see below) and plug it into your computer's USB port, then run the following:

text
idf.py -p /dev/ttyxxx0 flash monitor

Where /dev/ttyxxx0 (or COMx: on Windows) is the serial port created by your operating system after plugging ezDV in.

Using ESP Flash Tool

On Windows, you can use the ESP Flash Tool to flash ezDV. This does not require installation of ESP-IDF.

  1. Download the ESP Flash Tool from https://www.espressif.com/en/support/download/other-tools.
  2. Decompress all of the files in the ZIP file and execute flash_download_tool_3.9.3.exe.
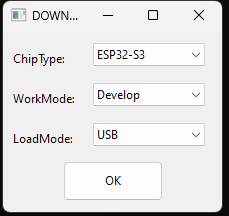
  3. Select "ESP32-S3" for "ChipType", "Develop" for "WorkMode" and "USB" for "LoadMode" as shown below:

ESP Flash Tool step 3

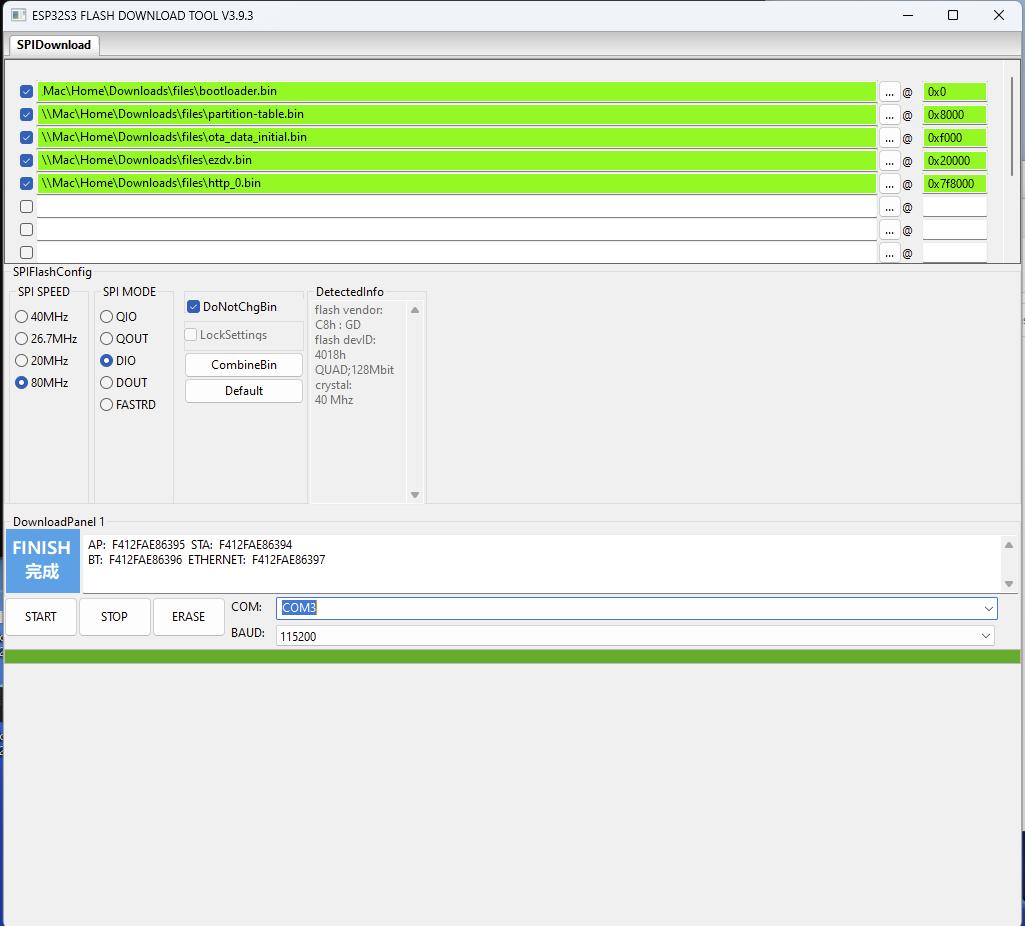
  1. Add rows for each of the .bin files in the resulting screen:
File NameOffset
bootloader.bin0x0
partition-table.bin0x8000
ota_data_initial.bin0xF000
ezdv.bin0x20000
http_0.bin0x7F8000

Additionally, check each of the checkboxes to the left of the file name. It should look something like this, with each of the rows having a green background:

ESP Flash Tool step 4

  1. Set "SPI SPEED" to "80 MHz" and "SPI MODE" to "DIO".

  2. Plug ezDV into your computer using a USB-C cable and turn it on by holding down the Mode button for a few seconds. Device Manager should show a new COM port named "USB/JTAG serial debug unit" or similar. Enter this COM port into the "COM" field in the application.

  3. (Optional) Push the ERASE button. This will show a green "SYNC" indicator for a bit followed by "Download" and then "FINISH" as per the above screenshot. Note: There will be no firmware installed on the board once this step finishes. You will need to reconfigure ezDV after new firmware has been flashed.

  4. Push the START button. This will go through the same indicators as step 1 but this time will also have a progress bar indicating how far it's gotten in flashing the new software.

  5. Push the STOP button and then close the application. Open the ezDV enclosure and briefly push/release the "Reset" button on the right hand side of the board. If everything went well, you'll see the four LEDs light up for a few seconds indicating that ezDV is booting normally.

Using esptool

You can also use esptool. For example:

text
esptool esp32s3 -p /dev/cu.usbmodem14101 -b 460800 --before=default_reset --after=hard_reset write_flash --flash_mode dio --flash_freq 80m --flash_size detect 0x0 bootloader.bin 0x20000 ezdv.bin 0x8000 partition_table/partition-table.bin 0xf000 ota_data_initial.bin 0x7f8000 http_0.bin

Recovering from a bad flash

If the flash process fails (or you are flashing for the first time), you can manually place ezDV into flash mode by holding down the "GPIO0/Flash" button while pushing the "Reset" button on the board. Hold "GPIO0/Flash" for a second or so after releasing Reset, then release. You can then use ESP-IDF, the ESP Flash Tool or esptool to flash ezDV with working firmware.

Contributing to ezDV

Pleae read the Theory of Operation document for more information about the general hardware and software architecture, along with information about how to contribute changes to ezDV.

License

This project is subject to the terms of the TAPR Open Hardware License v1.0 (schematics, other hardware documentation) and GNU General Public License v3.0 (firmware).

Parts

130
QtyValueFootprintReferences
13TPD1E10B06DPYRezDV_production:DIO_TPD1E05U06DPYRD8, D9, D10, D11, D12, D13, D14, D17, D18, D19, D20, D21, D22
80.1uFCapacitor_SMD:C_0402_1005MetricC6, C7, C13, C14, C20, C23, C27, C30
810uFCapacitor_SMD:C_0402_1005MetricC3, C8, C9, C10, C11, C21, C26, C29
710KResistor_SMD:R_0402_1005MetricR5, R11, R18, R21, R22, R24, R35
62.7KResistor_SMD:R_0603_1608MetricR1, R23, R28, R30, R31, R34
4100KResistor_SMD:R_0402_1005MetricR7, R17, R38, R39
427Resistor_SMD:R_0402_1005MetricR13, R14, R15, R16
450Resistor_SMD:R_0603_1608MetricR26, R29, R32, R33
4MBT3904DW1T1Package_TO_SOT_SMD:SOT-363_SC-70-6Q3, Q4, Q5, Q6
4MountingHole_PadMountingHole:MountingHole_3.2mm_M3_PadH1, H2, H3, H4
20.47uF 16VCapacitor_SMD:C_0402_1005MetricC15, C18
2100Resistor_SMD:R_0402_1005MetricR36, R37
21KResistor_SMD:R_0402_1005MetricR6, R8
21uFCapacitor_SMD:C_0402_1005MetricC12, C19
21uF 50VCapacitor_SMD:C_0805_2012MetricC4, C5
233pF 50VCapacitor_SMD:C_0402_1005MetricC1, C22
24.7KResistor_SMD:R_0603_1608MetricR19, R20
247nF 50VCapacitor_SMD:C_0402_1005MetricC24, C25
247uFCapacitor_SMD:C_0603_1608MetricC16, C17
2AO3401APackage_TO_SOT_SMD:SOT-23Q1, Q2
2SDNT2012X103F3950FTFResistor_SMD:R_0805_2012MetricTH1, TH2
2TPD1E05U06DPYRezDV_production:DIO_TPD1E05U06DPYRD15, D16
1 B5819W SLDiode_SMD:D_SOD-123D23
110Resistor_SMD:R_0402_1005MetricR12
1100nF 50VCapacitor_SMD:C_0402_1005MetricC2
11300Resistor_SMD:R_0402_1005MetricR3
12.2KResistor_SMD:R_0402_1005MetricR10
12.7KResistor_SMD:R_0402_1005MetricR4
14.7KResistor_SMD:R_0402_1005MetricR9
14.87KResistor_SMD:R_0805_2012MetricR27
15.1KResistor_SMD:R_0402_1005MetricR2
18.2nFCapacitor_SMD:C_0402_1005MetricC28
180.6KResistor_SMD:R_0603_1608MetricR25
1BatteryConnector_PinSocket_2.54mm:PinSocket_1x02_P2.54mm_VerticalBT1
1ESD122DMXRezDV_production:IC_ESD122DMXRU6
1ESP32-S3-WROOM-1-N16R8ezDV_production:XCVR_ESP32S3WROOM1N8R8U5
1ESP32S3 Boot MethodButton_Switch_SMD:SW_SPST_TL3342SW2
1ESP32S3 ResetButton_Switch_SMD:SW_SPST_TL3342SW1
1ESP32_UART0Connector_PinHeader_2.54mm:PinHeader_1x03_P2.54mm_VerticalJ6
1GreenDiode_SMD:D_0603_1608MetricD1
1I2C BreakoutConnector_PinHeader_2.54mm:PinHeader_1x04_P2.54mm_VerticalJ4
1MAX17048G+T10ezDV_production:SON50P200X200X80-9NU2
1MCU PowerConnector_PinHeader_2.54mm:PinHeader_1x04_P2.54mm_VerticalJ7
1Mode_ButtonButton_Switch_SMD:SW_SPST_TL3305CSW4
1NCP167BFCT330T2GezDV_production:BGA4N35P2X2_64X64X33NU3
1NET_LEDDiode_SMD:D_0603_1608MetricD6
1OVL_LEDDiode_SMD:D_0603_1608MetricD5
1PTT BreakoutConnector_PinHeader_2.54mm:PinHeader_1x02_P2.54mm_VerticalJ5
1PTT_ButtonButton_Switch_SMD:SW_SPST_TL3305CSW3
1PTT_LEDDiode_SMD:D_0603_1608MetricD7
1Radio AudioConnector_PinHeader_2.54mm:PinHeader_1x04_P2.54mm_VerticalJ10
1Radio_JackezDV_production:CUI_SJ-43514J2
1RedDiode_SMD:D_0603_1608MetricD2
1SS34Diode_SMD:D_SMAD3
1SYNC_LEDDiode_SMD:D_0603_1608MetricD4
1TLV320AIC3254IRHBRezDV_production:IC_ADS125H01IRHBTU4
1TP4056ezDV_production:SOP127P600X175-9NU1
1TPS259533Package_SON:WSON-8-1EP_2x2mm_P0.5mm_EP0.9x1.6mm_ThermalViasU8
1TYPE-C-31-M-04ezDV_production:HRO_TYPE-C-31-M-04J1
1ULP SerialConnector_PinHeader_2.54mm:PinHeader_2x02_P2.54mm_VerticalJ8
1User AudioConnector_PinSocket_2.54mm:PinSocket_1x03_P2.54mm_VerticalJ9
1User_JackezDV_production:CUI_SJ-43514J3
1Vol_Down_ButtonButton_Switch_SMD:SW_SPST_TL3305CSW6
1Vol_Up_ButtonButton_Switch_SMD:SW_SPST_TL3305CSW5
1WUSB3801ezDV_production:QFN1616-12LU7

The 129 most common of 130 parts.

Questions

How big is the EzDV PCB?

It measures 64.8 × 69.9 mm and has 6 copper layers, 1.58 mm thick.

What parts does the EzDV use?

130 parts, built around the ESP32-S3-WROOM-1-N16R8, ESD122DMXR, MAX17048G+T10 and TP4056. The full list of its parts is on this page, with links to each part's symbol and footprint where PCBKit's library has them.

Where can I download the EzDV KiCad files?

From the tmiw/ezDV repository on GitHub, at the commit this page was made from: the board is schematic/v0.7/ezDV.kicad_pcb and its schematic schematic/v0.7/audio_codec.kicad_sch. PCBKit opens the board in the browser, with nothing to install.

Can I use the EzDV design in my own project?

Its repository states no licence, so its author keeps all rights: ask tmiw before reusing the design.

Similar boards

  • 4 layers120 × 75 mmSwitches, the printed circuit board in 3D

    Switches

    ZeniteSolar/MAM21

    Dados os requisitos e especificações apresentadas anteriormente, foi definido que a topologia utilizada será um conversor chopper, por não haver necessidade de elevação de tensão e por este permitir a variação da tensão…

    108 parts1GPL-3.0
  • 2 layers192.4 × 50 mmOmote, the printed circuit board in 3D

    Omote

    OMOTE-Community/OMOTE-Hardware

    Open Source Remote - Hardware

    187 parts157GPL-3.0
  • 4 layers42 × 85 mmDevice, the printed circuit board in 3D

    Device

    jayis1/hardware-design-lab

    Full-cycle hardware device designs — each device in its own subfolder with architecture, schematics, PCB layout, and software stack

    26 parts
  • 4 layersSmartCompass, the printed circuit board in 3D

    SmartCompass

    wildjames/smart_compass

    The product is going to be something similar to the compass in the Pirates of the Caribbean.

    78 parts
  • 4 layers31.8 × 15.3 mmTracker PCB, the printed circuit board in 3D

    Tracker PCB

    NicholasKorth/Slim-Sleep-Tracker

    A low-profile wrist wearable that measures motion, optical heart rate and SpO2 and streams them over Bluetooth LE to a PC visualizer.

    64 parts
  • 2 layers63.5 × 76.2 mmRemigochi pcb, the printed circuit board in 3D

    Remigochi pcb

    thetaspirit/remigochi-pcb

    For 18-500 capstone

    67 parts