

6 layers243.8 × 243.8 mm
Raven
agranlund/raven
Homemade MC68060 + DSP56303 Atari-compatible computer. Hardware, firmware, and software stack
331 parts87

An unofficial CD drive add-on for the NES.
Cdi is an open-source printed circuit board by ThroatyMumbo, from the ThroatyMumbo/NESCD repository on GitHub, published under the MIT licence. It is a 2-layer board of 140 × 170 mm with 28 parts on 76 nets, routed with 462 tracks and 36 vias.
It is built around the PCM5102APW. Its parts include 9 connectors, 8 capacitors and 1 resistor. It belongs with the retro computing and games boards of this library.
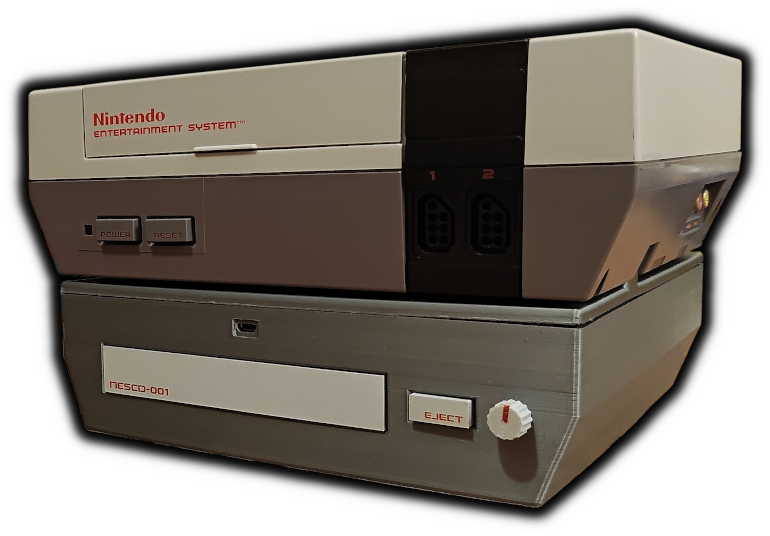
An unofficial homemade CD add-on for the NES, just because!
This repo contains the schematics, PCB, 3D printable STLs for the shell, sticker labels, and the firmware.
It's basically an RP2350B hooked up to both an Everdrive N8 Pro and an IDE CD drive. It reads the game ROM off the CD, uploads it to the Everdrive over USB and asks the menu to install it, then watches a mailbox byte in the cart's CHR RAM for the game to ask for music. The RP2350B is the coordinator in the middle that bridges the NES/Everdrive and the CD drive.
Project video: https://www.youtube.com/watch?v=6D8RWVwW4ZI
cd firmware && ./flash.shThe demo game needs cc65 (ca65/ld65), plus
python3 with numpy, ffmpeg for the audio, and xorriso to burn.
cd game && make         # demo.nes, four music tracks, and build/demo.img
cd game && make burn    # burn build/demo.img and read it back to check
To put your own game on a disc, pass mkgamedisc.py
an iNES ROM and one track per music byte:
python3 firmware/tools/mktrack.py theme.wav -o theme.rom --loop-start 4.2
python3 firmware/tools/mkgamedisc.py -o mygame.img --title "MY GAME" --nes mygame.nes --track 1=theme.rom --verify
firmware/burn.sh mygame.imgIf everything goes right, you should be able to just put a burned disc into the CD drive while the NES is on and sitting on the Everdrive menu. It'll auto-boot the game once it's read and uploaded to the Everdrive.
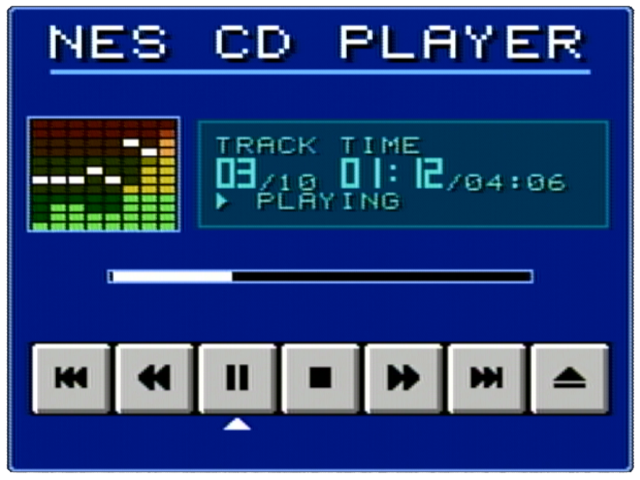
Arguably the most practical use for this thing: A CD player!
Insert the CD while on the Everdrive menu and it should automatically launch the player.
Great question! I came up with the idea for this project while reading about the canceled SNES CD-ROM add-on. I was originally going to make my own version of that add-on, but decided it'd be funnier and weirder if I took it a step further and made one for NES.
Because it's fun.
It's me! Your old pal - Throaty Mumbo!
I chose not to include any FMV-related code here because to get that working I had to semi-reverse engineer Something Nerdy's Bad Apple!! Ultimate NES Demake, which is currently closed source. The team has mentioned they're planning to formally open source their MXM mapper (which this demo presumably uses, actually not sure) once their game Former Dawn is released. I didn't feel good about publishing reverse engineered code from an indie development team for my stupid meme project, especially when they have plans to release it themselves.
I originally wanted to do this, but was hitting a ceiling on the Everdrive USB bandwidth. I'd likely have to add some form of aggressive compression to make room. It's also a nice touch to use the expansion port instead.
The USB cable poking out on the front is by far the biggest blemish on the design of this contraption, so I did look at moving everything to the expansion port. Unfortunately the bandwidth there is even more limited than the USB route.
Plus, the expansion port audio allows more flexibility with mixing and volume control - hence the volume knob on the front.
A single molex cable from a wall adapter (this one in particular). The 5V/12V rails are split between the CD drive and the board + the NES output. I took the end of a spare NES power cable and hooked it up to a buck converter that converts the 12V input to ~9.5V so you can power the NES as well (the plug pokes out of the top of the box). That way you only need one wall outlet to get the entire thing running. You can also power the NES separately from its regular adapter - the plug coming out of the NESCD is optional.
This was my initial plan, but it seemed tight considering the stock NES adapter (1.3A) has to power the NES, Everdrive, RP2350, DAC, and the CD drive. The power adapter for that Fideco drive sled I tested with initially outputs at 2A, so I figured a dedicated 2A molex adapter (which supposedly outputs 2A on 5V and 12V each, at least according to the label) would be the minimum. But honestly I didn't actually test running the CD drive and everything else off VRAW at the same time, so this was more of a cautious choice than based off of objective measurement. If it works it'd be a nice improvement for an eventual v2 design.
This is still something I'm trying to figure out. AFAIK there's no way to trigger a soft reset on the NES. However one guaranteed solution is to hook up the NES power output rail to a relay switch. That way if the board ever needs the NES to reset, it can just turn it on and off from the source. Not super elegant but it should work.
| Qty | Value | Footprint | References |
|---|---|---|---|
| 5 | 100n | Capacitor_THT:C_Disc_D5.0mm_W2.5mm_P5.00mm | C2, C3, C5, C6, C8 |
| 4 | M3 | MountingHole:MountingHole_3.2mm_M3_DIN965_Pad | H1, H2, H3, H4 |
| 1 | +12V | TestPoint:TestPoint_THTPad_D1.5mm_Drill0.7mm | TP3 |
| 1 | +3V3 | TestPoint:TestPoint_THTPad_D1.5mm_Drill0.7mm | TP2 |
| 1 | +5V | TestPoint:TestPoint_THTPad_D1.5mm_Drill0.7mm | TP1 |
| 1 | 100u/16V | Capacitor_THT:CP_Radial_D6.3mm_P2.50mm | C1 |
| 1 | 12V TO BUCK | TerminalBlock_Phoenix:TerminalBlock_Phoenix_MKDS-1,5-2-5.08_1x02_P5.08mm_Horizontal | J4 |
| 1 | 1k | Resistor_THT:R_Axial_DIN0207_L6.3mm_D2.5mm_P7.62mm_Horizontal | R1 |
| 1 | 22u/10V | Capacitor_THT:CP_Radial_D5.0mm_P2.50mm | C4 |
| 1 | 22u/16V | Capacitor_THT:CP_Radial_D5.0mm_P2.50mm | C7 |
| 1 | GND | TestPoint:TestPoint_THTPad_D1.5mm_Drill0.7mm | TP4 |
| 1 | IDE 40 | Connector_IDC:IDC-Header_2x20_P2.54mm_Vertical | J5 |
| 1 | MOLEX IN | Connector_TE-Connectivity:TE_MATE-N-LOK_350211-1_1x04_P5.08mm_Vertical | J1 |
| 1 | MOLEX TO DRIVE | Connector_TE-Connectivity:TE_MATE-N-LOK_350211-1_1x04_P5.08mm_Vertical | J2 |
| 1 | PANEL POT 10k | Connector_PinHeader_2.54mm:PinHeader_1x03_P2.54mm_Vertical | J8 |
| 1 | PCM5102A | cdi:PCM5102A_Board | A2 |
| 1 | PGA2350 | cdi:Pimoroni_PGA2350 | A1 |
| 1 | PWR SWITCH | TerminalBlock_Phoenix:TerminalBlock_Phoenix_MKDS-1,5-4-5.08_1x04_P5.08mm_Horizontal | J3 |
| 1 | SPARE GPIO | Connector_PinHeader_2.54mm:PinHeader_2x10_P2.54mm_Vertical | J9 |
| 1 | SWD+UART | Connector_PinHeader_2.54mm:PinHeader_1x05_P2.54mm_Vertical | J7 |
| 1 | USB TO EVERDRIVE | cdi:USB_Micro_DIP_1x05_P2.54mm | J6 |
It measures 140 × 170 mm and has 2 copper layers, 1.6 mm thick.
28 parts, built around the PCM5102APW. The full list of its parts is on this page, with links to each part's symbol and footprint where PCBKit's library has them.
From the ThroatyMumbo/NESCD repository on GitHub, at the commit this page was made from: the board is pcb/cdi.kicad_pcb and its schematic pcb/cdi.kicad_sch. PCBKit opens the board in the browser, with nothing to install.
Its repository publishes it under the MIT licence: you may reuse it on that licence's terms (keep the author's notice, and for a copyleft licence share your changes alike).
agranlund/raven
Homemade MC68060 + DSP56303 Atari-compatible computer. Hardware, firmware, and software stack


xiphonics/picoTracker-pcb
Buy the official kit at xiphonics store # Trademark Notice


martinroger/ipodesp32
An iPod emulator for 2006-2013 BMW Mini Coopers that need Bluetooth

iollama/Voice-Assistant-5
ESP32-S3 push-to-talk voice assistant using OpenAI Realtime API