4 layers87.5 × 129.5 mm

 syn-ack-zack/SkeletonKey
SkeletonKey is the firmware for the Hackers Teaching Hackers 2022 Goonies badge. It starts as a seven-part hardware CTF and, once unlocked, becomes a small ESP8266 infrared and Wi-Fi experimentation toolkit.
HTH SkeletonKey is an open-source printed circuit board by syn-ack-zack, from the syn-ack-zack/SkeletonKey repository on GitHub, published under the MIT licence. It is a 2-layer board of 57.4 × 148.8 mm with 48 parts on 43 nets, routed with 558 tracks and 88 vias.
It is built around the ESP-WROOM-02, AP2112K-3.3 and SK6812, with the NSR0320MW2 and BC817 among its other parts. Its parts include 10 switches, 6 diodes, 3 capacitors, 3 resistors and 3 ICs.


SkeletonKey is the firmware for the Hackers Teaching Hackers 2022 Goonies badge. It starts as a seven-part hardware CTF and, once unlocked, becomes a small ESP8266 infrared and Wi-Fi experimentation toolkit.
[!WARNING] The firmware can transmit 802.11 deauthentication frames and infrared power codes. Use those functions only on equipment and networks you own or have explicit permission to test.
The target configured in platformio.ini is an Espressif ESP-WROOM-02 with
2 MB of flash. The application uses:
| Function | Badge resource |
|---|---|
| IR transmit | GPIO 14 |
| IR receive | GPIO 5 |
| Eye/status LED | GPIO 12 |
| Trigger button | GPIO 13, active low |
| Capacitive/touch mode control | ADC / A0 |
| Front lighting | Eight SK6812 LEDs on GPIO 4 |
| Persistent challenge state | LittleFS (state.txt and flags.txt) |
| Learned IR signal | EEPROM |
| Challenge web UI | HTTP on port 80 and WebSocket on port 81 |
KiCad sources and original SVG artwork are under hardware/.
At boot, the badge reads its progress from LittleFS:
8: locked challenge mode.8 or higher: unlocked toolkit mode.9: also enables the long-press deauth-all control in detector mode.Touching the capacitive mode control on A0 advances to the next mode and
wraps to the first mode at the end of the list. The physical trigger button on
GPIO 13 does not change modes; it performs the action assigned to the selected
mode.
The locked badge alternates between two modes:
SkeletonKey<number> as its SSID and
oneeyedwilly<number> as its password, with no separator before the
number.Seven distinct accepted flags advance persistent state to 8, unlock the
treasure page, and expose the full mode list. See
docs/challenge-walkthrough.md for the
intended solve path and the original challenge defects.
The rows below are in touch-selection order. After ESP8266 Deauther, the next touch returns to Bling.
| Mode | Capability | Trigger action |
|---|---|---|
| Bling | Eight FastLED animation patterns | Advance animation |
| IR web app / challenge room | Local AP, HTTP UI, WebSocket IR monitor and NEC transmitter | Start or stop AP |
| Universal remote | Learn common or raw IR signals and persist the last capture in EEPROM | Tap to replay; hold to learn |
| TV-B-Gone | Transmit the archived North American or European TV power-code set | Start; press again to stop early |
| Deauth detector | Hop Wi-Fi channels and count deauth/disassociation management frames | At state 9, long-press starts deauth-all |
| ESP8266 Deauther | Captive-portal interface derived from SpacehuhnTech's ESP8266 Deauther | Start or stop AP |
The short version is:
pio run -e esp_wroom_02
pio run -e esp_wroom_02 -t upload --upload-port <PORT>
pio run -e esp_wroom_02 -t uploadfs --upload-port <PORT>
pio device monitor --baud 115200 --port <PORT>
Both the firmware and the LittleFS image are required. The filesystem contains the challenge state, pages, deauther UI, SSTV audio, fonts, and artwork.
The USB-C connector powers the badge but does not provide onboard USB serial. The programming pads are not labelled on the badge:
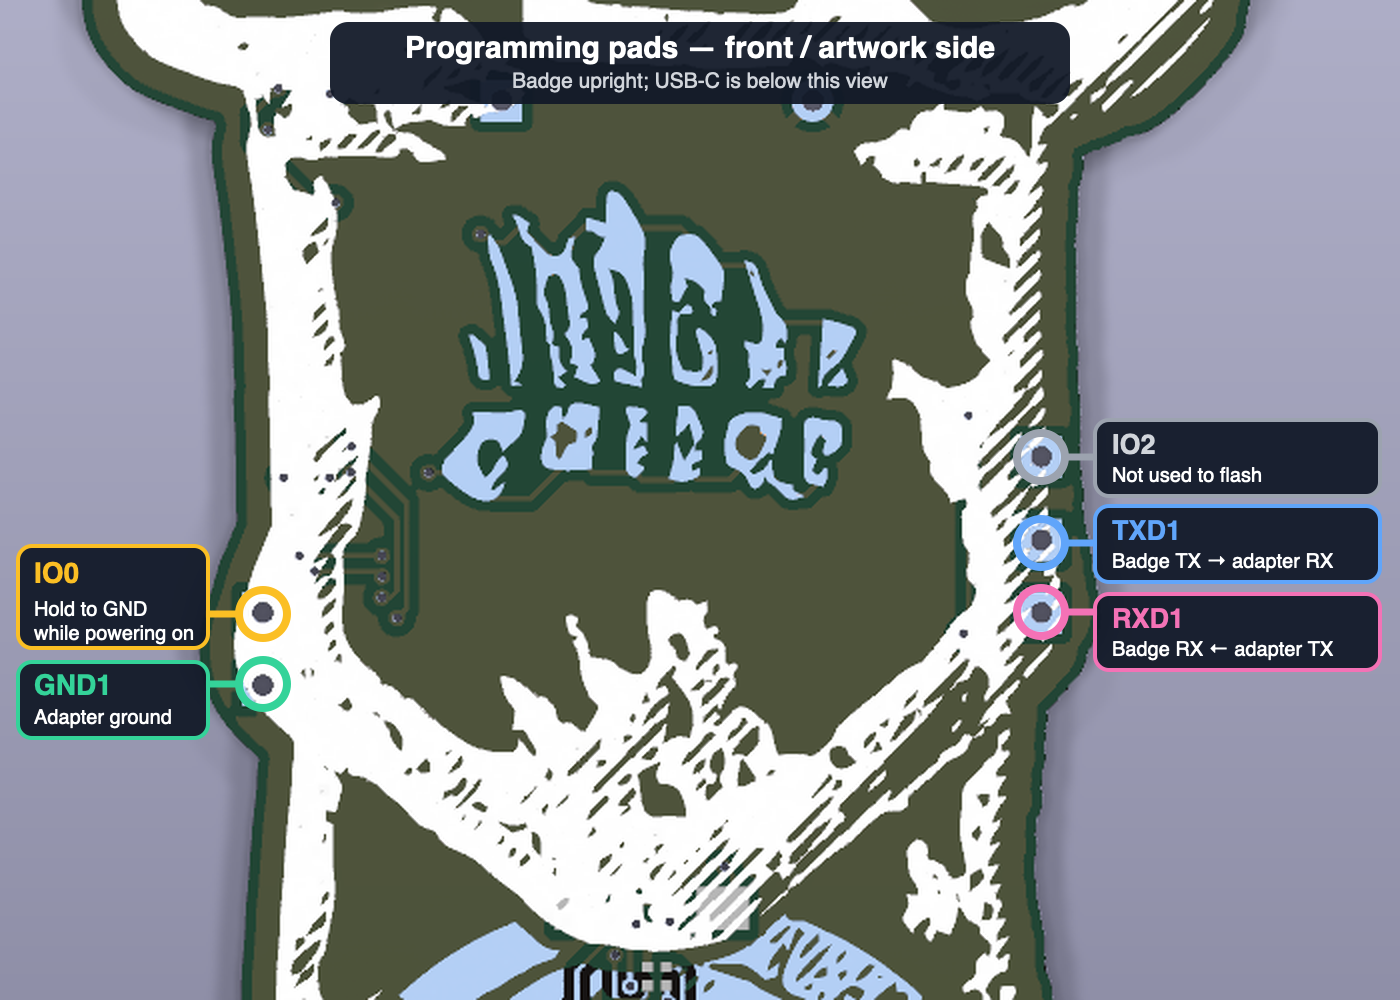
Use a 3.3 V USB-to-UART adapter: adapter TX to RXD1, adapter RX to
TXD1, and adapter ground to GND1. Hold IO0 to GND1 while powering
the badge on to enter the bootloader.
Read docs/flashing.md before flashing. The
Deauth Patch/ is discussed separately in
docs/deauth-patch.md and is not applied by the normal
PlatformIO build.
The intended route is to solve and submit all seven flags. For development or badge recovery there are two shortcuts:
64948196 decimal (0x03DF07E4) as a
32-bit NEC IR code at the receiver. It toggles the in-memory lock and does
not persist across reboot.data/state.txt to 8 and data/flags.txt to
1111111, then upload the LittleFS image. Use state 9 only if you
deliberately want the hidden deauth-all control enabled.data/ LittleFS content: challenge UI, state, audio and deauther web assets
Deauth Patch/ Historical ESP8266 NONOS SDK library sets; not applied automatically
docs/ Flashing, challenge and patch notes
hardware/ KiCad source and SVG artwork
src/SkeletonKey.ino Badge application and mode state machine
src/esp8266_deauther/ Vendored ESP8266 Deauther-derived implementation
platformio.ini ESP-WROOM-02 build configuration
password.jpg Original public CTF hintOriginal SkeletonKey project material is released under the MIT License; see
LICENSE. Vendored code, generated web assets, fonts, SDK binaries,
and event artwork retain their respective upstream terms and are not
relicensed by the top-level MIT License. See
THIRD_PARTY_NOTICES.md.
| Qty | Value | Footprint | References |
|---|---|---|---|
| 11 | , , , , , , , , , , | ||
| 8 | SK6812 | LED_SMD:LED_SK6812_EC15_1.5x1.5mm | S1, S2, S3, S4, S5, S6, S7, S8 |
| 5 | TESTPOINT | TestPoint:TestPoint_THTPad_2.0x2.0mm_Drill1.0mm | GND1, IO0, IO2, RXD1, TXD1 |
| 2 | NSR0320 | Diode_SMD:D_SOD-323F | D3, D6 |
| 2 | 10uF | Capacitor_SMD:C_0805_2012Metric | C1, C2 |
| 2 | 5.1K | Resistor_SMD:R_0402_1005Metric | R4, R5 |
| 2 | LED | LED_SMD:LED_miniPLCC_2315 | D4, D5 |
| 2 | LED | LED_THT:LED_D2.0mm_W4.8mm_H2.5mm_FlatTop | D1, D2 |
| 2 | TPB1,27 | TestPoint:TestPoint_Pad_D1.0mm | SWC1, SWC2 |
| 1 | 100 | Resistor_SMD:R_0603_1608Metric | R1 |
| 1 | 1uF | Capacitor_SMD:C_0805_2012Metric | C3 |
| 1 | AP2112K-3.3 | Package_SO:Diodes_SO-8EP | U5 |
| 1 | BC817 | Package_TO_SOT_SMD:SOT-23 | Q1 |
| 1 | Badgelife_sao_connector_v169bis | SkeletonKey:Badgelife-SAOv169-BADGE-2x3 | X3 |
| 1 | Battery | Battery:BatteryHolder_Keystone_2462_2xAA | BT1 |
| 1 | ESP-WROOM-02 | RF_Module:ESP-WROOM-02 | U1 |
| 1 | SW_DIP_x01 | Button_Switch_SMD:SW_DIP_SPSTx01_Slide_Omron_A6S-110x_W8.9mm_P2.54mm | SW1 |
| 1 | SW_Push | Button_Switch_SMD:SW_SPST_CK_RS282G05A3 | SW2 |
| 1 | TSOP531xx | Package_TO_SOT_SMD:LFPAK56 | U3 |
| 1 | USB TYPE C | Connector_USB:USB_C_Receptacle_HRO_TYPE-C-31-M-12 | X2 |
| 1 | Val** | SkeletonKey:HTH22-Badge-SepInkSAO-edgex | Ref** |
It measures 57.4 × 148.8 mm and has 2 copper layers, 1.6 mm thick.
48 parts, built around the ESP-WROOM-02, AP2112K-3.3, SK6812 and NSR0320MW2. The full list of its parts is on this page, with links to each part's symbol and footprint where PCBKit's library has them.
From the syn-ack-zack/SkeletonKey repository on GitHub, at the commit this page was made from: the board is hardware/kicad/HTH-SkeletonKey.kicad_pcb and its schematic hardware/kicad/HTH-SkeletonKey.kicad_sch. PCBKit opens the board in the browser, with nothing to install.
Its repository publishes it under the MIT licence: you may reuse it on that licence's terms (keep the author's notice, and for a copyleft licence share your changes alike).


Hugoyhu/corgikeychain
Corgi "keychain" LilyPad with ATSAMD21E18

Hugoyhu/Hack-Club-Sticker-Development-Boards
"Sticker" dev boards.

d4vid-le/qt-py-esp32-s2-experiment
A personal, non-production experiment: reconstruct the Adafruit QT Py ESP32-S2 (Product 5325, Rev C) in KiCad from the authoritative Eagle source, measuring how accurately an AI agent can do it — and documenting every…

gkuegler/undercabinet-lighting-ctrl
Click here to purchase one from the Adafruit shop

h7ga40/RP2040_Logicool_K275_PCB
Replace PCB of Logitech K275 keyboard with RP2040

michaelpmurphy14/AirQ-automation
using ESP32C3 chip to collect and analyze air quality data