2 layers19 × 76 mm
Sub
google/mozc-devices
Circuit diagrams and firmware source code for Gboard DIY keyboards
15 parts3kApache-2.0
 seankyer/LED-Goals1
Arduino Nano PCB Project
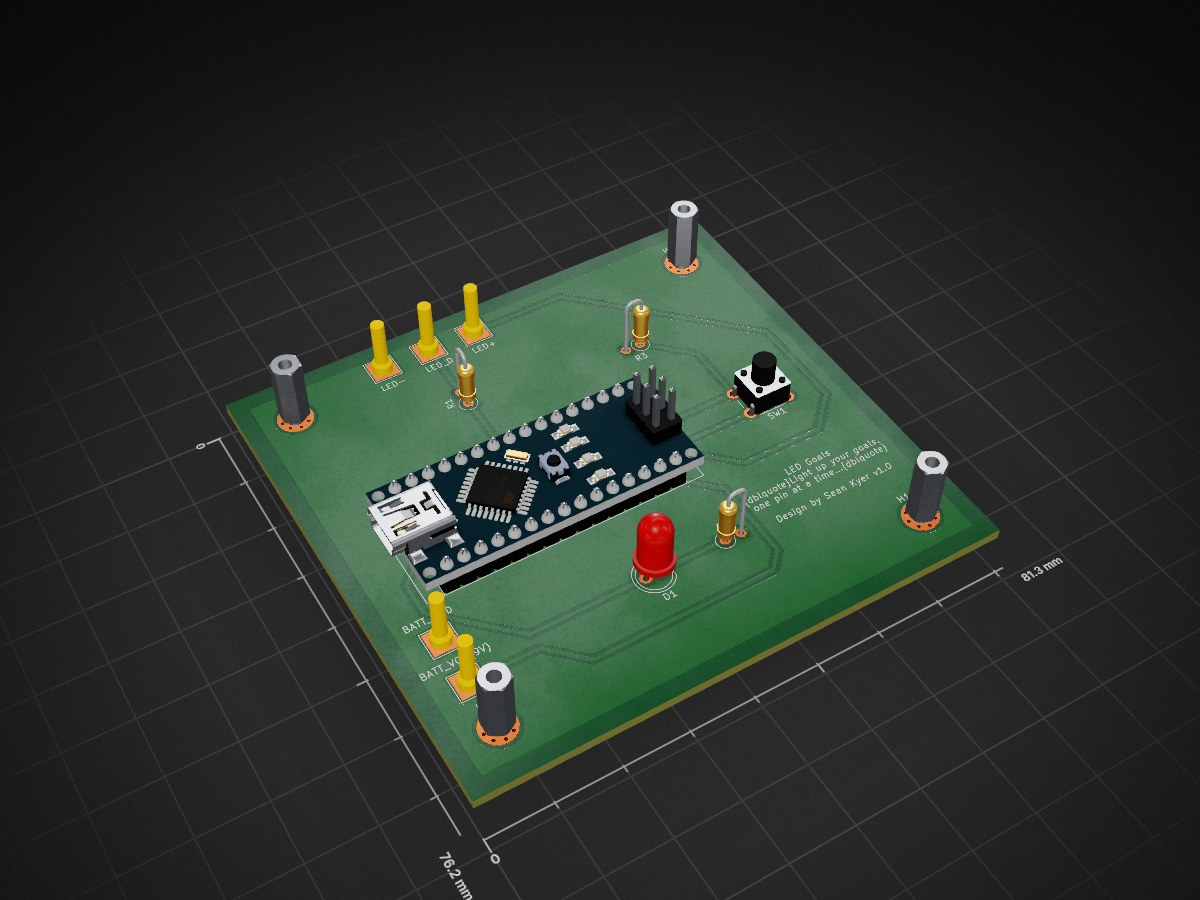
LED Goals is an open-source printed circuit board by seankyer, from the seankyer/LED-Goals repository on GitHub, published under the Apache-2.0 licence. It is a 2-layer board of 81.3 × 76.2 mm with 15 parts on 31 nets, routed with 45 tracks and 7 vias.
Its parts include 5 connectors, 3 resistors, 1 diode and 1 switch. It belongs with the AVR (ATmega, ATtiny) boards of this library.
LED-Goals is a personal project designed to help you track and visualize your long-term goals. It uses an LED strip to track the progress you make toward your goals over the course of a month.
I designed a custom PCB to connect the button, LED strip, and Arduino Nano together.
https://youtube.com/shorts/Iak79aCZ45Q?feature=share
The Arduino code controls the NeoPixel strip and button logic. It gradually fills the LED strip based on button presses or time, and resets when the goal is complete.
Once powered on, the LEDs will gradually light up over the course of a month. Pressing the push-button will manually light up an addtional LED. When all LEDs are lit, pressing the button again will reset the strip.
| Qty | Value | Footprint | References |
|---|---|---|---|
| 4 | MountingHole | MountingHole:MountingHole_2.7mm_Pad_Via | H1, H2, H3, H4 |
| 3 | R330 | Resistor_THT:R_Axial_DIN0207_L6.3mm_D2.5mm_P2.54mm_Vertical | R1, R2, R3 |
| 1 | Arduino_Nano_v3.x | Module:Arduino_Nano | A1 |
| 1 | GND(9V) | TestPoint:TestPoint_Pad_4.0x4.0mm | J1 |
| 1 | LED | LED_THT:LED_D5.0mm | D1 |
| 1 | LED+ | TestPoint:TestPoint_Pad_4.0x4.0mm | J3 |
| 1 | LED- | TestPoint:TestPoint_Pad_4.0x4.0mm | J5 |
| 1 | LED_D | TestPoint:TestPoint_Pad_4.0x4.0mm | J4 |
| 1 | SW_Push | Button_Switch_THT:SW_PUSH_6mm_H7.3mm | SW1 |
| 1 | VCC(9V) | TestPoint:TestPoint_Pad_4.0x4.0mm | J2 |
google/mozc-devices
Circuit diagrams and firmware source code for Gboard DIY keyboards

hoglet67/RGBtoHDMI
Bare-metal Raspberry Pi project that provides pixel-perfect sampling of Retro Computer RGB/YUV video and conversion to HDMI

mntmn/amiga2000-gfxcard
MNT VA2000, an Open Source Amiga 2/3/4000 Graphics Card (Zorro II/III), written in Verilog

hackclub/OnBoard
💡 Join 1,000 teenagers and make your first PCB with a $100 grant!

kenp-io/not-for-airpods-repairs
The content of this repository is licensed under the WTFPL License. Please have a close look at the terms before using this material.

Luos-io/luos_engine
Open-source and real-time orchestrator for cyber-physical-systems, to easily design, test and deploy embedded applications and digital twins.

Chrismettal/EleLab_v2
Cheap DIY lab system for hobbyists and the tinkering folk

It measures 81.3 × 76.2 mm and has 2 copper layers, 1.6 mm thick.
15 parts. The full list of its parts is on this page, with links to each part's symbol and footprint where PCBKit's library has them.
From the seankyer/LED-Goals repository on GitHub, at the commit this page was made from: the board is led-goals/led-goals.kicad_pcb and its schematic led-goals/led-goals.kicad_sch. PCBKit opens the board in the browser, with nothing to install.
Its repository publishes it under the Apache-2.0 licence: you may reuse it on that licence's terms (keep the author's notice, and for a copyleft licence share your changes alike).