2 layers116.8 × 30 mm
Type d
google/mozc-devices
Circuit diagrams and firmware source code for Gboard DIY keyboards
14 parts3kApache-2.0

 OpenPodcar/OpenPodcar50
Open source hardware design and software for OpenPodcar.
Podcar PCB is an open-source printed circuit board by OpenPodcar, from the OpenPodcar/OpenPodcar repository on GitHub, published under the GPL-2.0 licence. It is a 2-layer board of 271.1 × 132.2 mm with 14 parts on 55 nets, routed with 61 tracks and 0 vias.
Its parts include 6 ICs, 2 resistors and 2 connectors. It belongs with the AVR (ATmega, ATtiny) boards of this library.
Open Source Hardware Design and Software for OpenPodcar.
I. General Info
III. Software Setup
IV. Hardware Setup
V. User Guide
VI. General Testing
VII. 3D Gazebo Simulation
VIII. Troubleshooting Guide
XI. Licence
The OpenPodcar is an affordable and open source hardware and software platform for self-driving car research. It can be used for general autonomous vehicle research as well as for human-robot interaction (HRI) studies and practical automated transportation of people and goods.
The project includes:
To build the physical OpenPodcar, first obtain the components detailed in Bill of Materials, then follow the steps of the build process detailed in Software Setup, Hardware Setup, General Testing and User Guide. The 3D simulation can be directly installed in 3D Gazebo Simulation.
Obtain the following components, which are available from many commercial suppliers and some weblinks are suggested.
The OpenPodcar software stack requires a laptop working under Ubuntu 16.04 and with ROS Kinetic and Gazebo 7 installed:
NB: Pololu JRK Configuration Utility tool is a Windows app, which does not work on linux.
LIBRARIES folderphysicalVehicleNonRos/Arduino/ThrottleControlSerial.inoThrottleControlSerial.ino file in Arduino IDEDownload Pololu's Windows Configuration Tool Pololu JRK Configuration Utility on a Windows computer by following these steps here.
To configure the Pololu, please follow the instructions here.
For OpenPodCar, the steps below are followed:
Connect the Pololu USB cable to the Windows computer and open Pololu Jrk Configuration Utility tool
Go to "Input" tab:
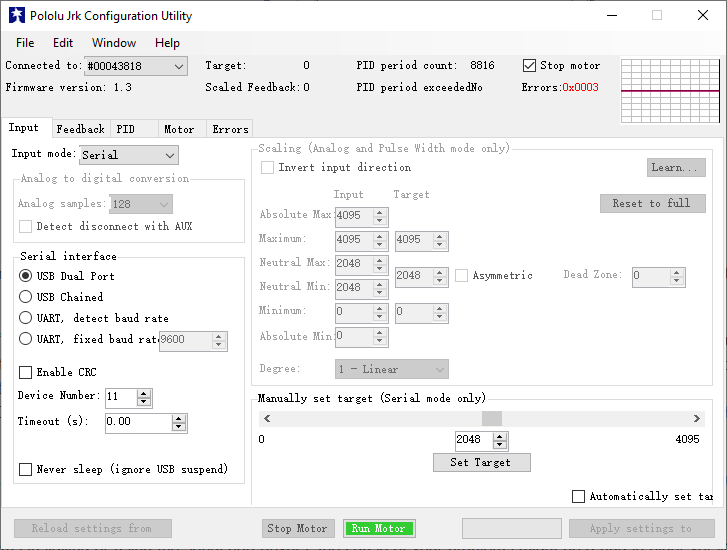
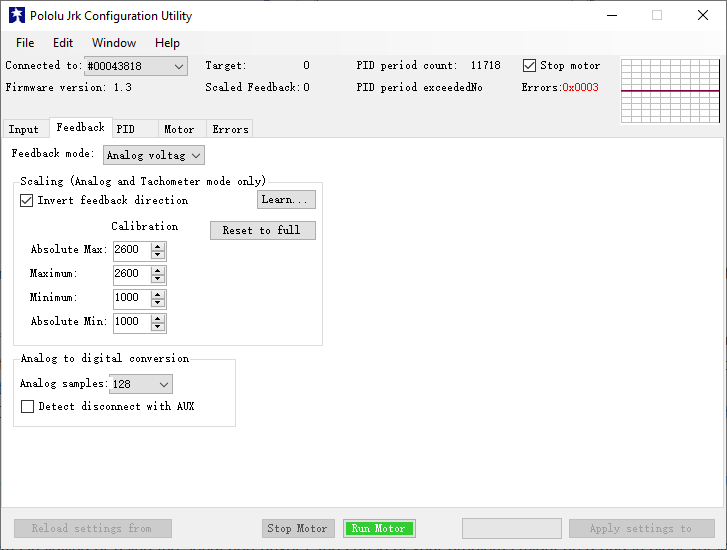
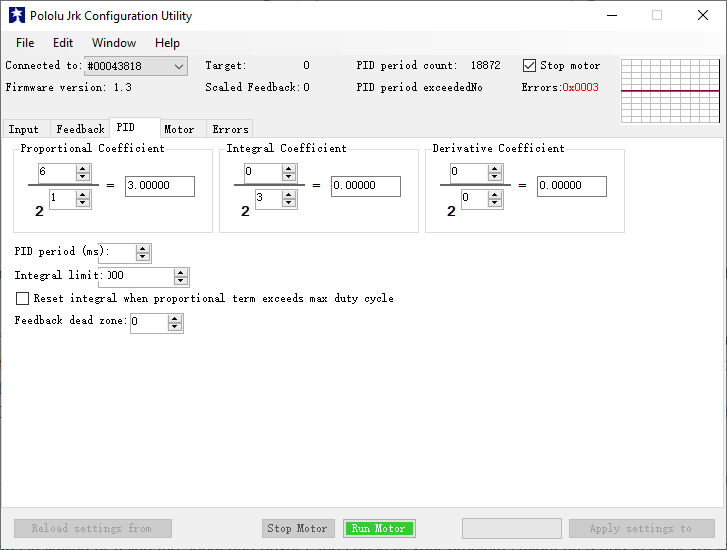
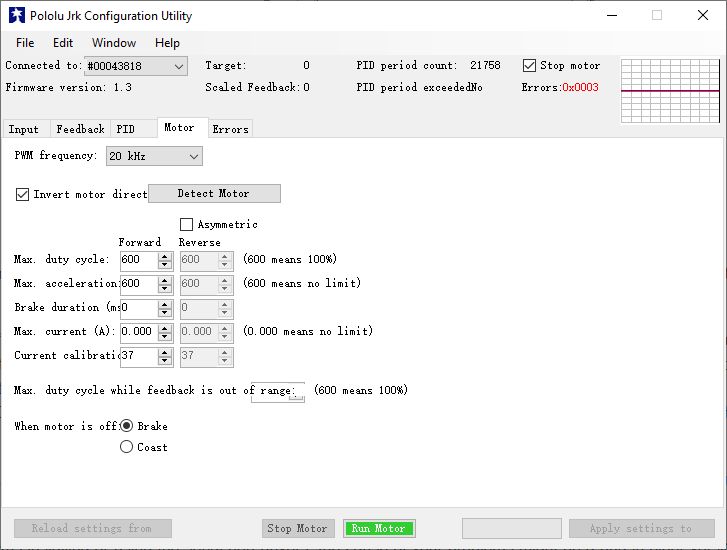
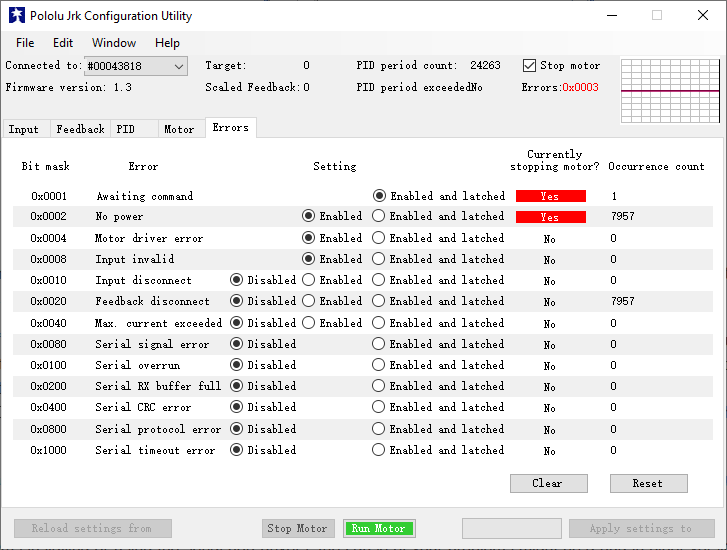
Here, the goal is to create persistent USB serial device names (aka Simlink) for the Arduino and the Pololu.
sudo nano /etc/udev/rules.d/99-tty.rulessudo lsusb -v | grep 'idVendor\|idProduct\|iSerial'99-tty.rules file:#Arduino com-port rules
SUBSYSTEM=="tty", ATTRS{idVendor}=="2341", ATTRS{idProduct}=="0043", SYMLINK+="ttyArduino", GROUP="dialout", MODE="0666"
#Pololu com-port rules -- NB the pololu has two virtual serial ports on a single USB interface.
SUBSYSTEM=="tty", ATTRS{idVendor} =="1ffb", ENV{ID_USB_INTERFACE_NUM}=="00" SYMLINK+="ttyPololuCOM"
SUBSYSTEM=="tty", ATTRS{idVendor} =="1ffb", ENV{ID_USB_INTERFACE_NUM}=="02" SYMLINK+="ttyPololuTTL"99-tty.rules filesudo rebootls -l /dev/ttyArduino or ls -l /dev/ttyPololuCOMThe lidar needs to be set up over Ethernet. The laptop must be on a wired network, not wifi. The IPs must be configured as in the velodyne, the default lidar IP is 192.168.1.201.
Follow the Velodyne installation instructions for ROS from here.
Before mounting the linear actuator under the vehicle, first acceptance test it with the Pololu to check that it is functional.
This section shows how to test the linear actuactor before mounting it.
To access the underside of the vehicle, this requires the help of at least three people.
Material: 2 axle stands, 2 jacks
Bring in two axle stands and set them as high as about 75cm each
Place the two axle stands about one meter away from the front and back wheels, both on the same side of the vehicle, as shown in red in the picture below.
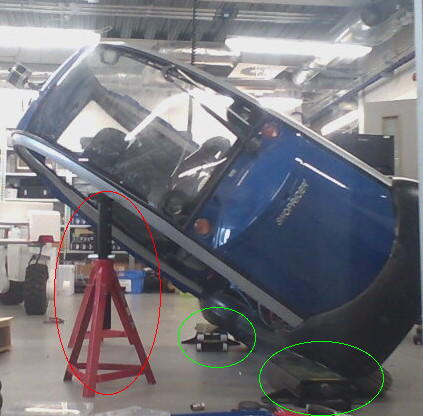
Place two jacks right next to the front and back wheels, on the same side as the axle stands as shown in green in the above picture
One person should stand next to each axle stand
Another person should stand on the other side of the vehicle and push the vehicle from the top towards the people next to the axle stands
The persons next to the axle stands should adjust the positions of the stands in order to get the vehicle nicely tilted without any instability
The vehicle should now be tilted on one side and its underside clearly visible in order to mount the linear actuactor
- MOUNTING THE LINEAR REQUIRES DRILLING THROUGH STEEL USING A SUITABLE POWERFUL DRILL AND QUALIFIED OPERATOR.
- THERE IS POTENTIAL FOR INJURY TO UNQUALIFIED OPERATORS. THIS IS THE ONLY BUILD STEP WHICH REQUIRES A QUALIFIED OPERATOR.
Material: Gimson linear actuator, a drill capable of drilling steel, 2 M6 HEX head bolts, 2 HEX nuts, 2 cap hex nuts and a few flat washers with 8mm diameter
The linear actuator must have a medium length obtained via the Pololu command "1900", cf. the Acceptance Testing detailed above.
There is an existing hole in the triangular part of chassis next to the right front wheel axle, shown in the figure below in the green circle. Fix the front hole of the linear actuator to this using an M6 bolt, nut, several washers and a cap nut
Drill a new M6 hole on the left side of the front chassis at the location shown by the red circle in the photo below.
Fix the back of the linear actuactor to the newly drilled hole using an M6 bolt and nuts, via washers
The final mounting is shown in the photo below.
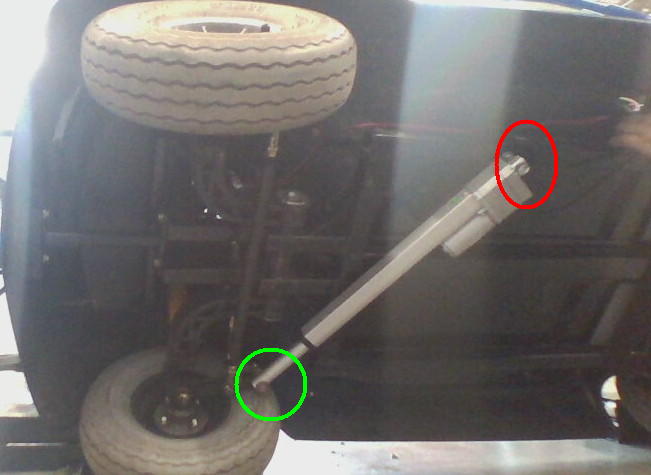
Once the mounting is finished, bring the podcar back to its normal position (requires again at least 3 people).
Remove the axle stands and jacks before making the integration test of the linear actuactor.
This final test will helps to verify that the linear actuactor is well mounted and can steer the wheels as expected:
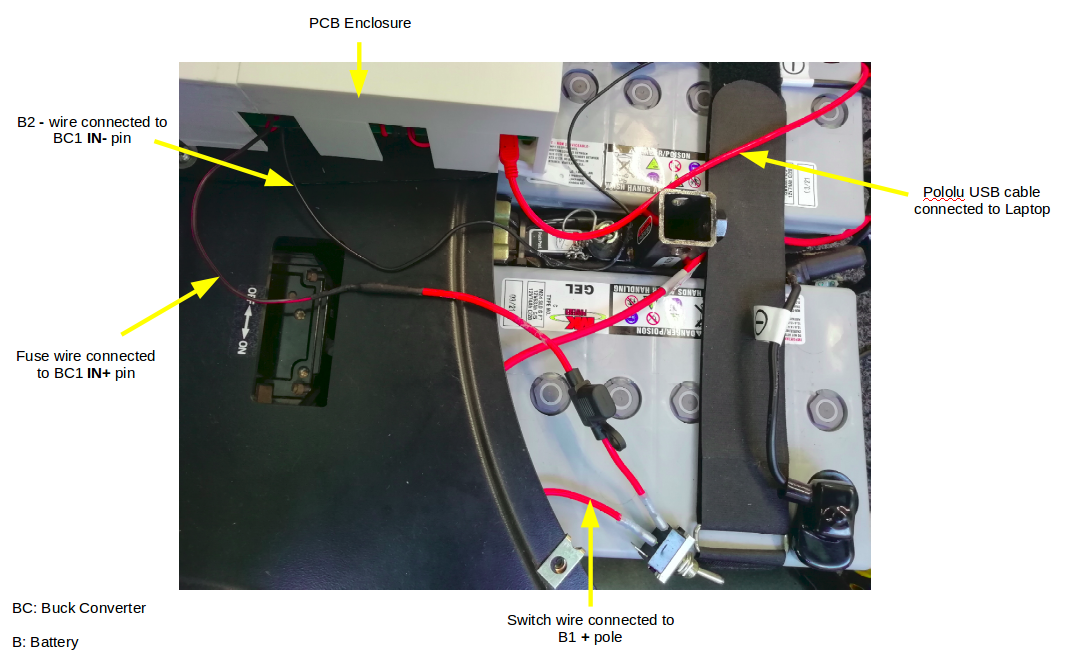
Material: inline car fuse, fuse 7.5Amp, ON/OFF switch, x2 12V batteries (the ones already part of the vehicle, under the seatback), some wires (use ~4mm diameter for fuse, switch and batteries, ~2mm diameter for the buck converters)
Switch off the vehicle batteries completely, switch is under the vehicle seatback
Fix a wire using a crimp bullet terminal onto each pin of the switch
Get access to the right battery's "+" pole and use a plier to unscrew the bolt and flat washer as shown below.
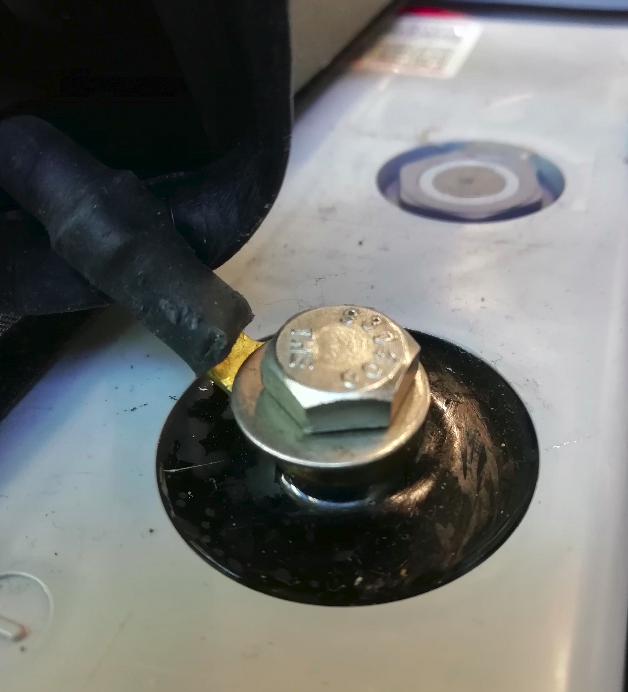
Strip the wire on the "+" pin of the switch by 3cm and connect it to the "+" of the right battery by tangling it around the battery "+" pole
Screw back the bolt and flat washer that were removed from the battery "+" pole
Insert the 7.5Amp fuse inside the inline car fuse
Connect the inline car fuse "-" wire to the switch "-" pin
Extend the inline fuse "+" wire by 30cm such as soldering another wire to it, then keep it safely for later connection with the buck converter "+" on the PCB board
Get access to the left battery's "-" pole's wire, strip a small area in the middle and plug a new and long wire (~50cm) there, then keep this new wire safely for later connection with the buck converter "-" on the PCB board as shown below.
Material: 3D lidar, tripod, a drill, 3 cable ties
Place the tripod on the vehicle's roof as shown in the photo below and use a marker to mark the positions of its three feet.
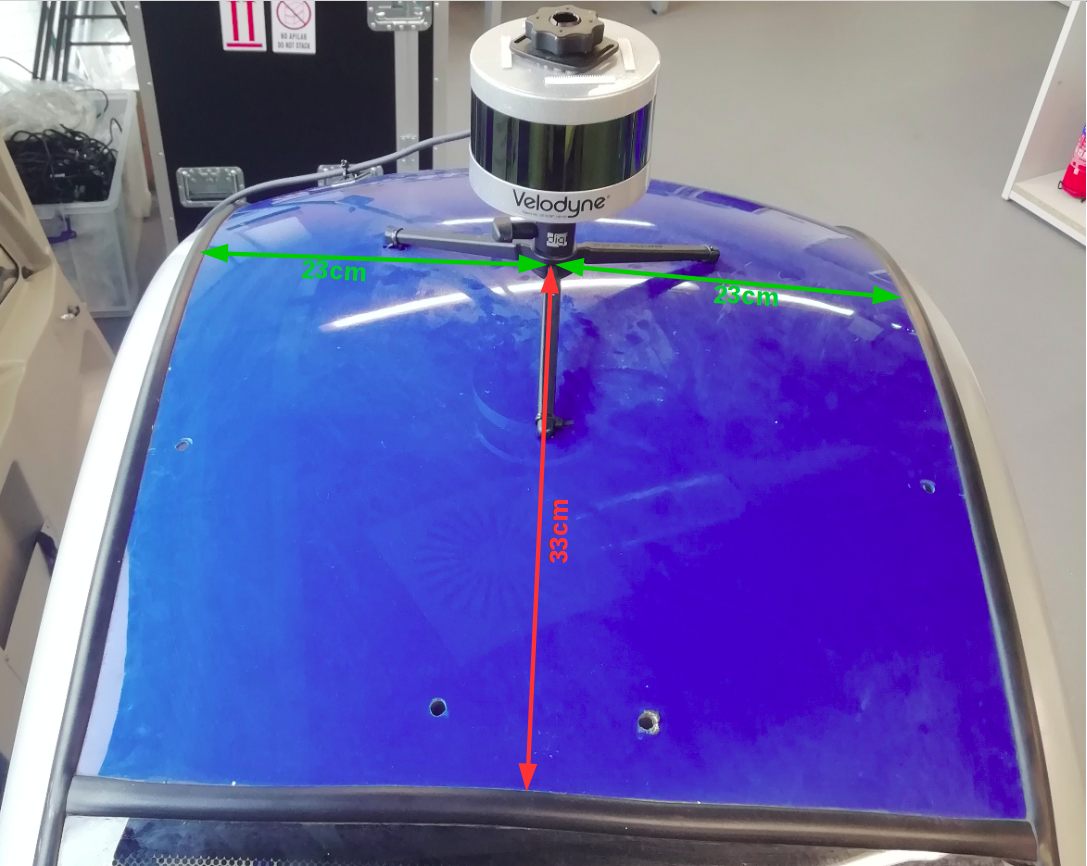
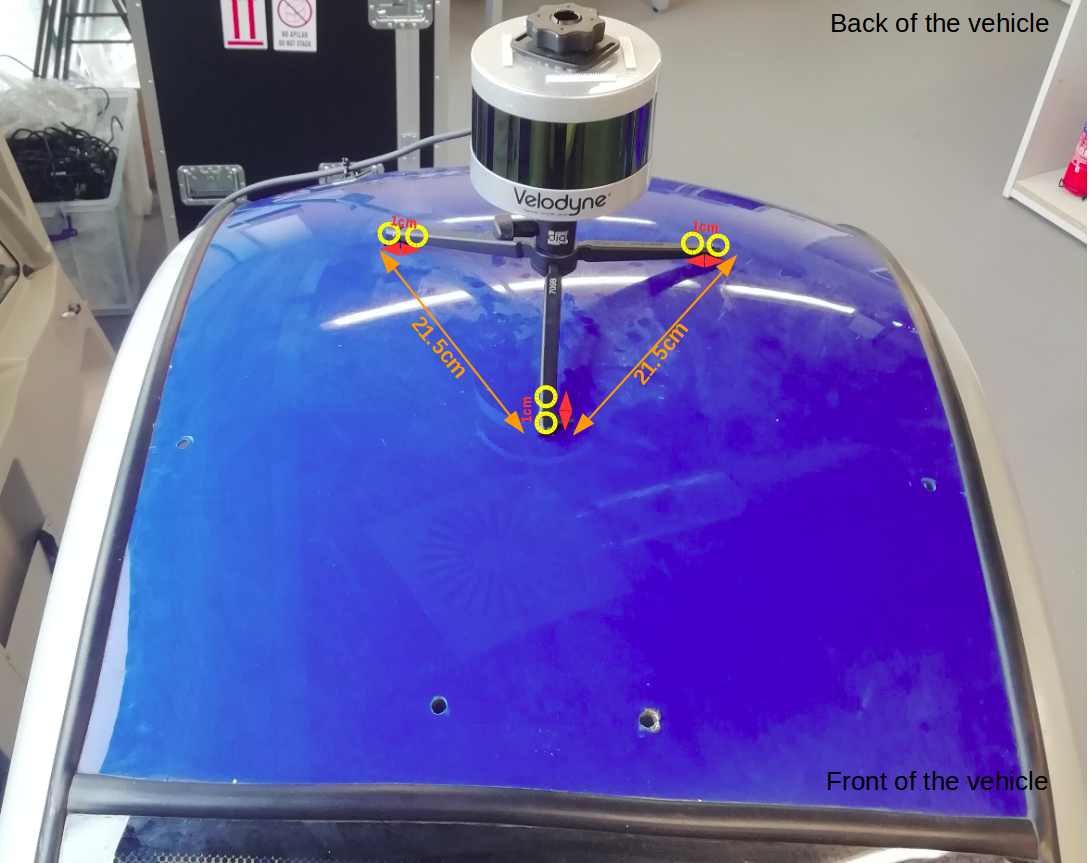
Remove the tripod from the roof
Drill two holes, ~0.6mm diameter each and their centers separated by about 1cm, on either side of each marked position as shown in the photo below.
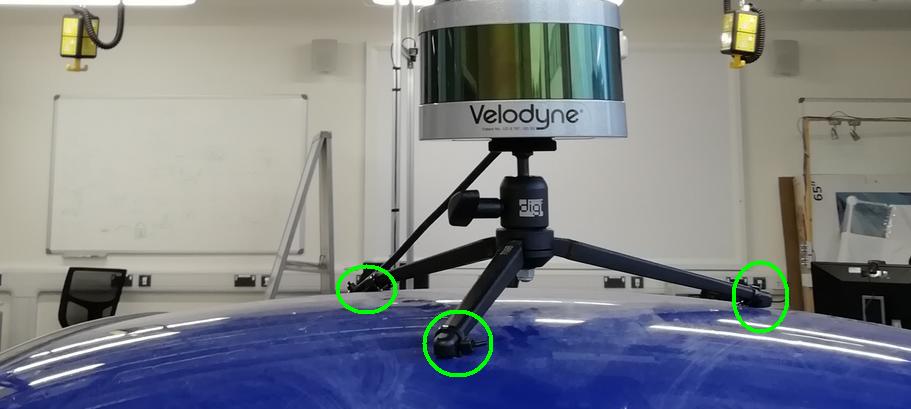
Screw the lidar onto the tripod
Place the tripod back on the roof
Use the cable ties, each passed through one pair of drilled holes and around a tripod foot, to secure the tripod to the roof as shown in the photo below. (may require the intervention of two people)
Here, the buck converters' voltage and current will set to the desired values and then tested.
The following items need to be 3D printed, the files are located under physicalVehicleNonRos/3D_parts:
LCD_support.stlVLP16_support.stlPCB_enclosure/Manufacture the PCB board by sending the gerber zip files physicalVehicleNonRos/PCB/gerber.zip to an online PCB manufacturer such as (https://www.pcbway.com). They will then post the bare board to you, usually in a few days. At this stage there are no components on it, you will solder them on later in these instructions. NB: You may wish to order several copies of the PCB in case of manufacturing errors or if you break one or more of them.
Material: power supply, multimeter, some wires (~2mm diameter)
Connect wires between the power supply and buck converter 1's "IN+" and "IN-"
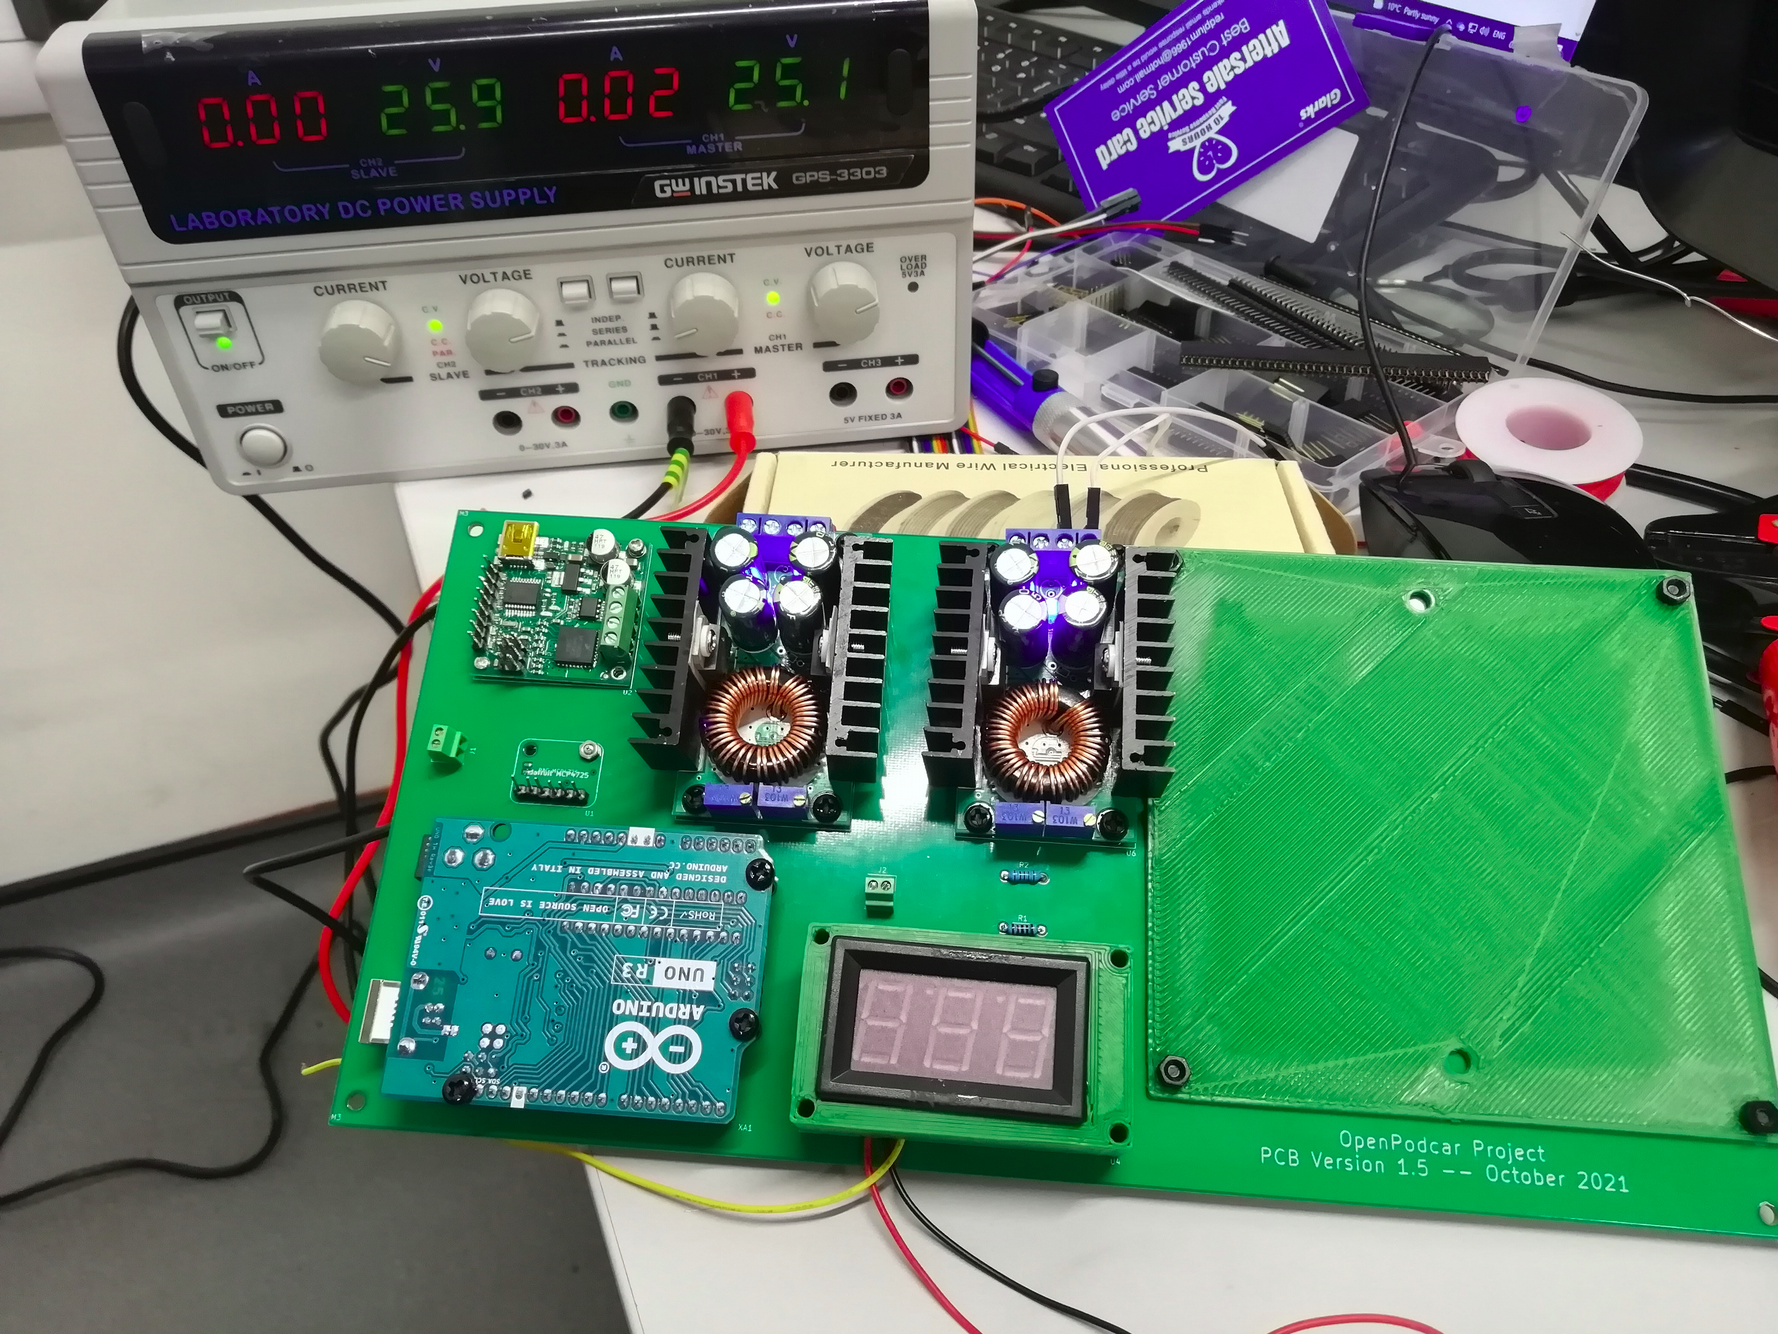
Measure the voltage across the PCB components, check the safety of the board and ensure that the components (especially Arduino, buck converters and DAC) work as expected, as shown in the figure below.
This step explains how to integrate a DMH and a relay in order to control the vehicle ignition system. The addition of the Relay and the DMH Switch are essential for safe operation, especially where new unproven autonomous control systems are in development. A two stage approach is used to reduce this risk. Refer to the schematic diagram DMH section in conjunction with this description.
Material: 1 deadman push button, 1 relay, some wires (~2mm diameter), 3-meter rubber cable, female and male insulated electric connector crimp bullet terminals, plier, flathead screwdriver
For the relay:
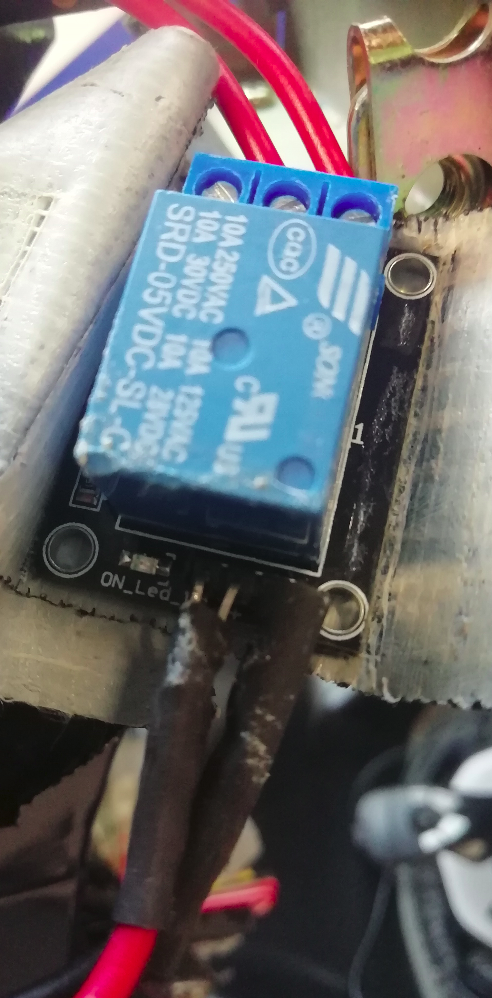
Connect a 2-meter wire to the relay's "-" pin
Connect a 2-meter wire to both the relay pins "S" and "+"
The relay wires should be as shown in the photo below
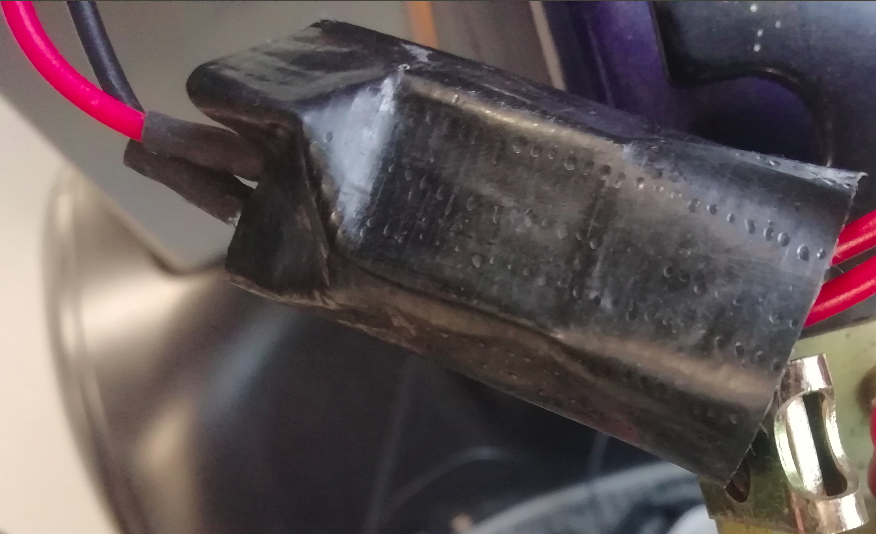
Use electrical insulating tape to wrap the relay with as shown below.
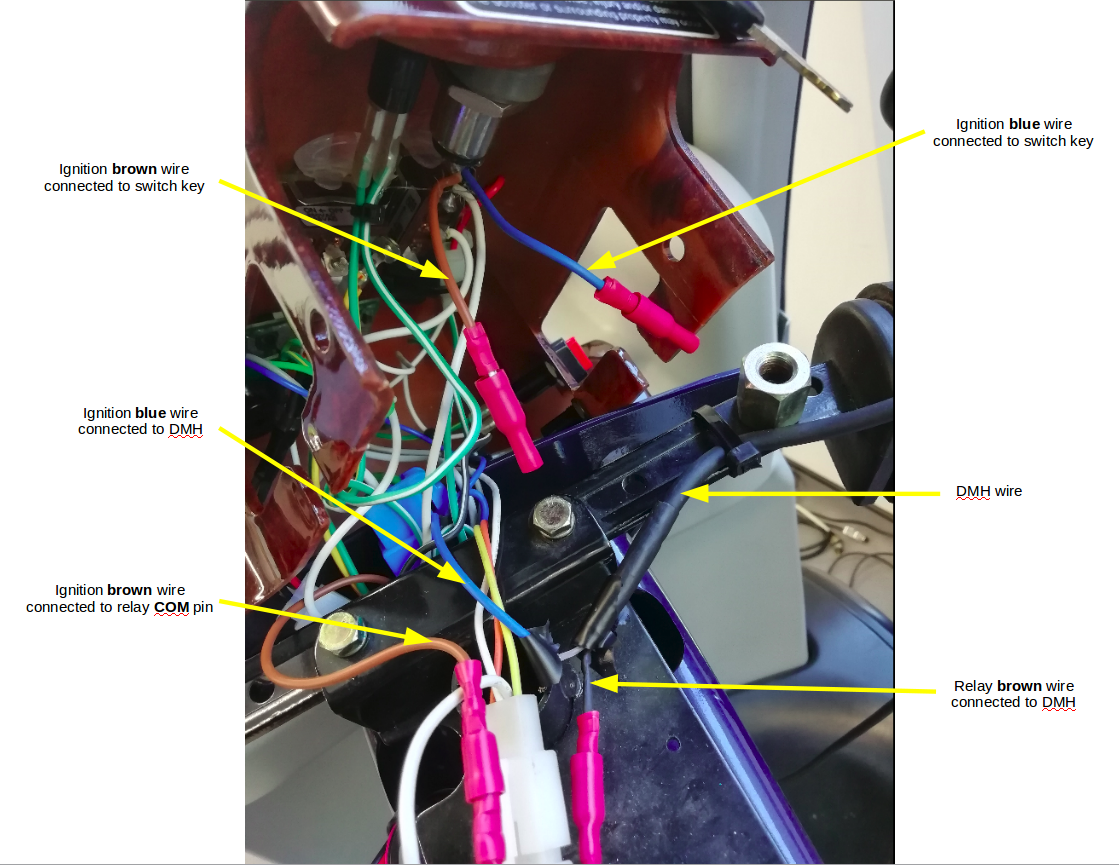
Use a plier to cut the two wires brown and blue connected to the vehicle ignition key
Attach a female insulated electric connector crimp bullet terminal to the blue wire directly connected to the ignition key for safety reasons
Attach a female insulated electric connector crimp bullet terminal to the brown wire directly connected to the ignition key for safety reasons
Connect the relay's "COM" pin to the ignition brown wire coming from the vehicle steering column using a female insulated electric connector crimp bullet terminal
Connect the relay's "NO" pin to the ignition blue wire coming from the vehicle steering column using a female insulated electric connector crimp bullet terminal
For the DMH:
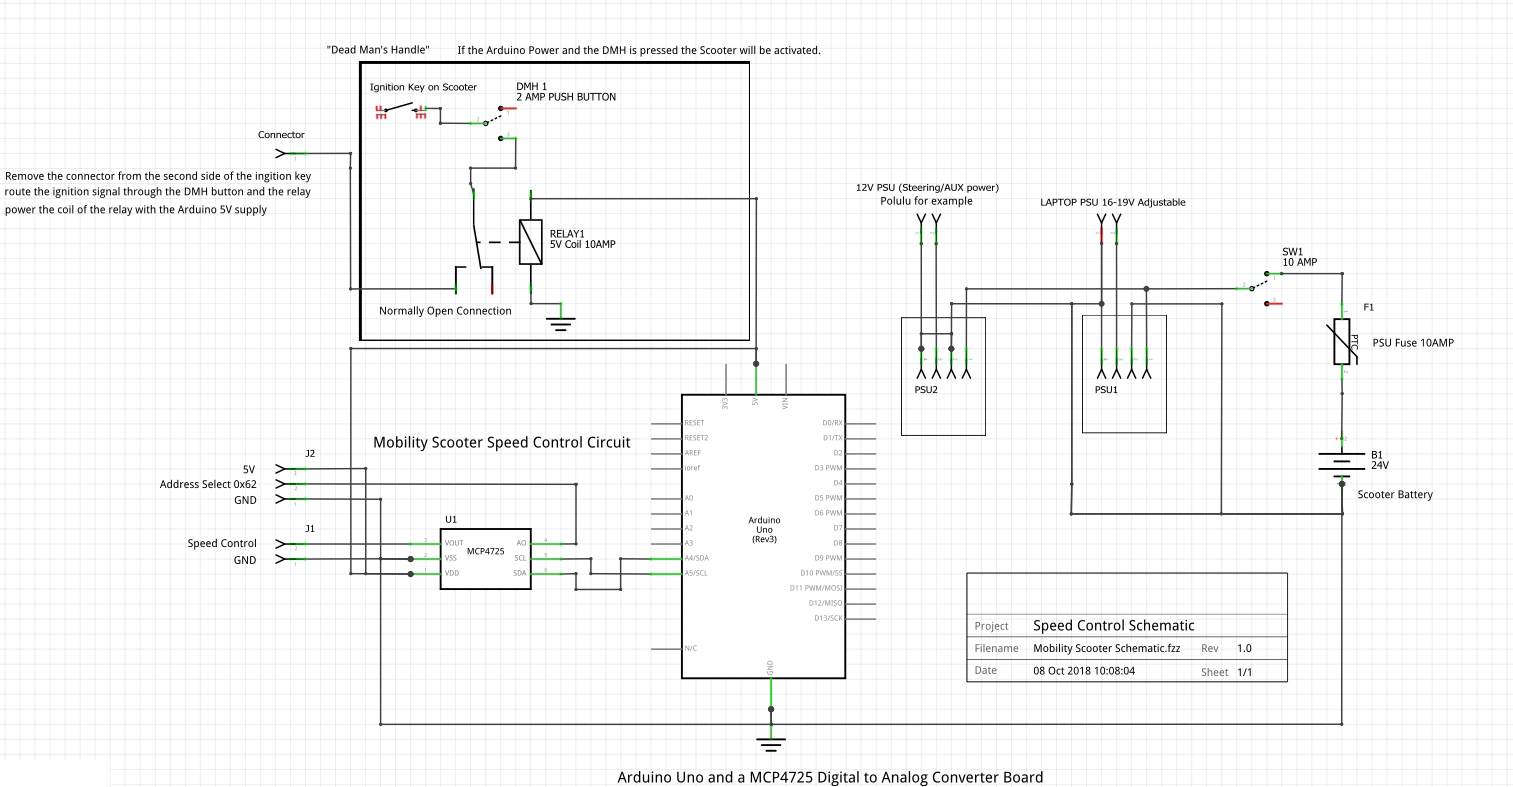
This section generally explains some steps to test the general functioning of the vehicle speed, steering, detection and tracking systems.
Implementing and testing this speed system should be undertaken with the drive wheels of the vehicle raised off of the ground, allowing for checks to be made of the DMH without the risk of the vehicle speeding off out of control.
cd physicalVehicleNonRos/testingTools/python zeroSpeed.py to zero the speedpython fastSpeed.py to move the vehicle forward (speed commands can be modified)python slowSpeed.py to move the vehicle backward (speed commands can be modified)The Arduino serial monitor could be used to send speed commands.
The steering and Pololu can be tested with a C++ executable JrkCmd.
physicalVehicleNonRos/testingTools/JrkCmd has the permission to be an executable./OpenPodcar/podcar/physicalVehicleNonRos/testingTools/JrkCmd Val where "Val" is the desired command e.g. "1900" (straight), "2100" (turning slightly on the right), "1700" (turning slightly on the left) etc.NB:"Val" should be a value between "1000" (fully turned left) and "2500" (fully turned right).
To test the object detector and tracker:
flobot_tracker.launch to that of the newly recorded bag filecd OpenPodcar/catkin_ws/src/FLOBOT
source devel/setup.bash
roslaunch flobot_tracker_bringup flobot_tracker.launchAn example video with detection and tracking results is shown below.
Perform the following actions and verifications before attempting to drive the vehicle:
Check that the vehicle’s original lever for auto-manual is set to auto (DOWN). It is on the main motor, under the vehicle at the rear left, colored red. Requires some force to move it.
Power on the vehicle using the original on-off switch located under the seat on the left. It is marked ON-OFF.
Power on the modified electronics using the new toggle switch. (This lights LEDs on the DCDCs and Pololu, and the lidar makes a whirring sound).
Check that the batteries are charged (use a multimeter across one of the DCDC converters, need to see 24V or over. {\em Do not use the vehicle if it is undercharged, this is dangerous.}
Power on the laptop
Connect the lidar Ethernet cable to the laptop
Connect the Joystick, Pololu and Arduino USB cables to the USB hub
Connect the USB hub cable to the laptop USB port
Check that the Pololu LED flashes green
Check that the Arduino LED is green
Check that the LCD display shows a voltage between 1.9V and 2.1V
Press on the DMH push button and check that there is no beep
The vehicle can be remotely-controlled using a joystick as follows:
<include file="/YourPath/OpenPodcar/podcar/catkin_ws/src/velodyne/velodyne_pointcloud/launch/VLP16_points.launch"/> in launch/podcar.launch to correspond to the global path of Velodyne point_cloud launch file in the laptopcd OpenPodcar/catkin_ws/src/podcar
source devel/setup.bash
roslaunch podcar podcar.launchIf there is no error, the vehicle can then be simply controlled with the joystick as follows:
The video below shows a remote control drive of the OpenPodcar by a passenger.
This section explains how to drive the OpenPodcar in autonomous control mode using GMapping, move_base and the TEB planner.
<include file="/YourPath/OpenPodcar/podcar/catkin_ws/src/velodyne/velodyne_pointcloud/launch/VLP16_points.launch"/> in launch/podcarsim2real_laser_scan_matcher.launchto correspond to the global path of Velodyne point_cloud launch file in the laptopcd OpenPodcar/catkin_ws/src/podcar
source devel/setup.bash
roslaunch podcar podcarsim2real_laser_scan_matcher.launchcd OpenPodcar/catkin_ws/src/podcar
source devel/setup.bash
roslaunch podcar podcarsim_moveBase_sim2real.launchAt this stage, two options are available to send goal commands to the vehicle:
Option 1: RViz GUI
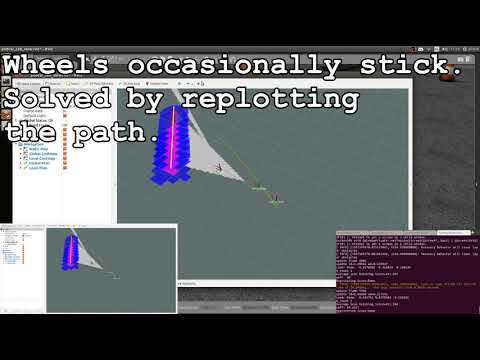
An example of such control is shown in the following video for the vehicle parallel parking demo.
Option 2: Terminal
cd OpenPodcar/catkin_ws/src/podcar
source devel/setup.bash
rostopic pub /move_base_simple/goal geometry_msgs/PoseStamped "frame_id: 'map' pose: position: x: 2.0 y: 0.0 z: 0.0 orientation: x: 0.0 y: 0.0 z: 0.0 w: 1.0"
This example command will move the vehicle 2m forward in map frame whilst keeping the same default orientation.
Note: the vehicle orientation is formed by the quaternion: x, y, z and w. Euler angles can be converted to quaternions, for example using this visualisation tool
An example of the terminal based goal command is shown in the video below.
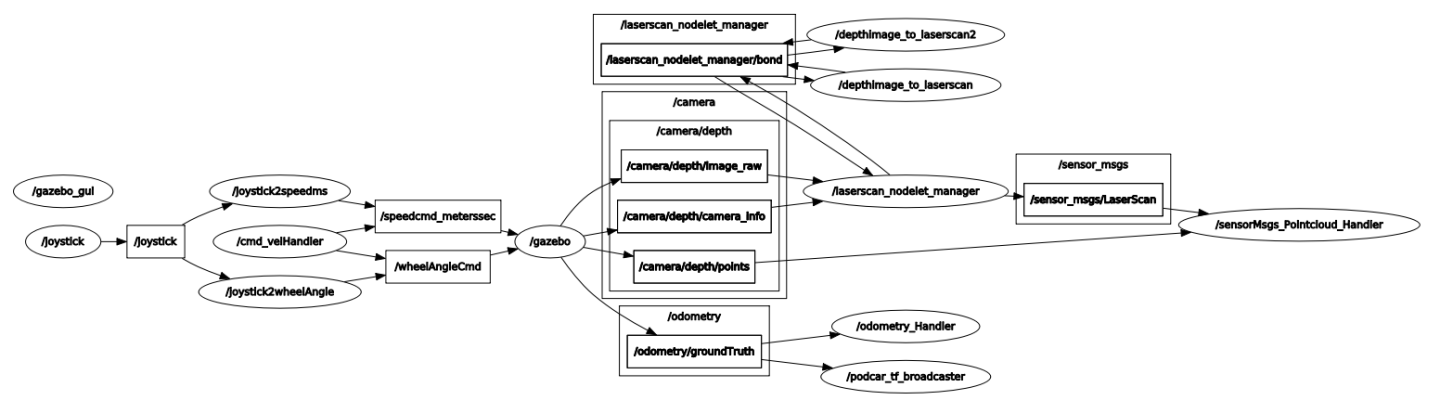
The figure below shows the complete ROS node configuration used during the autonomous driving mode.

Assuming: ROS Kinetic and Gazebo 7 already installed. Install instructions can be found here.
Rosdep is also required, but is standalone since ROS Fuerte. Install instructions can be found here.
To install the ros package and gazebo sim locally, clone the repository and run the follow commands (directories indicated by <> need to be replaced by their actual locations):
cd <install location>/catkin_ws
catkin_make
source devel/setup.bash
cd src/podcar/models/plugins
cmake .
make
export GAZEBO_PLUGIN_PATH=$GAZEBO_PLUGIN_PATH`pwd`:
cd ..
export GAZEBO_MODEL_PATH=$GAZEBO_MODEL_PATH`pwd`:
cd ../../../
rosdep install --from-paths src --ignore-src -r -y
roslaunch podcar podcarsim.launch
The first run of Gazebo may take a while (e.g. 5 minutes) to load because models used need to be automatically downloaded from the remote gazebo repositories.
If you have a USB joystick connected, open a new terminal and run,
source <install location>/catkin_ws/devel/setup.bash
roslaunch podcar joystick.launch
The figure below shows the complete ROS node configuration used during simulation, under manual joystick control.
Open a new terminal and run,
source <install location>/catkin_ws/devel/setup.bash
roslaunch podcar podcarsim_moveBase.launch
This will present a standard movebase GUI interface in rviz, enabling you to click desired destinations to command the vehicle to drive to.
3D simulation environments of the University of Leeds and Lincoln campuses were created in addition to the default Gazebo environment.
The University of Lincoln campus simulation is shown in the video below.
Vehicle beeps continuous when press DMH and rear wheels do not move
This is due to a safety mode preventing ignition.
Check: is the manual-auto switch under the rear motor on auto?
Check: are the batteries well charged (must be 24V or over.) ?
Check: is the control voltage is the dead zone ? It should be.
Rear wheels do not move, control voltages are correct
Control voltages means the display on the voltmeter LED. Should be above 1.2 or below 2.2 for forward and backwards.
Check: main vehicle battery level, by connecting the vehicle charger and inspecting the battery charge level. Problem occurs if the battery is nearly flat.
Check: charger must be disconnected for rear wheels to move (safety feature).
Linear Actuator
Speed
Simlink
ls -l /dev to see whether your device is connected well.udevadm info -q all -a -n /dev/ACM0 for the device connected at COM Port ACM0ROS Software:
rostopic echo topicName, for example:
rostopic echo /velodyne_points displays the lidar data (a huge flow of numbers should appear in the terminal)rostopic echo /odometry/groundTruth displays the vehicle position and orientationrosrun rqt_graph rqt_graph, rosrun tf tf_monitor, rosrun tf view_frames.Check: laptop must be on wired network, not wifi.
Check: wired network must be configured correctly, see velodyne setup docs. Maybe be interfered if wifi has been used recently.
Check connections to Velodyne box including power and Ethernet.
AF_NET error
Cannot locate node i.e. you should make your Python scripts as executables in order to launch them
Contributions to and forks of OpenPodcar are strongly encouraged and welcomed.
Useful contributions to improve the current design could include:
Replace the donor vehicle’s propriatory motor driver with the OSMC open source hardware motor driver
Port the ROS code to ROS2
Update ROS code to enable swarms of multiple podcars operating together
Add a 3d stereo camera to the hardware and software
Replace the body and wheels of the donor vehicle with an OSH alternative, keeping the sensors, mechatronics, and software the same.
Interface the system into Autoware
Possible forks could include:
Port the mechatronics and software to run on other closed source mobility scooters
Port the mechatronics and software to run on other classes of vehicles
We would be very interested to hear about and discuss your plans, so please get in touch if interested to contribute or fork.
Email contacts: Fanta Camara (tsfc@leeds.ac.uk / fcamara@lincoln.ac.uk) and/or Charles Fox (chfox@lincoln.ac.uk)
Please cite the following paper when you use the OpenPodcar.
Plain:
Fanta Camara, Chris Waltham, Grey Churchill, Charles Fox.
OpenPodcar: an Open Source Vehicle for Self-Driving Car Research.
(under review).
Bibtex:
@Article{camara2022openpodcar,
  Title                    = {OpenPodcar: an Open Source Vehicle for Self-Driving Car Research},
  Author                   = {Fanta Camara and Chris Waltham and Grey Churchill and Charles Fox},
  Year                     = {2022},
  Journal                  = {(under review}
}This work is provided under GPL licence for software source code and CERN-OHL-W licence for hardware design and build instructions.
Disclaimer: Neither the authors nor the Universities of Lincoln and Leeds are repsonsible for accidents, injuries or damage caused by this vehicle design, and by downloading, building or operating the design you agree to do so entirely at your own risk. The design is not a legal product and carries no safety certification.
| Qty | Value | Footprint | References |
|---|---|---|---|
| 3 | MountingHole_3.2mm_M3 | MountingHole:MountingHole_3.2mm_M3 | M3, M3, M3 |
| 2 | 10K | Resistor_THT:R_Axial_DIN0204_L3.6mm_D1.6mm_P7.62mm_Horizontal | R1, R2 |
| 2 | Screw_Terminal_01x02 | TerminalBlock_TE-Connectivity:TerminalBlock_TE_282834-2_1x02_P2.54mm_Horizontal | J1, J2 |
| 1 | Arduino_Uno_Shield | Arduino:Arduino_Uno_Shield | XA1 |
| 1 | DAC_MCP4725 | adafruit-mcp4725-1.snapshot:adafruit_mcp4725-fp | U1 |
| 1 | LCD_Display | adafruit-mcp4725-1.snapshot:LCD_Display | U4 |
| 1 | PSU_12 | adafruit-mcp4725-1.snapshot:dc_buck_converter-fp | U5 |
| 1 | PSU_16 | adafruit-mcp4725-1.snapshot:dc_buck_converter-fp | U6 |
| 1 | pololu_jrk_v3 | adafruit-mcp4725-1.snapshot:pololu_jrk21v3 | U2 |
| 1 | vlp-16 | adafruit-mcp4725-1.snapshot:VLP16 | U3 |
It measures 271.1 × 132.2 mm and has 2 copper layers, 1.6 mm thick.
14 parts. The full list of its parts is on this page, with links to each part's symbol and footprint where PCBKit's library has them.
From the OpenPodcar/OpenPodcar repository on GitHub, at the commit this page was made from: the board is physicalVehicleNonRos/PCB/Podcar_PCB.kicad_pcb. PCBKit opens the board in the browser, with nothing to install.
Its repository publishes it under the GPL-2.0 licence: you may reuse it on that licence's terms (keep the author's notice, and for a copyleft licence share your changes alike).
google/mozc-devices
Circuit diagrams and firmware source code for Gboard DIY keyboards


hackclub/OnBoard
💡 Join 1,000 teenagers and make your first PCB with a $100 grant!


Twotoz/C5VRX
Ultra-minimal, zero-CPU 5.8 GHz analog FPV video receiver using ESP32-C5 Wi-Fi 6 PHY MODEM_DIAG, BitScrambler WBFM demodulation & resistor DAC CVBS

