
4 layers99 × 53.3 mm
PSLab
fossasia/pslab-hardware
PSLab Hardware Design and Schematics https://pslab.io
199 parts1.7kApache-2.0

 Open-Domus/wemos_multiplate3
PCB da usare come shield per Wemos D1 mini con componenti compatibili ESPhome/HA.
Wemos esphome shield is an open-source printed circuit board by Open-Domus, from the Open-Domus/wemos_multiplate repository on GitHub. It is a 2-layer board of 74 × 52 mm with 31 parts on 46 nets, routed with 234 tracks and 14 vias.
It is built around the WS2812B. Its parts include 10 resistors, 3 transistors, 2 ICs, 1 capacitor and 1 diode. It belongs with the home automation and IoT boards of this library.
Wemos Multiplate is a modular, ESPHome-powered front plate for Wemos D1 mini and Wemos S2 mini development boards. It combines presence sensing, environmental telemetry, status lighting, and user inputs into a single wall-friendly enclosure.
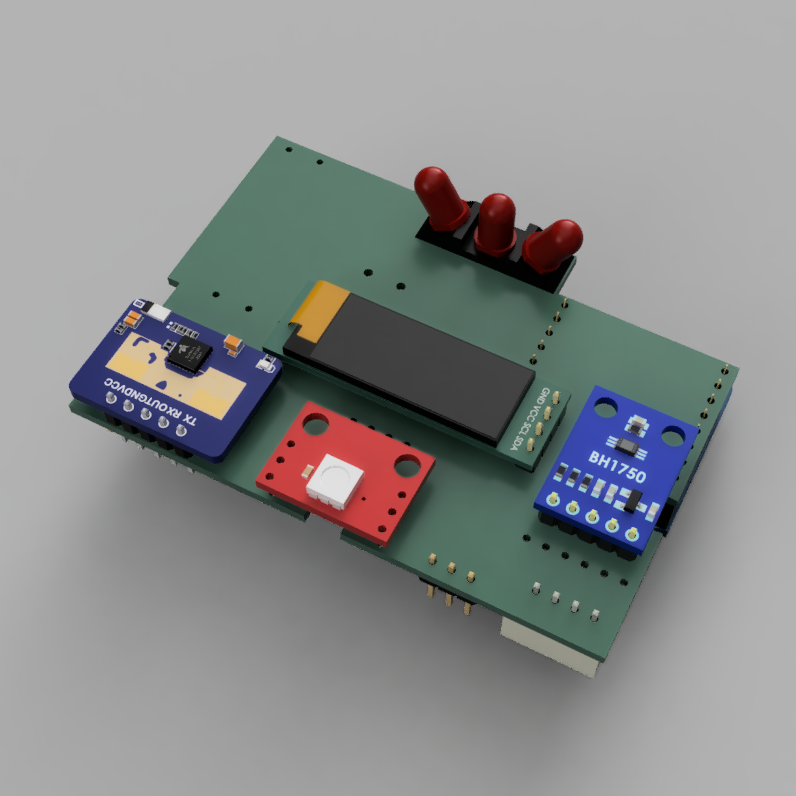
esphome/ – modular ESPHome configuration split by board (modules_d1mini/, modules_s2mini/) and shared components (modules_common/). Sample automations are under esphome/automations/.kicad/wemos-esphome-shield/ – KiCad project, gerbers, STEP models, and release archives for the PCB.Base components
Optional add-ons
PCB fabrication files for the latest revision live in kicad/wemos-esphome-shield/releases/.
Install ESPHome
Follow the ESPHome installation guide (CLI or Home Assistant add-on). CLI examples below assume pipx install esphome.
Create secrets
Copy the sample secrets file and edit it with your Wi-Fi and fallback hotspot credentials:
cp esphome/modules_s2mini/secrets_sample.yaml esphome/secrets.yamlThe same secrets.yaml is used by both board profiles.
Pick a base profile
esphome/multiplate_s2mini.yml — ESP32-S2 build with every module enabled.esphome/multiplate_d1mini.yml — ESP8266 build with a reduced feature set. Comment out any modules you did not solder to stay within memory limits.Enable or disable modules
Each module is loaded via the packages: section. Comment out a line to disable the corresponding hardware. For example, to skip the gesture sensor:
# gesture_sensor: !include modules_common/gesture_sensor.ymlBuild and flash
Connect the board over USB and run:
esphome run esphome/multiplate_s2mini.yml --device /dev/ttyUSB0After the first successful flash you can go OTA:
esphome run esphome/your-device-name.ymlAdopt in Home Assistant
The node exposes all sensors, lights, switches, and buttons via the ESPHome API. Home Assistant will prompt to adopt the new device and automatically create entities.
| Module | File | Notes |
|---|---|---|
| Core board setup & Wi-Fi | modules_d1mini/common.yml, modules_s2mini/common.yml | Handles board selection, Wi-Fi credentials, API, OTA. |
| OLED display, pages, and fonts | modules_common/display.yml, font/retrogaming.ttf | Provides readout and trend pages with a 4 h temperature graph. |
| LD2410C mmWave presence | modules_d1mini/motion_sensor.yml, modules_s2mini/motion_sensor.yml | Exposes presence, moving/still targets, distance, and Bluetooth control. |
| Temperature & humidity (SHT31-D) | modules_common/temp_sensor.yml | Includes a median filter and linear calibration datapoints. |
| Ambient light (BH1750) | modules_common/light_sensor.yml | Optional, comment out if the sensor is not populated. |
| Gesture & proximity (APDS9960) | modules_common/gesture_sensor.yml | Optional, provides four gesture binary sensors and calibrated proximity. |
| RGB status LEDs | modules_d1mini/rgb_leds.yml, modules_s2mini/rgb_leds.yml | Two WS2812 LEDs mapped in the sample automations. |
| Buzzer | modules_d1mini/buzzer.yml, modules_s2mini/buzzer.yml | Template buttons trigger predefined alert patterns. |
| IR transmitter/receiver | modules_d1mini/ir_remote.yml, modules_s2mini/ir_remote.yml | Exposes ir_remote transmitter ID and raw receiver for learning codes. |
| Relay header | modules_d1mini/relay.yml, modules_s2mini/relay.yml | Optional GPIO-controlled 5 V relay output. |
| Front buttons (S2 mini only) | modules_s2mini/buttons.yml | Three debounced GPIO inputs. |
| Automations (display & LEDs) | automations/display_motion.yml, automations/motion_status_leds.yml | Opt-in template switches to toggle display blanking and LED indicators. |
display_motion keeps the OLED blank until motion is detected, then shows the readout page.motion_status_leds maps moving and still target detection to the two WS2812 LEDs.Enable or disable these from the packages: block just like the hardware modules.
*-ld2410-bluetooth) exposed by ESPHome.Keeping the heavy tuning UI out of ESPHome reduces load on the D1 mini and shortens boot times.
Add climate, media, or switch components to your ESPHome profile and reference the shared ir_remote transmitter and ir_rx receiver IDs. Example:
climate:
  - platform: daikin
    name: ${device_name}-climate
    transmitter_id: ir_remote
    receiver_id: ir_rx
Use the remote_receiver in learning mode (dump: raw) to capture codes from your existing remote.
kicad/wemos-esphome-shield/gerber/kicad/wemos-esphome-shield/step/kicad/wemos-esphome-shield/releases/Send the gerber ZIP to your PCB manufacturer of choice, then populate the board according to the silkscreen and BOM in the release archive.
Questions, improvements, or pull requests are welcome!
| Qty | Value | Footprint | References |
|---|---|---|---|
| 4 | 10kohm | Resistor_SMD:R_1206_3216Metric_Pad1.30x1.75mm_HandSolder | R2, R7, R8, R10 |
| 3 | 100ohm | Resistor_SMD:R_1206_3216Metric_Pad1.30x1.75mm_HandSolder | R3, R4, R9 |
| 3 | 2N2222 | internal:SOT-23_Handsoldering | Q1, Q2, Q3 |
| 3 | 2kohm | Resistor_SMD:R_1206_3216Metric_Pad1.30x1.75mm_HandSolder | R1, R5, R6 |
| 3 | LED | LED_THT:LED_D5.0mm | IR1, IR2, IR3 |
| 1 | 4.7uf | Capacitor_SMD:C_1206_3216Metric_Pad1.33x1.80mm_HandSolder | C1 |
| 1 | BH1750 | internal:BH1750 | LUM1 |
| 1 | Buzzer | Buzzer_Beeper:Buzzer_12x9.5RM7.6 | BZ1 |
| 1 | Conn_01x02_Female | TerminalBlock_MetzConnect:TerminalBlock_MetzConnect_Type094_RT03502HBLU_1x02_P5.00mm_Horizontal | POWER1 |
| 1 | JSTXH_4p | Connector_JST:JST_XH_B4B-XH-A_1x04_P2.50mm_Vertical | BTN1 |
| 1 | LD2410C | internal:LD2410C | MOV1 |
| 1 | LOGO | LOGO | G*** |
| 1 | PinHeader | Connector_PinHeader_2.54mm:PinHeader_1x03_P2.54mm_Vertical | RELAY1 |
| 1 | PinHeader | Connector_PinHeader_2.54mm:PinHeader_1x05_P2.54mm_Vertical | EXTRA1 |
| 1 | SHT30 | Connector_JST:JST_XH_B4B-XH-A_1x04_P2.50mm_Vertical | TEMP1 |
| 1 | SSD1306 | internal:SSD1306 OLED 128x64 | OLED1 |
| 1 | TSOP34S40F | OptoDevice:Vishay_MOLD-3Pin | U1 |
| 1 | Transformer_1P_1S | internal:220v AC to 5v DC Transformer | T1 |
| 1 | WS2812B | internal:LED breakout | LED1 |
| 1 | WeMos_S2_mini | internal:WEMOS_S2_mini | U2 |
It measures 74 × 52 mm and has 2 copper layers, 1.6 mm thick.
31 parts, built around the WS2812B. The full list of its parts is on this page, with links to each part's symbol and footprint where PCBKit's library has them.
From the Open-Domus/wemos_multiplate repository on GitHub, at the commit this page was made from: the board is kicad/wemos-esphome-shield/wemos-esphome-shield.kicad_pcb and its schematic kicad/wemos-esphome-shield/wemos-esphome-shield.kicad_sch. PCBKit opens the board in the browser, with nothing to install.
Its repository states no licence, so its author keeps all rights: ask Open-Domus before reusing the design.
fossasia/pslab-hardware
PSLab Hardware Design and Schematics https://pslab.io

FrameworkComputer/ExpansionCards
Reference designs and documentation to create Expansion Cards for the Framework Laptop


PrintersForAnts/Micron
If you want to purchase full kits there are 3 available (Kits are slowly updating to R1 hardware just make sure to double check the included hardware in your kit and if you have any questions reach out in the discord)


