2 layers28.3 × 39.8 mm
LevelShifter
gusmanb/logicanalyzer
24 channel, 100Msps logic analyzer hardware and software
21 parts5.1kGPL-3.0

 ogatatsu/Helix-Wireless24
Battery Module is an open-source printed circuit board by ogatatsu, from the ogatatsu/Helix-Wireless repository on GitHub. It is a 2-layer board of 132 × 38 mm with 21 parts on 12 nets, routed with 84 tracks and 0 vias.
Its parts include 6 diodes and 2 switches. It belongs with the power boards of this library.
HelixにBL652-breakout を載せてワイヤレスに改造した物。
以下の図のようにマスター、スレーブ、PC間で通信する。
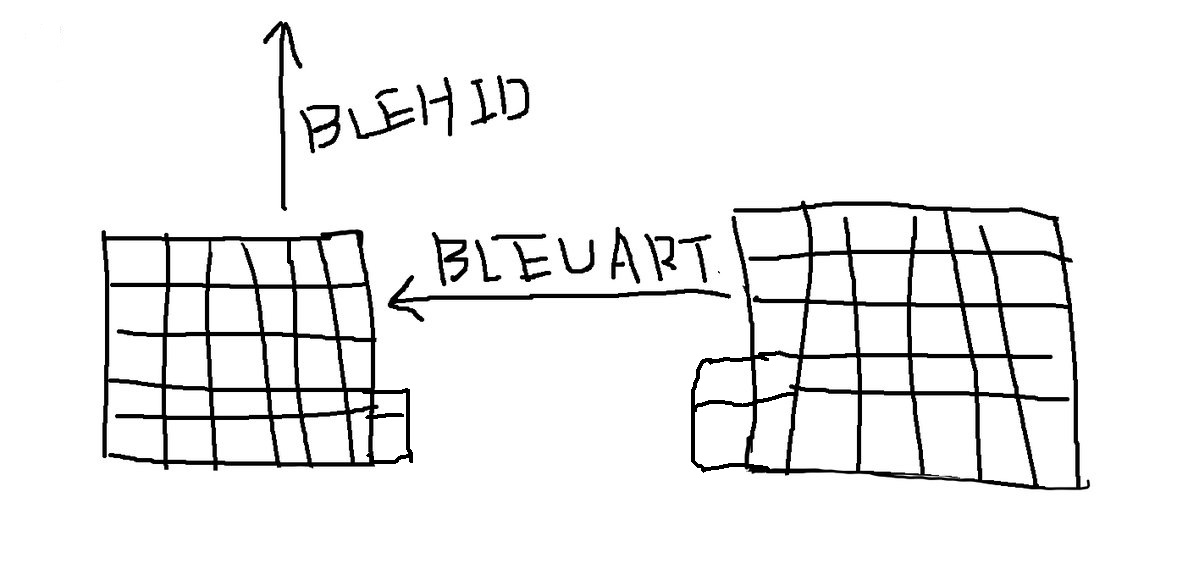
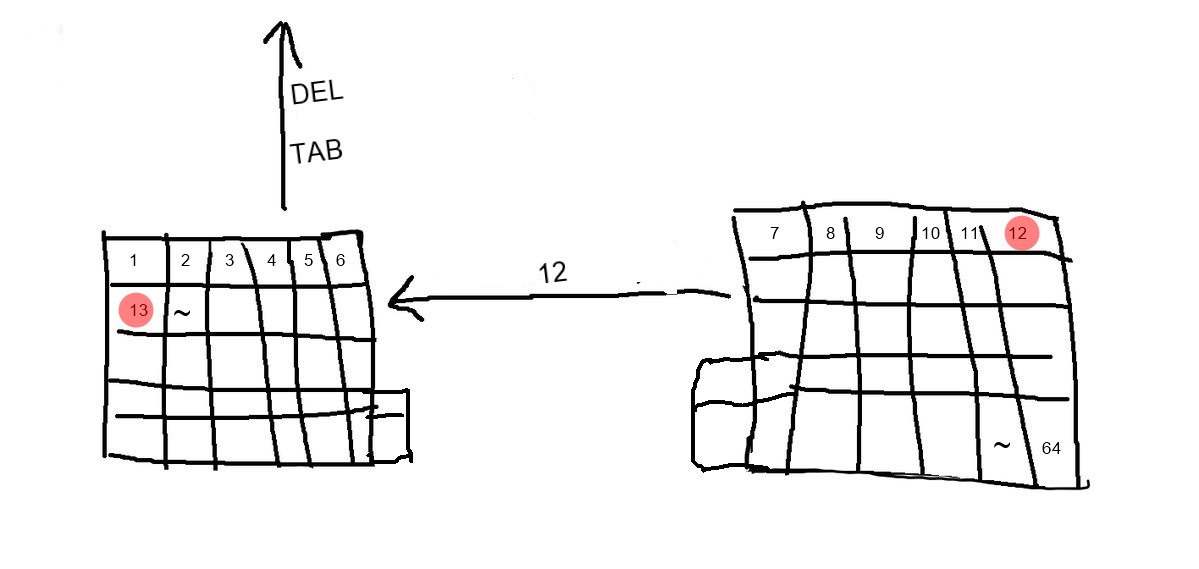
スイッチ1つ1つに一意なIDが振られていて、スレーブマスター間では押されたスイッチのIDを通信でやり取りする、 マスター側では受け取ったスレーブ側で押されたIDと自分側で押されたIDをキーマップからキーコードに変換してPCに送る。 キーマップはマスター側で持っているのでキー配列を変更する時はマスター側のプログラムを変更が必要となる。
BL652-breakoutには予めFeather nRF52のブートローダーを書き込んでおく。
参考URL
https://learn.adafruit.com/bluefruit-nrf52-feather-learning-guide/flashing-the-bootloader https://qiita.com/ogatatsu@github/items/37f4888c885c4e287df1
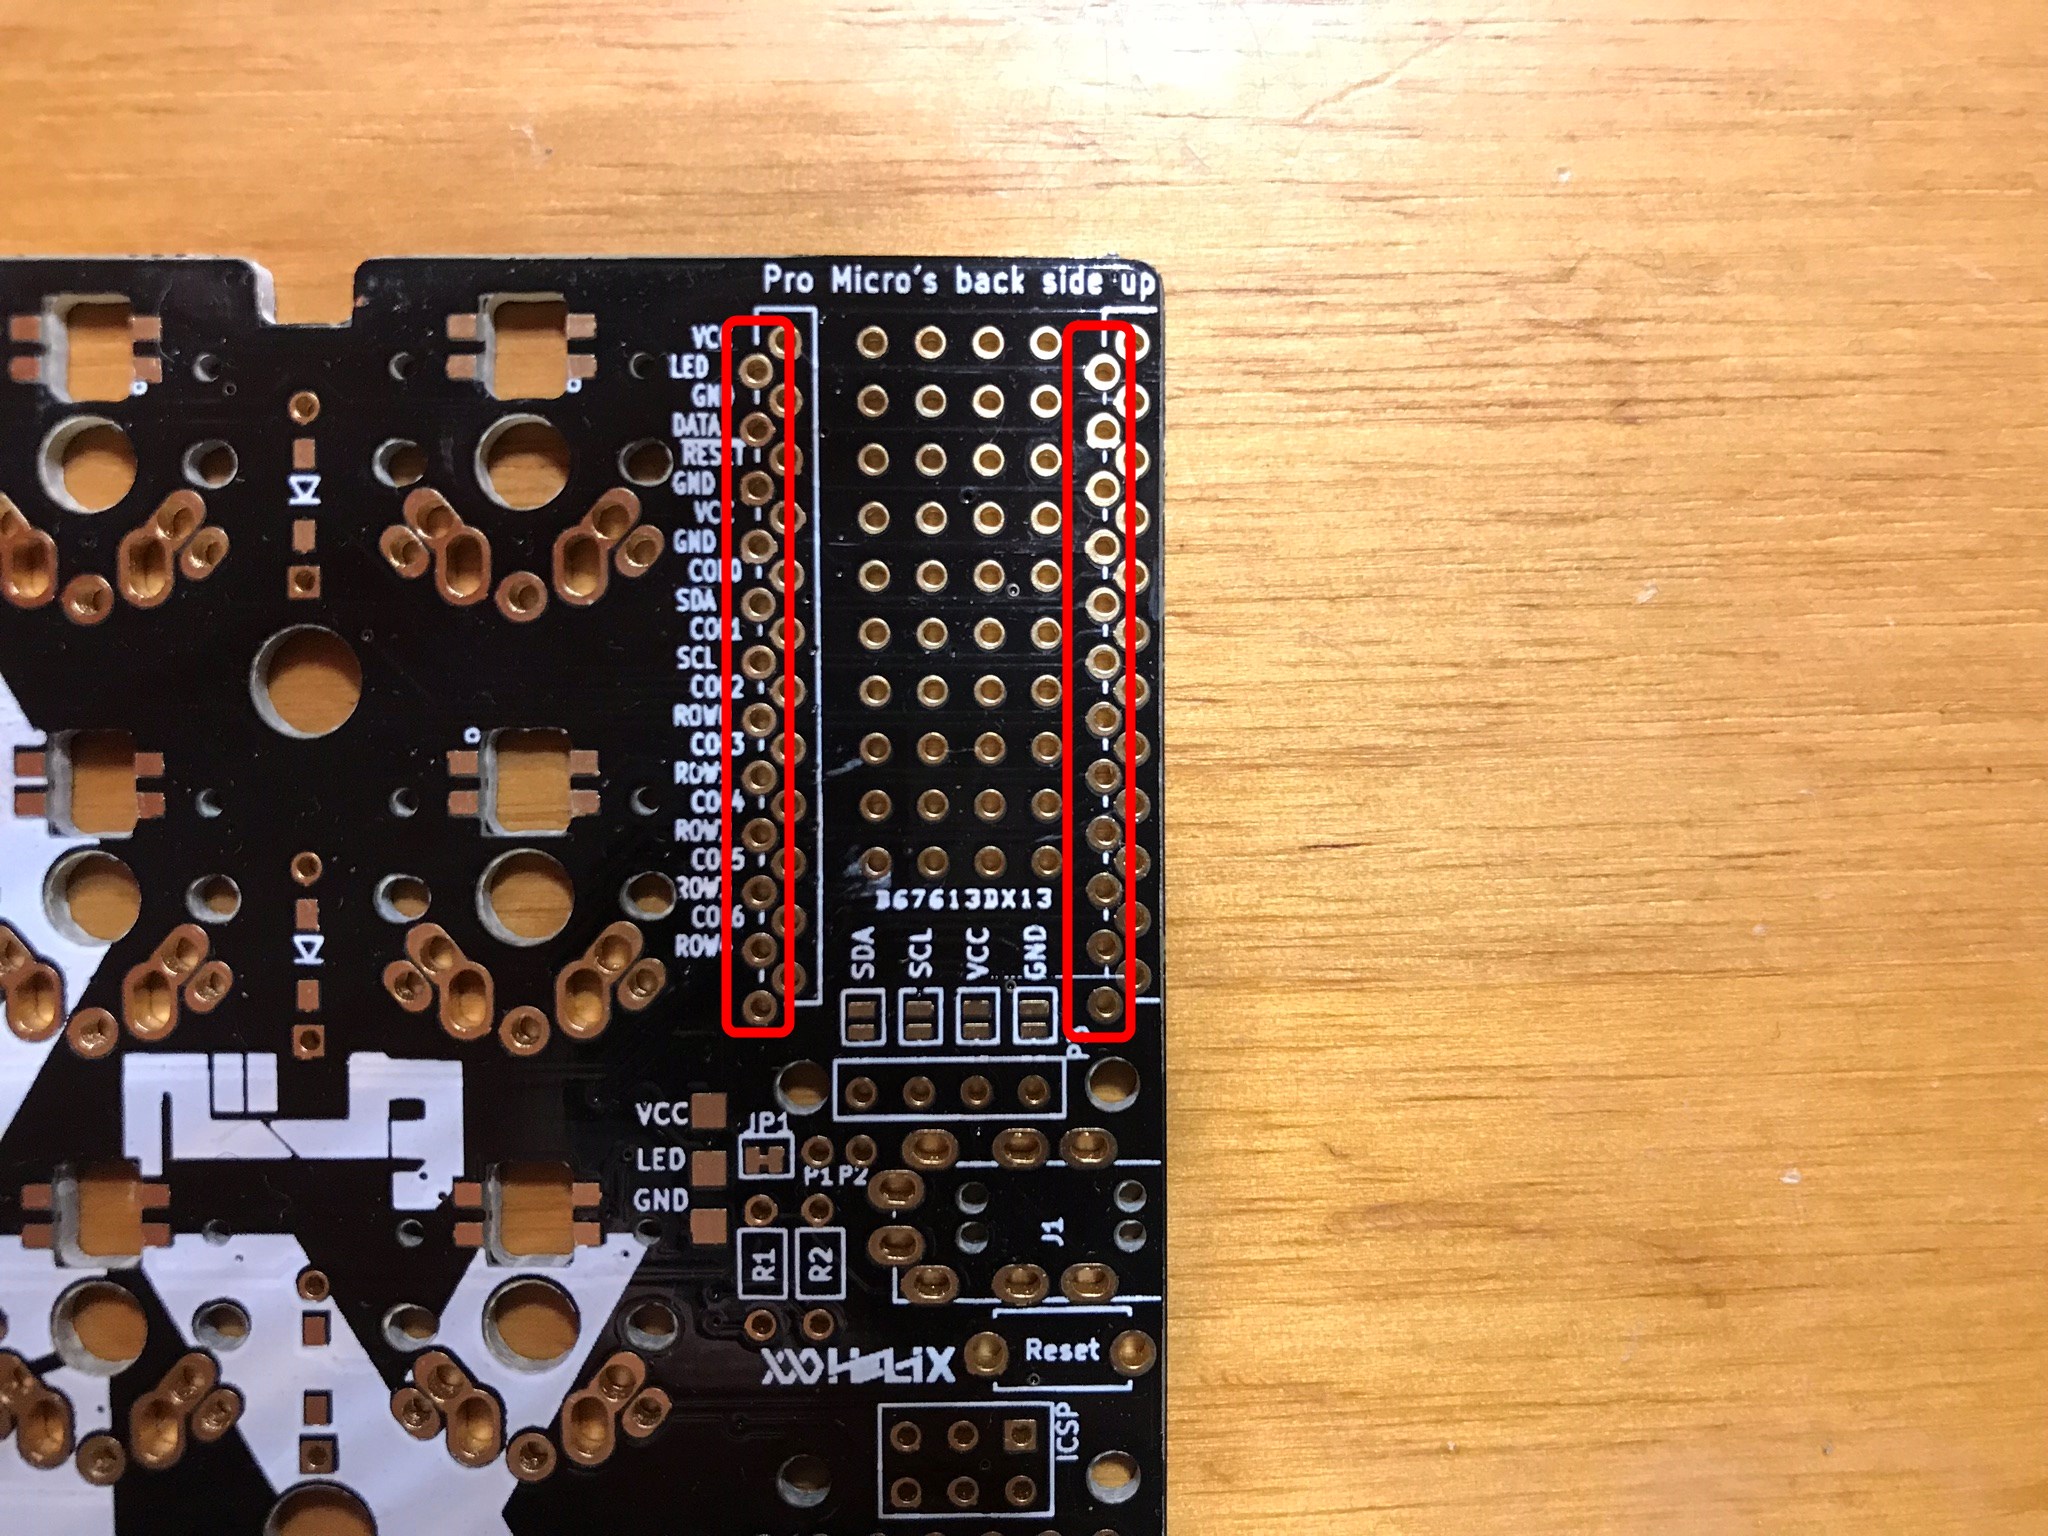
BL652-breakoutを右側、左側共にHelix PCBの白枠線内とは逆の方に刺す。(画像の赤い方)
ArduinoをインストールしてボードマネージャーからFeather nRF52用の物をインストールしておく。
参考URL
https://learn.adafruit.com/bluefruit-nrf52-feather-learning-guide/arduino-bsp-setup
ArduinoのライブラリマネージャからBounce2ライブラリをインストールする。
Arduino IDEで.inoファイルを開いて右側のボードにはSlave用のファームウェア、左側にはMaster用のファームウェアを書き込む。
キーのカスタマイズはマスター側のソースのkeymap.cppファイルを書き換えることでできる。
通常の入力時のカスタマイズはkeymap[]配列を変更する。
static Key keymap[] = {
    {1, L(NK(_GRAVE), CK(_SHIFT, _GRAVE), NK(_GRAVE))},
    {2, L(NK(_1), CK(_SHIFT, _1), NK(_1))},
    {3, L(NK(_2), CK(_SHIFT, _2), NK(_2))},
    {4, L(NK(_3), CK(_SHIFT, _3), NK(_3))},
    {5, L(NK(_4), CK(_SHIFT, _4), NK(_4))},
    ...
左側の数字は仕組みで説明した一意なID、右側の関数呼び出しはファームウェア内でコマンドと呼ばれる物でこれの組み合わせを変更することでIDを割り当てられたスイッチを押したときの挙動を変更できる。
どのスイッチが何番のIDに割り当てられているかは以下となる。
/* ID
   * ,-----------------------------------------.             ,-----------------------------------------.
   * |   1  |   2  |   3  |   4  |   5  |   6  |             |   7  |   8  |   9  |  10  |  11  |  12  |
   * |------+------+------+------+------+------|             |------+------+------+------+------+------|
   * |  13  |  14  |  15  |  16  |  17  |  18  |             |  19  |  20  |  21  |  22  |  23  |  24  |
   * |------+------+------+------+------+------|             |------+------+------+------+------+------|
   * |  25  |  26  |  27  |  28  |  29  |  30  |             |  31  |  32  |  33  |  34  |  35  |  36  |
   * |------+------+------+------+------+------+------+------+------+------+------+------+------+------|
   * |  37  |  38  |  39  |  40  |  41  |  42  |  43  |  44  |  45  |  46  |  47  |  48  |  49  |  50  |
   * |------+------+------+------+------+------+------+------+------+------+------+------+------+------|
   * |  51  |  52  |  53  |  54  |  55  |  56  |  57  |  58  |  59  |  60  |  61  |  62  |  63  |  64  |
   * `-------------------------------------------------------------------------------------------------'
*/Command *NOP何もしないコマンド、以下の例ではSW1を押しても何も起こらない。
static Key keymap[] = {
    {1, NOP},
};Command *NK(uint8_t keycode)通常キー用のコマンド、以下の例ではSW1はA,SW2はB,SW3はCのキーコードを送出する。
(keycode.hファイルにキーコードに対して_Aなどの名前が割り当てられているのでそちらも参照のこと。)
static Key keymap[] = {
    {1, NK(_A)},
    {2, NK(_B)},
    {3, NK(_C)},
};Command *MO(Modifier modifier)修飾キー用のコマンド、以下の例ではSW1はSHIFTのキーコードを、SW2はCTRLとSHIFTのキーコードを同時に送出する。
修飾キーは|演算子で同時押しの組み合わせを表現できる。
static Key keymap[] = {
    {1, MO(_SHIFT)},
    {2, MO(_CTRL | _SHIFT)},
};Command *CK(Modifier modifier, uint8_t keycode)コンビネーションキー用のコマンド、修飾キーと通常キーの同時押しを表現できる。以下の例はSW1はCTRL+C、SW2はCTRL+ALT+DELETEのキーコードを送出する。
static Key keymap[] = {
    {1, CK(_CTRL, _C)},
    {2, CK(_CTRL | _ALT, _DELETE)},
};Command *MT(Modifier modifier, uint8_t keycode)スイッチを押した後リリースせずにに別のスイッチを押したときは第1引数の修飾キー、スイッチ単体でタップすると第2引数の通常キーとして機能するコマンド、以下の例でSW1を押した後離さずにSW2を押すとSHIFTキー(結果としてSHIFT+A)、SW1を押して何もせずにそのまま離すとSPACEキーのキーコードが送出される。
static Key keymap[] = {
    {1, MT(_SHIFT, _SPACE)},
    {2, NK(_A)},
};Command *OSM(Modifier modifier)スイッチを押して離すと次にスイッチを押した時に送出されるキーコードと同時に引数の修飾キーも送出される、スイッチを押して離さずに別のスイッチを押した場合は通常の修飾キーコマンドの様に動作する。下の例ではSW1を押して離した後にSW2を押すとSHIFT+Aのキーコードが送出される。
static Key keymap[] = {
    {1, OSM(_SHIFT)},
    {2, NK(_A)},
};Command *L(Command *first, Commands... rest)レイヤー分けをするコマンド、現在のレイヤーの状態によって動作させるコマンドを変更する。以下の例ではSW1を押すとレイヤー2がONの時はC、2がOFFで1がONの時はB、2と1がOFFの時はAのキーコードを送出する、0レイヤーはデフォルトでONとなる。
static Key keymap[] = {
    //    0     , 1     , 2
    {1, L(NK(_A), NK(_B), NK(_C))},
};Command *SL(uint8_t layerNumber)スイッチを押してる間だけ引数の番号のレイヤーをONにする。以下の例ではSW1単体で押すとA、SW2を押しながらSW1を押すとB、SW3を押しながらSW1を押すとCのキーコードを送出する。レイヤー番号の数字が高いほうのコマンドが優先されるのでSW2とSW3を同時に押しながらSW1を押すとSW3のレイヤー番号の2が優先されCのキーコードが送出される。
static Key keymap[] = {
    {1, L(NK(_A), NK(_B), NK(_C))},
    {2, SL(1)},
    {3, SL(2)},
};Command *TL(uint8_t layerNumber)スイッチを押したら引数の番号のレイヤーをトグルする、SLコマンドと違いスイッチを離したあとでもレイヤーをONにし続ける事ができる。以下の例だと1回SW2を押すとレイヤー1がONになりその状態でSW1を押すとBのキーコードを送出する。もう1回SW2を押すとレイヤー1がONからOFFに変わりその状態でSW1を押すとAのキーコードを送出する。
static Key keymap[] = {
    {1, L(NK(_A), NK(_B))},
    {2, TL(1)},
};Command *LT(uint8_t layerNumber, uint8_t keycode)MTコマンドのレイヤー版。
Command *OSL(uint8_t layerNumber)OSMコマンドのレイヤー版。
続く
| Qty | Value | Footprint | References |
|---|---|---|---|
| 6 | Battery_Cell | Footprints:BHSD-2032-SM | BT1, BT2, BT3, BT4, BT5, BT6 |
| 6 | D_Schottky | Footprints:SS2040FL | D1, D2, D3, D4, D5, D6 |
| 4 | Conn_01x01 | Footprints:2060 | GND1, GND2, VDD1, VDD2 |
| 2 | SW_SPDT | Footprints:SSSS811101 | SW1, SW2 |
The 18 most common of 21 parts.
gusmanb/logicanalyzer
24 channel, 100Msps logic analyzer hardware and software

mntmn/amiga2000-gfxcard
MNT VA2000, an Open Source Amiga 2/3/4000 Graphics Card (Zorro II/III), written in Verilog


hackclub/OnBoard
💡 Join 1,000 teenagers and make your first PCB with a $100 grant!

drandyhaas/KiCadRoutingTools
A set of Python/Rust tools to aid routing in KiCad

Arrow-air/project-quiver
Project Quiver documentation, designs, and project artifacts.


It measures 132 × 38 mm and has 2 copper layers, 1.6 mm thick.
21 parts. The full list of its parts is on this page, with links to each part's symbol and footprint where PCBKit's library has them.
From the ogatatsu/Helix-Wireless repository on GitHub, at the commit this page was made from: the board is Battery Module/Battery Module.kicad_pcb. PCBKit opens the board in the browser, with nothing to install.
Its repository states no licence, so its author keeps all rights: ask ogatatsu before reusing the design.