2 layers117.2 × 52.6 mm

 Mourty/Wattmeter-Project
This is a repo for a class project about making a wattmeter. Enjoy it if you want to aswell.
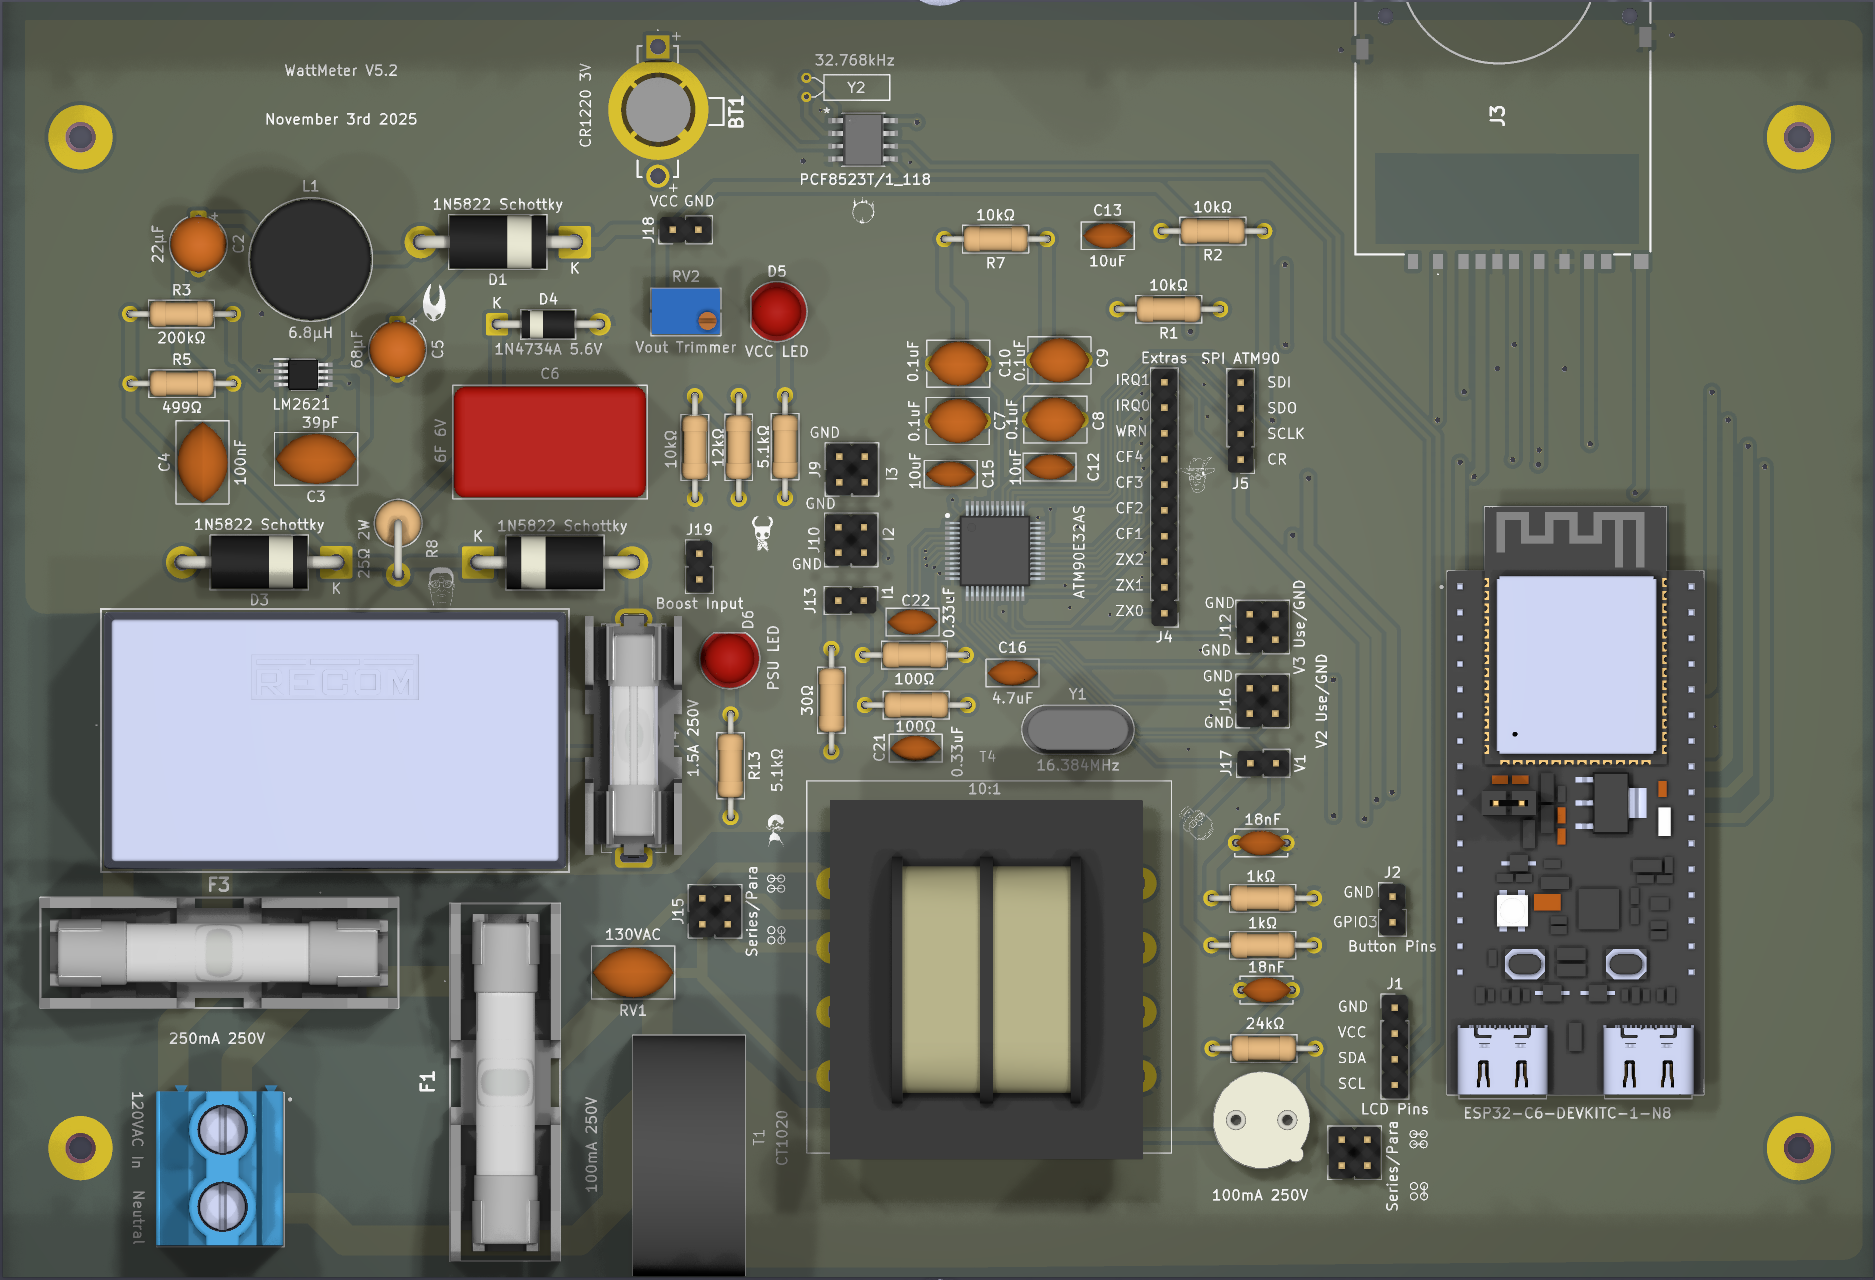
WattMeter is an open-source printed circuit board by Mourty, from the Mourty/Wattmeter-Project repository on GitHub. It is a 2-layer board of 185 × 126.1 mm with 80 parts on 89 nets, routed with 820 tracks and 72 vias.
It is built around the ESP32-C6-DEVKITC-1-N8, GSD09002SEU and ATM90E32AS-AU-R, with the CR1220-2 among its other parts. Its parts include 17 capacitors, 16 resistors, 16 connectors, 6 diodes and 4 ICs. It belongs with the ESP32 and RISC-V boards of this library.


This project was created for a senior design course as part of my degree path. I wanted to create a wattmeter similar to the "Kill A Watt" meters typically available, but with an important change. I wanted the ability to log the energy consumption data over time. I created a functional prototype well before I even began the class, but decided to iterate on the project and improve it. This is my first project of this scale, and I am sure it isn't perfect. In fact I'm sure it can be improved upon, but it works well enough for me.
The hardware is a custom designed PCB with mostly through hole components. I chose through hole because it is what I wanted to use, more on this later. The meter uses the Atmel M90E32 Poly-phase energy monitoring IC to do the heavy lifting of accurate power measurement. The voltage input uses a stepdown transformer and voltage divider to bring the 120VAC input voltage down around a manageable 0.6vrms. The transformer is somewhat unnecessary as a series of resistors could do the same, but this also provides some transient protection and isolation. The current measurement utilizes a current transformer with a carefully sizes burden resistor to bring the voltage down to around 0.6vrms when 20 amps is flowing though the primary of the CT. The power supply for the whole board is an off the shelf AC to DC power supply. This provides stable "safe" power without needed to roll my own PSU. This is fed to a super capacitor, then to the LM2621 based boost converted. The super capacitor provided an energy buffer to allow for controlled shutdown of the microcontroller in the event of a power outage. This allows time to write the current buffer of power statistics to the SD card. without this feature the SD card would either need to be written to more often with small amounts of data or the buffer would be lost during a power outage. Depending on the setting this could be multiple minutes or hours of data lost. The size of the super cap was chosen due to part availability at the time; It could easily be a quarter or even an eighth as large and still serve its purpose. None of the components have been price optimized to a good degree. For example the diodes that are apart of the super capacitor/boost converter are rated for 2 amps, but don't ever see near that amount. These are simply what I had on hand during the design and didn't see a need to order different ones. So If you make this project too, you might want to consider components carefully, you might save some money.
I figured I could improve upon the wattmeter with the wattmeterJR. This version has fewer features, but is smaller and uses SMD components. It lacks an LCD display or the whole integrated UPS part. It is mainly to measure the same power statistics, but really requires the remote server to log the data. it is much less user friendly to build and to debug, but is cheaper and smaller. You can find this version at https://github.com/Mourty/WattmeterJR
I wrote the firmware with assistance from Claude.ai. I'm not the sort to go around proclaiming to be a coder, so you will find issues here. I used the Arduino IDE to develop, compile, and upload the code to the ESP32. The code is semi-organized into different files and imported where needed. The meter itself can be configured using the SD card. You will need to write the settings.ini to the SD card. In the settings you will find a place to configure your WiFi credentials as well as other settings. Many of these will seem cryptic, but most of them won't need to be modified at all. Most are actually configuration registers for the ATM90E32. You can find more on what the do in the IC's datasheet.
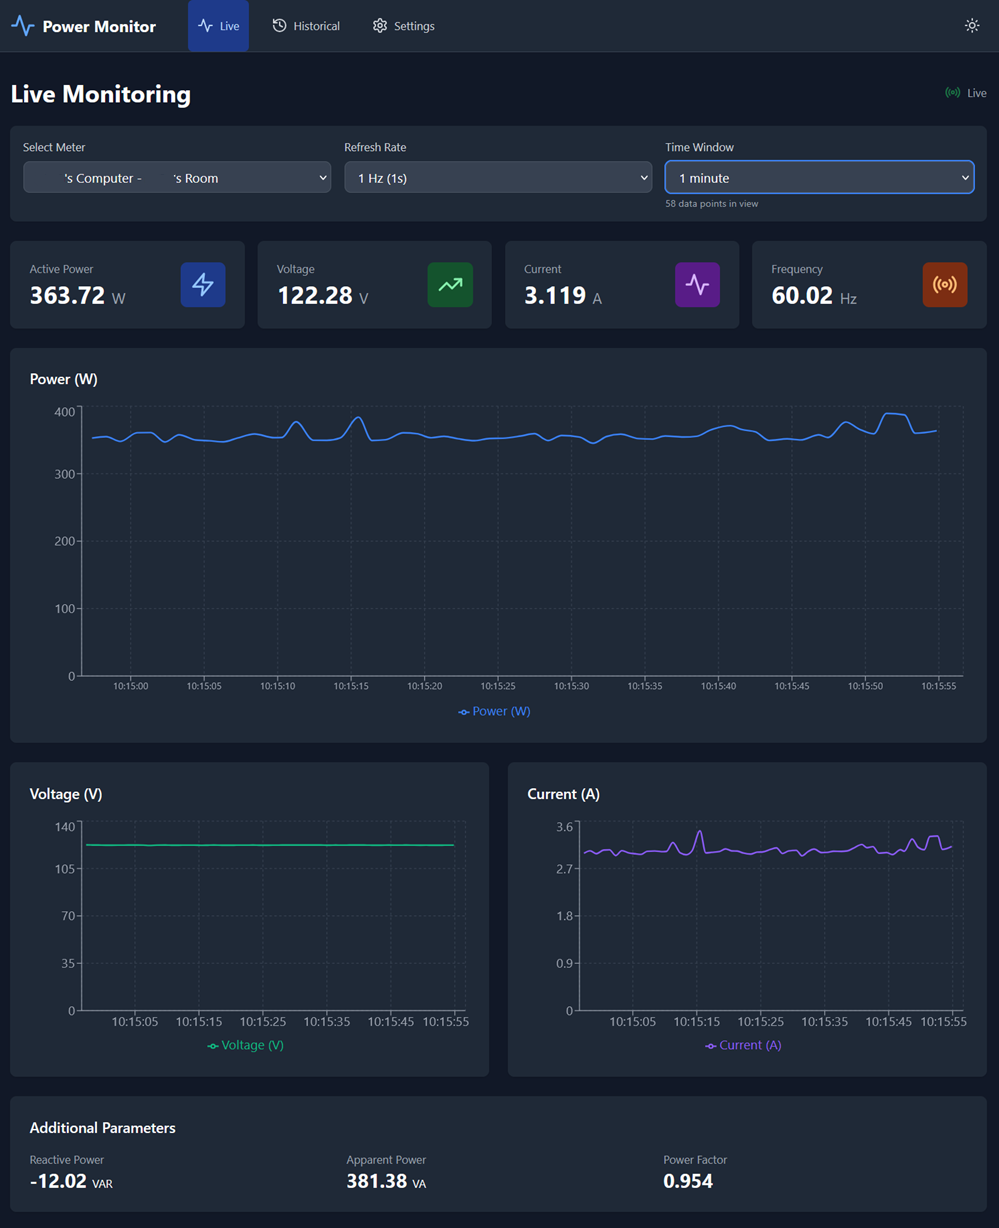
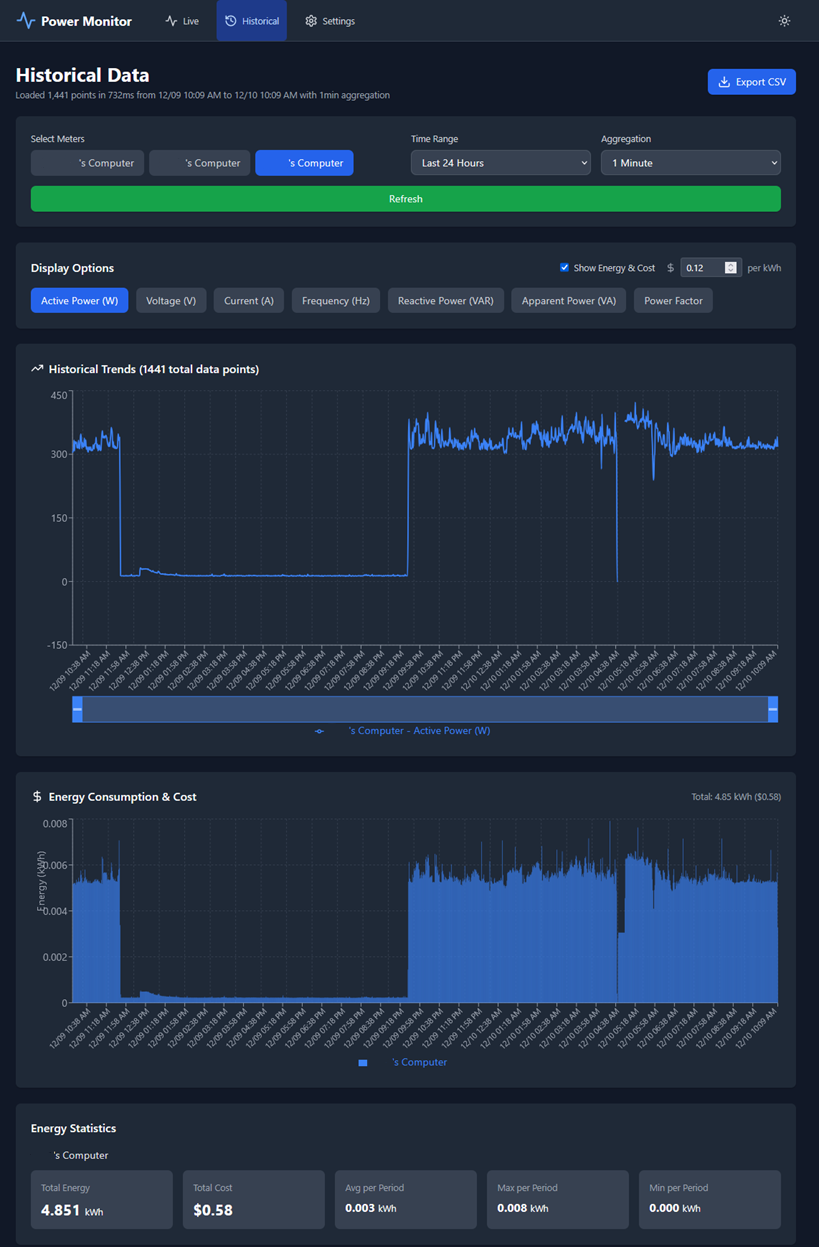
The service is a web server that uses React for the front end and python for the backend. I again used Claude.ai to write much of the code here. The service is containerized using docker, so you should be able to get it up and running fairly easily. I used a Raspberry PI 3+, but in theory any linux computer can run this server. You will need to install docker to compose the containers and to run them. Docker should take care of installing other things for the containers like python and such.
I don't plan to maintain this or improve further at this time. If someone wants to improve this feel free, it won't hurt my feelings if you fork this project and do cool things with it, just give me credit for what you use. I have no idea what license this project should have given it uses a few external libraries, so before you go attempting to monetize this project you might need to check on that.
| Qty | Value | Footprint | References |
|---|---|---|---|
| 4 | 0.1uF | Capacitor_THT:C_Disc_D6.0mm_W4.4mm_P5.00mm | C7, C8, C9, C10 |
| 4 | 10kΩ | Resistor_THT:R_Axial_DIN0207_L6.3mm_D2.5mm_P10.16mm_Horizontal | R1, R2, R4, R7 |
| 3 | 10uF | Capacitor_THT:C_Disc_D5.0mm_W2.5mm_P2.50mm | C12, C13, C15 |
| 3 | 1N5822 Schottky | Diode_THT:D_DO-201AD_P15.24mm_Horizontal | D1, D2, D3 |
| 2 | 0.33uF | Capacitor_THT:C_Disc_D5.0mm_W2.5mm_P2.50mm | C21, C22 |
| 2 | 100Ω | Resistor_THT:R_Axial_DIN0207_L6.3mm_D2.5mm_P10.16mm_Horizontal | R10, R11 |
| 2 | 18nF | Capacitor_THT:C_Disc_D5.0mm_W2.5mm_P5.00mm | C23, C24 |
| 2 | 1kΩ | Resistor_THT:R_Axial_DIN0207_L6.3mm_D2.5mm_P10.16mm_Horizontal | R14, R18 |
| 2 | 5.1kΩ | Resistor_THT:R_Axial_DIN0207_L6.3mm_D2.5mm_P10.16mm_Horizontal | R12, R13 |
| 2 | Series/Para | Connector_PinHeader_2.54mm:PinHeader_2x02_P2.54mm_Vertical | J14, J15 |
| 1 | 1.5A 250V | fuse holders:Fuseholder_Clip-5x20mm_Keystone_3512P_Inline_P23.62x7.27mm_D1.02x2.41x1.02x1.57mm_Horizontal_With_Model | F4 |
| 1 | 100mA 250V | Fuse:Fuseholder_TR5_Littelfuse_No560_No460 | F2 |
| 1 | 100mA 250V | FuseHolder OGD:00318231 | F1 |
| 1 | 100nF | Capacitor_THT:C_Disc_D8.0mm_W5.0mm_P5.00mm | C4 |
| 1 | 10:1 | 3FD-210:3FD-224 | T4 |
| 1 | 12kΩ | Resistor_THT:R_Axial_DIN0207_L6.3mm_D2.5mm_P10.16mm_Horizontal | R6 |
| 1 | 130VAC | Capacitor_THT:C_Disc_D8.0mm_W5.0mm_P5.00mm | RV1 |
| 1 | 16.384MHz | Crystal:Crystal_HC49-U_Vertical | Y1 |
| 1 | 1N4734A 5.6V | Diode_THT:D_DO-41_SOD81_P10.16mm_Horizontal | D4 |
| 1 | 200kΩ | Resistor_THT:R_Axial_DIN0207_L6.3mm_D2.5mm_P10.16mm_Horizontal | R3 |
| 1 | 22μF | Capacitor_THT:CP_Radial_Tantal_D5.5mm_P5.00mm | C2 |
| 1 | 24kΩ | Resistor_THT:R_Axial_DIN0207_L6.3mm_D2.5mm_P10.16mm_Horizontal | R19 |
| 1 | 250mA 250V | FuseHolder OGD:00318231 | F3 |
| 1 | 25Ω 2W | Resistor_THT:R_Axial_DIN0414_L11.9mm_D4.5mm_P5.08mm_Vertical | R8 |
| 1 | 30Ω | Resistor_THT:R_Axial_DIN0207_L6.3mm_D2.5mm_P10.16mm_Horizontal | R9 |
| 1 | 32.768kHz | Crystal:Crystal_DS26_D2.0mm_L6.0mm_Horizontal | Y2 |
| 1 | 39pF | Capacitor_THT:C_Disc_D8.0mm_W5.0mm_P5.00mm | C3 |
| 1 | 4.7uF | Capacitor_THT:C_Disc_D5.0mm_W2.5mm_P2.50mm | C16 |
| 1 | 499Ω | Resistor_THT:R_Axial_DIN0207_L6.3mm_D2.5mm_P10.16mm_Horizontal | R5 |
| 1 | 6.8μH | Inductor_THT:L_Radial_D12.0mm_P5.00mm_Fastron_11P | L1 |
| 1 | 68μF | Capacitor_THT:CP_Radial_Tantal_D5.5mm_P5.00mm | C5 |
| 1 | 6F 6V | Capacitor_THT:C_Rect_L19.0mm_W11.0mm_P15.00mm_MKS4 | C6 |
| 1 | ATM90E32AS-AU-R | ATM90E32AS:QFP50P900X900X120-48N | IC1 |
| 1 | Boost Input | Connector_PinHeader_2.54mm:PinHeader_1x02_P2.54mm_Vertical | J19 |
| 1 | Button Pins | Connector_PinHeader_2.54mm:PinHeader_1x02_P2.54mm_Vertical | J2 |
| 1 | CR1220 | Battery Holders:BH127A1 | BT1 |
| 1 | CT1020 | CT1020:CT1020 | T1 |
| 1 | ESP32-C6-DEVKITC-1-N8 | ESP32:MODULE_ESP32-C6-DEVKITC-1-N8 | U1 |
| 1 | Extras | Connector_PinHeader_2.54mm:PinHeader_1x10_P2.54mm_Vertical | J4 |
| 1 | GSD09002SEU | SD card Holder:GSD09002SEU | J3 |
| 1 | Housing | Mounting Footprints:1591XXF Enclosure 4 point | N1 |
| 1 | I1 | Connector_PinHeader_2.54mm:PinHeader_1x02_P2.54mm_Vertical | J13 |
| 1 | I2 Use/GND | Connector_PinHeader_2.54mm:PinHeader_2x02_P2.54mm_Vertical | J10 |
| 1 | I3 Use/GND | Connector_PinHeader_2.54mm:PinHeader_2x02_P2.54mm_Vertical | J9 |
| 1 | Input | Screw Terminals Custom:CUI_TB005-762-02BE | J11 |
| 1 | LCD Pins | Connector_PinHeader_2.54mm:PinHeader_1x04_P2.54mm_Vertical | J1 |
| 1 | LM2621MMX_NOPB | LM2621:SOP65P490X110-8N | IC2 |
| 1 | LOGO | Memes:Silksong Lace | G*** |
| 1 | LOGO | Memes:tank hill2 0.15.png | G*** |
| 1 | LOGO | Memes:Hornet Silhouette | G*** |
| 1 | LOGO | Memes:darksign | G*** |
| 1 | LOGO | Memes:Hank Hill pimp hat Silkscreen 0.150 | G*** |
| 1 | LOGO | Memes:Hank Hill Silkscreen 0.150 | G*** |
| 1 | LOGO | Memes:Hollow knight Knight | G*** |
| 1 | PCF8523T/1_118 | PFC8523:SO8_SOT96-1_NXP | U3 |
| 1 | PSU LED | LED_THT:LED_D5.0mm | D6 |
| 1 | RAC10E-05SK_277 | RAC10E-05SK_277:RAC10E05SK277 | PS1 |
| 1 | SPI ATM90 | Connector_PinHeader_2.54mm:PinHeader_1x04_P2.54mm_Vertical | J5 |
| 1 | V1 | Connector_PinHeader_2.54mm:PinHeader_1x02_P2.54mm_Vertical | J17 |
| 1 | V2 Use/GND | Connector_PinHeader_2.54mm:PinHeader_2x02_P2.54mm_Vertical | J16 |
| 1 | V3 Use/GND | Connector_PinHeader_2.54mm:PinHeader_2x02_P2.54mm_Vertical | J12 |
| 1 | VCC LED | LED_THT:LED_D5.0mm | D5 |
| 1 | VCC Pins | Connector_PinHeader_2.54mm:PinHeader_1x02_P2.54mm_Vertical | J18 |
| 1 | Vout Trimmer | Potentiometer_THT:Potentiometer_Bourns_3266Y_Vertical | RV2 |
It measures 185 × 126.1 mm and has 2 copper layers, 1.6 mm thick.
80 parts, built around the ESP32-C6-DEVKITC-1-N8, GSD09002SEU, ATM90E32AS-AU-R and CR1220-2. The full list of its parts is on this page, with links to each part's symbol and footprint where PCBKit's library has them.
From the Mourty/Wattmeter-Project repository on GitHub, at the commit this page was made from: the board is Hardware/Circuit and PCB/WattMeter.kicad_pcb and its schematic Hardware/Circuit and PCB/WattMeter.kicad_sch. PCBKit opens the board in the browser, with nothing to install.
Its repository states no licence, so its author keeps all rights: ask Mourty before reusing the design.


ElektorLabs/esp32-energymeter
The Elektor ESP32 Energy Meter project, featuring schematics, PCB designs, and ESPHome integration for advanced energy monitoring


pedrohqr/ra5_2022_m
Base/carrier board for a modular PLC (Programmable Logic Controller): an I/O front-end with no main MCU of its own — sensing and metering peripherals are driven by a separate MCU+LTE modem card that plugs into the…

cvonk/OPNpool
Integrates the functionality of a Pentair pool controller into the smart home using ESP32 SoC.