Skip to the content
PCBKitNew board
2 layers56.5 × 65 mmRaspiIR, the printed circuit board in 3D

This an extension PCB for Raspberry PIs with 40 Pins.

Size
56.5 × 65 mm
Copper layers
2
Thickness
1.6 mm
Parts
35
Nets
44
Pads
142
Tracks, vias
189, 18
Pours
2
Routed
Yes
KiCad
KiCad 4
Created
8 Jul 2018
Updated
8 Jul 2018

Overview

RaspiIR is an open-source printed circuit board by maz3max, from the maz3max/PI-LIRC-HAT repository on GitHub, published under the GPL-2.0 licence. It is a 2-layer board of 56.5 × 65 mm with 35 parts on 44 nets, routed with 189 tracks and 18 vias.

It is built around the MMBT3904 and CAT24C32WI-GT3. Its parts include 5 transistors and 2 connectors.

Main components

2

README

README.md

Raspberry PI LIRC HAT

Now, you can control everything with an infrared remote with your Raspberry Pi!

This an extension PCB for Raspberry PIs with 40 Pins.

Its purpose is to provide a infrared interface compatible with LIRC.

I did my very best to fulfill the Raspberry Pi HAT specification.
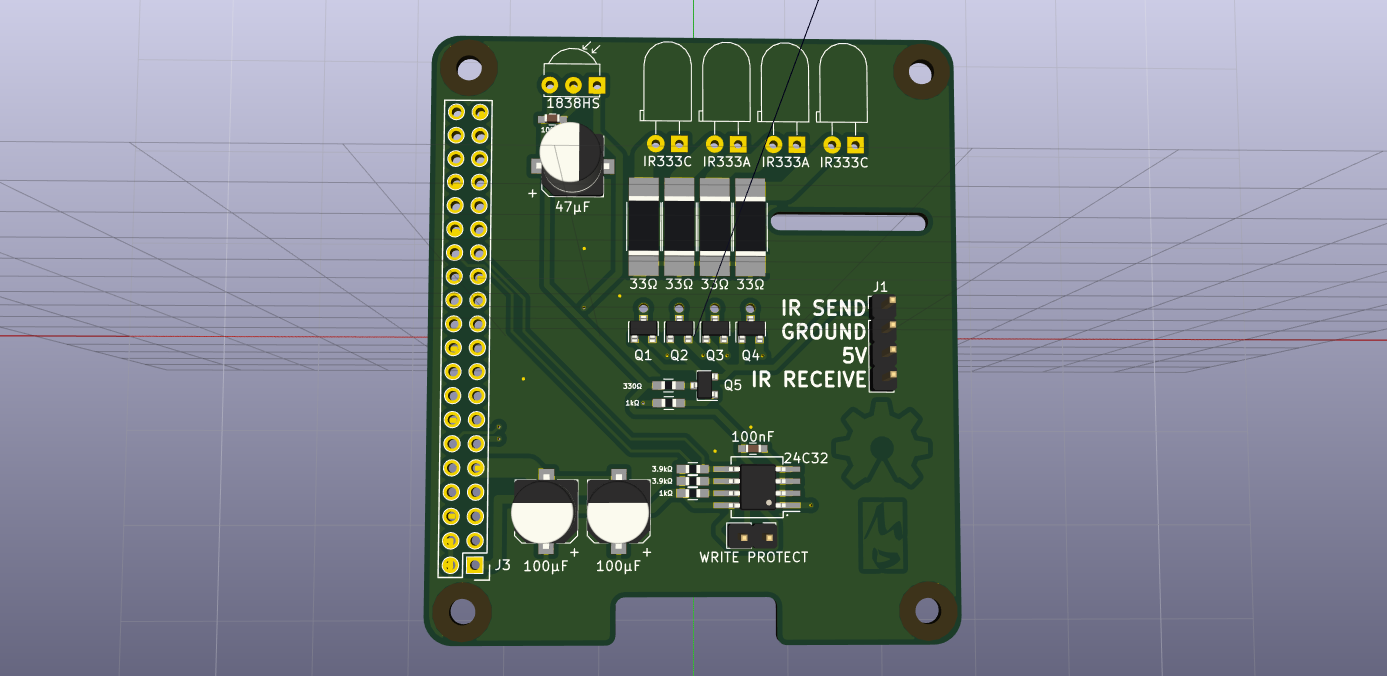
3D render

To build it, you need:

  • bravery, soldering skills, linux
  • The PCB like in the design file in RaspiIR/RaspiIR.kicad_pcb
  • 2x 100nF Ceramic Cap 0603 SMD
  • 2x 100uF Electrolytic Cap SMD 6.3mm diameter
  • 2x IR-LED: Everlight IR333-A
  • 2x IR-LED: Everlight IR333C/H0/L10
  • 1x TSOP383xx or AX-1838 IR receiver
  • 5x MMBT3904TPMSCT-ND NPN transistor SOT-23
  • 1x 24C32 I2C eeprom SOIC-8 or SO-8
  • 4x 33R 1W 2512 SMD resistor
  • 1x 330R 0603 SMD resistor
  • 2x 1k 0603 SMD resistor
  • 2x 3.9k 0603 SMD resistor
  • 1x Pin-Header 0.1" pitch 2x20 pins (at least 8mm high)

After soldering it all together, you have to generate and write content on the ID eeprom. Its purpose is to load the driver when your Raspberry Pi boots.

To achieve this, follow these steps:

  1. compile the tools in pi-lirc-hat/eepromutils with make
  2. use ./eepmake eeprom_settings.txt lircHAT.eep lirc-rpi-overlay.dtbo -c setup-readme-blob to compile the eeprom content
  3. connect the eeprom to the I2C-Pins of a Raspberry (NOT the ID-SCL, ID-SDA pins)
  4. read on how to use eepflash with ./eepflash.sh -h
  5. use eepflash to write the content to the ID eeprom, e.g.:./eepflash.sh -w -f=lircHAT.eep -t=24c32 -d=1 -a=50

After that, you have to install lirc on the Raspberry. This is documented in pi-lirc-hat/eepromutils/setup-readme-blob.

You can also find this in /proc/device-tree/hat/custom_0, because it is included in the eeprom! :D

The design with the 4 IR leds is inspired by TV-B-Gone. The driver overlay is from the Raspberry Pi Kernel source tree with slight modifications. The PCB was designed using KiCAD. I used a template for the PCB design which can be found here

Parts

35
QtyValueFootprintReferences
5MMBT3904TO_SOT_Packages_SMD:SOT-23Q1, Q2, Q3, Q4, Q5
4RPi_Hat:RPi_Hat_Mounting_Hole, , ,
433Resistors_SMD:R_2512_HandSoldering33Ω, 33Ω, 33Ω, 33Ω
4LEDLEDs:LED_D5.0mm_Horicontal_O2.54mmIR333A, IR333A, IR333C, IR333C
3100uCapacitors_SMD:CP_Elec_6.3x7.747µF, 100µF, 100µF
2100nCapacitors_SMD:C_0603_HandSoldering100nF, 100nF
21kResistors_SMD:R_0603_HandSoldering1kΩ, 1kΩ
23k9Resistors_SMD:R_0603_HandSoldering3.9kΩ, 3.9kΩ
1logo:LOGO
1330Resistors_SMD:R_0603_HandSoldering330Ω
1CAT24C32WI-GT3Housings_SOIC:SOIC-8_3.9x4.9mm_Pitch1.27mm24C32
1Conn_01x02Pin_Headers:Pin_Header_Straight_1x02_Pitch2.54mmWRITE PROTECT
1Conn_01x04_MalePin_Headers:Pin_Header_Straight_1x04_Pitch2.54mmJ1
1Raspberry_Pi_2_3RPi_Hat:Pin_Header_Straight_2x20J3
1SO-8_5.3x6.2mm_Pitch1.27mmHousings_SOIC:SO-8_5.3x6.2mm_Pitch1.27mm.
1TSOP343xxOpto-Devices:IRReceiver_Vishay_MOLD-3pin1838HS
1VAL**logo:OSHW_COPPER_10MMOSHW_COPPER_10MM

Questions

How big is the RaspiIR PCB?

It measures 56.5 × 65 mm and has 2 copper layers, 1.6 mm thick.

What parts does the RaspiIR use?

35 parts, built around the MMBT3904 and CAT24C32WI-GT3. The full list of its parts is on this page, with links to each part's symbol and footprint where PCBKit's library has them.

Where can I download the RaspiIR KiCad files?

From the maz3max/PI-LIRC-HAT repository on GitHub, at the commit this page was made from: the board is RaspiIR/RaspiIR.kicad_pcb. PCBKit opens the board in the browser, with nothing to install.

Can I use the RaspiIR design in my own project?

Its repository publishes it under the GPL-2.0 licence: you may reuse it on that licence's terms (keep the author's notice, and for a copyleft licence share your changes alike).

Similar boards

  • 4 layers164.9 × 102 mmCarrier, the printed circuit board in 3D

    Carrier

    AJXD2/carplay-project

    One board that turns the Pi 4 + 7" screen into a complete car radio replacement. It bolts onto the Pi like a HAT, plugs into the truck's radio harness, and does everything the factory radio did plus what the Pi needs:

    171 parts
  • 4 layers65 × 56.5 mm2019-07-03 17:28:54 fpga hat, the printed circuit board in 3D

    2019-07-03 17:28:54 fpga hat

    Wren6991/Snowflake-FPGA

    A cheap iCE40 development board, designed on and for Raspberry Pi

    90 parts31
  • 2 layers65 × 30 mmInfra pHAT, the printed circuit board in 3D

    Infra pHAT

    AnaviTechnology/anavi-infrared

    ANAVI Infrared pHAT is an open source hardware Raspberry Pi pHAT (add-on board) for rapid prototyping of Internet of Things (IoT) powered by free and open source software. It features:

    26 parts22
  • 2 layers65 × 30 mmGardening pHAT, the printed circuit board in 3D

    Gardening pHAT

    AnaviTechnology/anavi-gardening

    ANAVI Gardening uHAT is an open source hardware add-on board for Raspberry Pi that helps you develop smart solutions for monitoring and growing plants.

    27 parts11
  • 2 layers65 × 30 mmAnavi light, the printed circuit board in 3D

    Anavi light

    AnaviTechnology/anavi-light

    Anavi Light pHAT is an open source hardware Raspberry Pi pHAT (add-on board) for controlling RGB LED strip powered by free and open source software. It features:

    27 parts11
  • 2 layers65 × 56 mmRaspberyPI Hat, the printed circuit board in 3D

    RaspberyPI Hat

    AnaviTechnology/anavi-flex

    ANAVI Flex Raspberry Pi HAT

    46 parts8
  • 2 layers65 × 30 mmAnavi play phat, the printed circuit board in 3D

    Anavi play phat

    AnaviTechnology/anavi-play-phat

    Simple open source hardware keyboard for playing games on Raspberry Pi

    25 parts6
  • 2 layers65 × 30 mmPiStripe uHAT, the printed circuit board in 3D

    PiStripe uHAT

    pief/PiStripe_uHAT

    LED stripe add-on board for the Raspberry Pi

    46 parts5