
2 layers96.6 × 82.8 mm

 marvyluvu/Starfield-WX
Portable weather station made for camping and stargazing enthusiasts made for us along with ORBITZ
Starfield is an open-source printed circuit board by marvyluvu, from the marvyluvu/Starfield-WX repository on GitHub. It is a 2-layer board of 68.6 × 53.3 mm with 14 parts on 35 nets, routed with 87 tracks and 13 vias.
It is built around the DHT11. Its parts include 6 connectors and 2 resistors. It belongs with the home automation and IoT boards of this library.
Portable Arduino‑powered dew‑risk weather station with LCD and LED halo.
Starfield WX is a pocket-sized weather station that tells you when dew is about to become a problem for stargazing/ astrophotography.
I love being outside with my telescope, but because of where I live, I always end up with dew messing up my session before I could photograph anything. Starfield WX is my companion project for ORBTIZ. it can warn you about dew forming before it ruins your session.
The brains of the operation is the arduino uno. It:
You can view the full schematic for the ORBITZ PCB below.
The custom STARFIELD pcb plugs directly onto an Arduino Uno and breaks out all parts needed for weather station
key pins:
you can view the full schematic here.
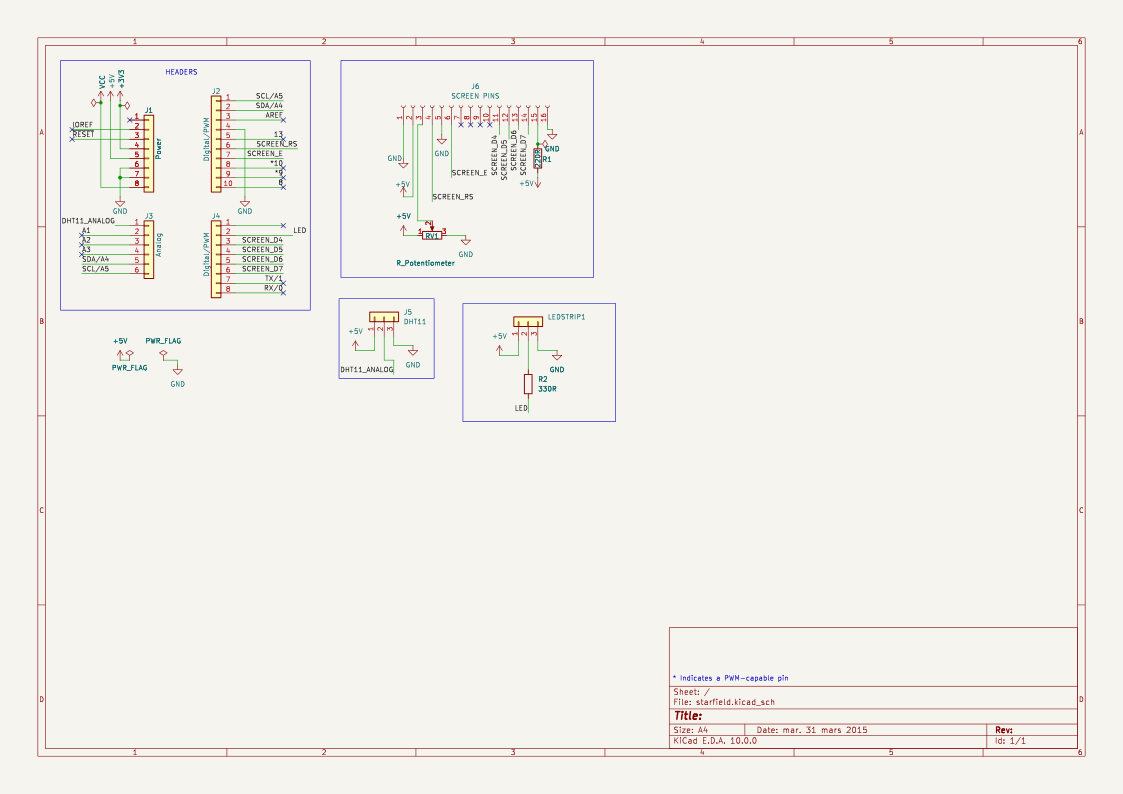
Power on the arduino uno via USB or a 5v supply ( you can also power it using the usb hub on orbitz!!)
StarField WX boots, then starts cycling through three screens on the LCD:
The led halo color shows dew risk : green (low), orange ( medium), red (high). when it turns red, conditions are close to the dew point and you should protect your optics or wrap up the session , unfortunately :(
Below is what the fully assembled design should look like.
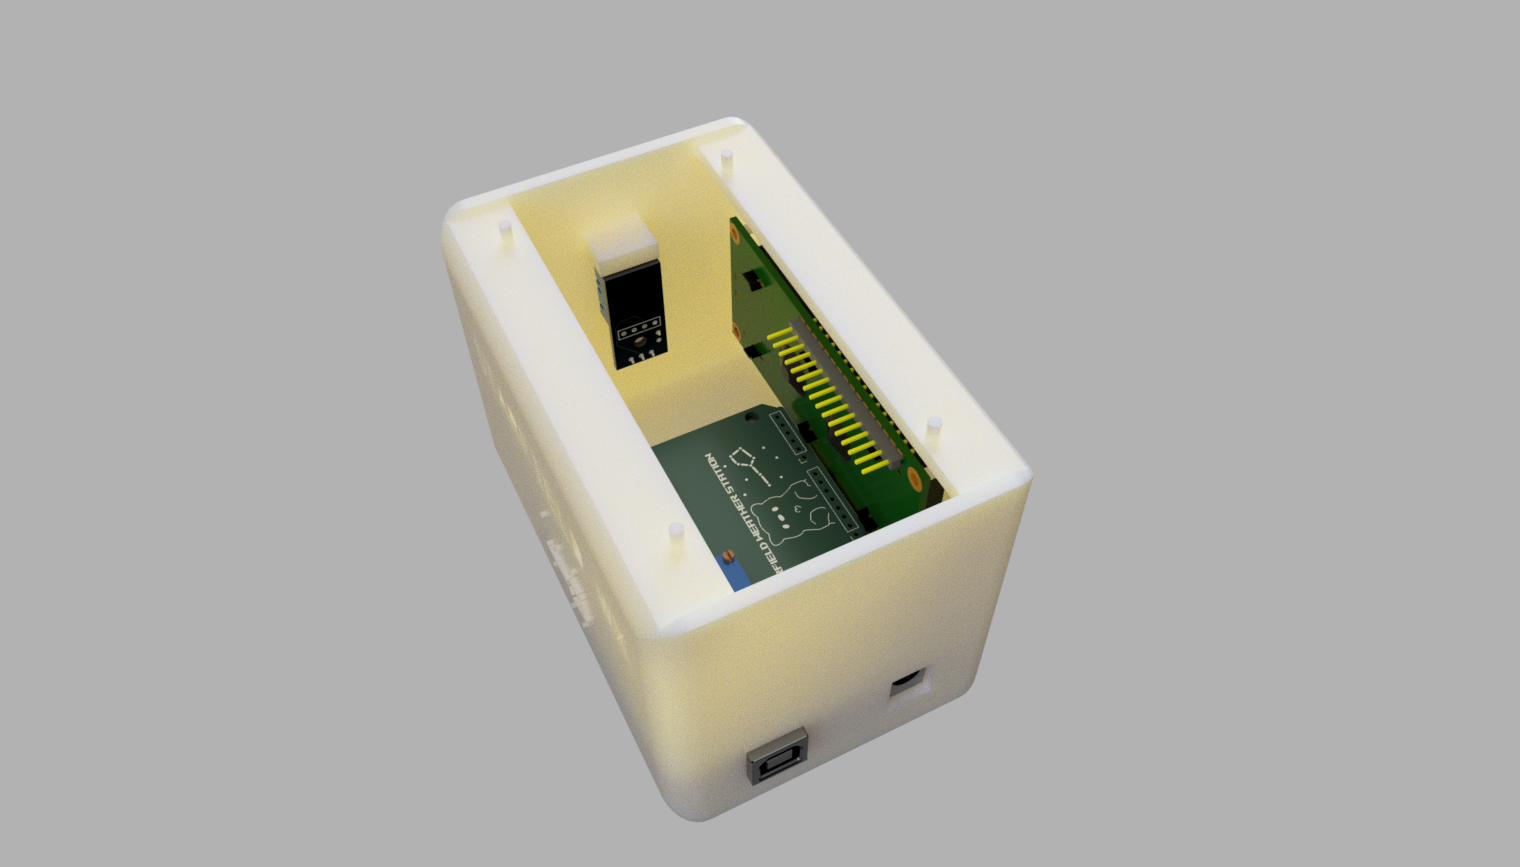
The firmware is a single Arduino sketch that runs on the Uno
Features:
|
FINAL PCB SCREENSHOTS |
|
PCB |
|
FINAL BUILD |
The full detailed BOM is included in this repository:
You can open this file in Excel, Google Sheets, or any spreadsheet tool. It includes part names, descriptions, quantities, prices, and direct purchase links.
Key components
| Product name | Description | Qty | Unit price | Link |
|---|---|---|---|---|
| Arduino Uno | Main microcontroller board | 1 | dh30.90 | Amazon |
| WS2812B RGB STRIP | led halo indicator | 1 | dh3.75 | AliExpress |
| jumper cables | for connecting components internally | 1 | dh12.45 | AliExpress |
| STARFIELD custom pcb | main board | 1 | dh108.67 | JLCPCB |
| MALE HEADERS | LED , DHT11 PINS | 1 | dh3.75 | AliExpress |
| DHT11 MODULE | HUMIDTY AND TEMP SENSOR | 1 | dh17.48 | AliExpress |
| 1602A LCD Display | Main Display | 1 | dh65.88 | Amazon |
| Trimmer potentiometer | Controls display contrast (3296W-103 10K) | 1 | dh10.90 | AliExpress |
| 220 OHM RESISTOR | lcd backlight resistor 220 OHM | 1 | dh3.75 | AliExpress |
| 330 OHM RESISTOR | led strip resistor 330 OHM | 1 | dh3.75 | AliExpress |
| Qty | Value | Footprint | References |
|---|---|---|---|
| 4 | MountingHole_3.2mm | Arduino_MountingHole:MountingHole_3.2mm | MH1, MH2, MH3, MH4 |
| 1 | 220R | Resistor_THT:R_Axial_DIN0207_L6.3mm_D2.5mm_P7.62mm_Horizontal | R1 |
| 1 | 330R | Resistor_THT:R_Axial_DIN0207_L6.3mm_D2.5mm_P7.62mm_Horizontal | R2 |
| 1 | Analog | Connector_PinSocket_2.54mm:PinSocket_1x06_P2.54mm_Vertical | J3 |
| 1 | Conn_01x16_Socket | Connector_PinSocket_2.54mm:PinSocket_1x16_P2.54mm_Vertical | J6 |
| 1 | DHT11 | Connector_PinHeader_2.54mm:PinHeader_1x03_P2.54mm_Vertical | J5 |
| 1 | Digital/PWM | Connector_PinSocket_2.54mm:PinSocket_1x08_P2.54mm_Vertical | J4 |
| 1 | Digital/PWM | Connector_PinSocket_2.54mm:PinSocket_1x10_P2.54mm_Vertical | J2 |
| 1 | LEDSTRIP1 | Connector_PinHeader_2.54mm:PinHeader_1x03_P2.54mm_Vertical | LEDSTRIP1 |
| 1 | Power | Connector_PinSocket_2.54mm:PinSocket_1x08_P2.54mm_Vertical | J1 |
| 1 | R_Potentiometer | Potentiometer_THT:Potentiometer_Bourns_3296W_Vertical | RV1 |

lansidev/conveyor-belt
Miniature 3D printed conveyor belt for simulation and fun working with sensors, all controllable with Raspberry Pi


ebrithiljonas/OMG_PCB
All in One PCB for the OpenMQTTGateway Project

GeorgK/SniffingTrinket
A room climate monitor using the Adafruit Trinket Pro

bhaskar9980/Guardian
Guardian is an advanced, fully automated hydroponics system designed to optimize plant growth and maximize yield.

Twistx77/Firefly
Open WIFI-enabled RGB lamp with temperature, humidity, suspended air particles and eCO2 sensors.

unla-investigacion-desarrollo/ecosistema-iot
Antes de desarrollar el sistema final, realizamos una etapa de exploración donde investigamos y experimentamos con las siguientes tecnologías:
It measures 68.6 × 53.3 mm and has 2 copper layers, 1.6 mm thick.
14 parts, built around the DHT11. The full list of its parts is on this page, with links to each part's symbol and footprint where PCBKit's library has them.
From the marvyluvu/Starfield-WX repository on GitHub, at the commit this page was made from: the board is hardware/starfield.kicad_pcb and its schematic hardware/starfield.kicad_sch. PCBKit opens the board in the browser, with nothing to install.
Its repository states no licence, so its author keeps all rights: ask marvyluvu before reusing the design.