2 layers28.3 × 39.8 mm
LevelShifter
gusmanb/logicanalyzer
24 channel, 100Msps logic analyzer hardware and software
21 parts5.1kGPL-3.0
 maltman23/Brain_Machine_kit10
A hackable Sound & Light Machine soldering kit that is easy to make, and comes pre-programmed with a nice 14-minute meditation brainwave sequence.
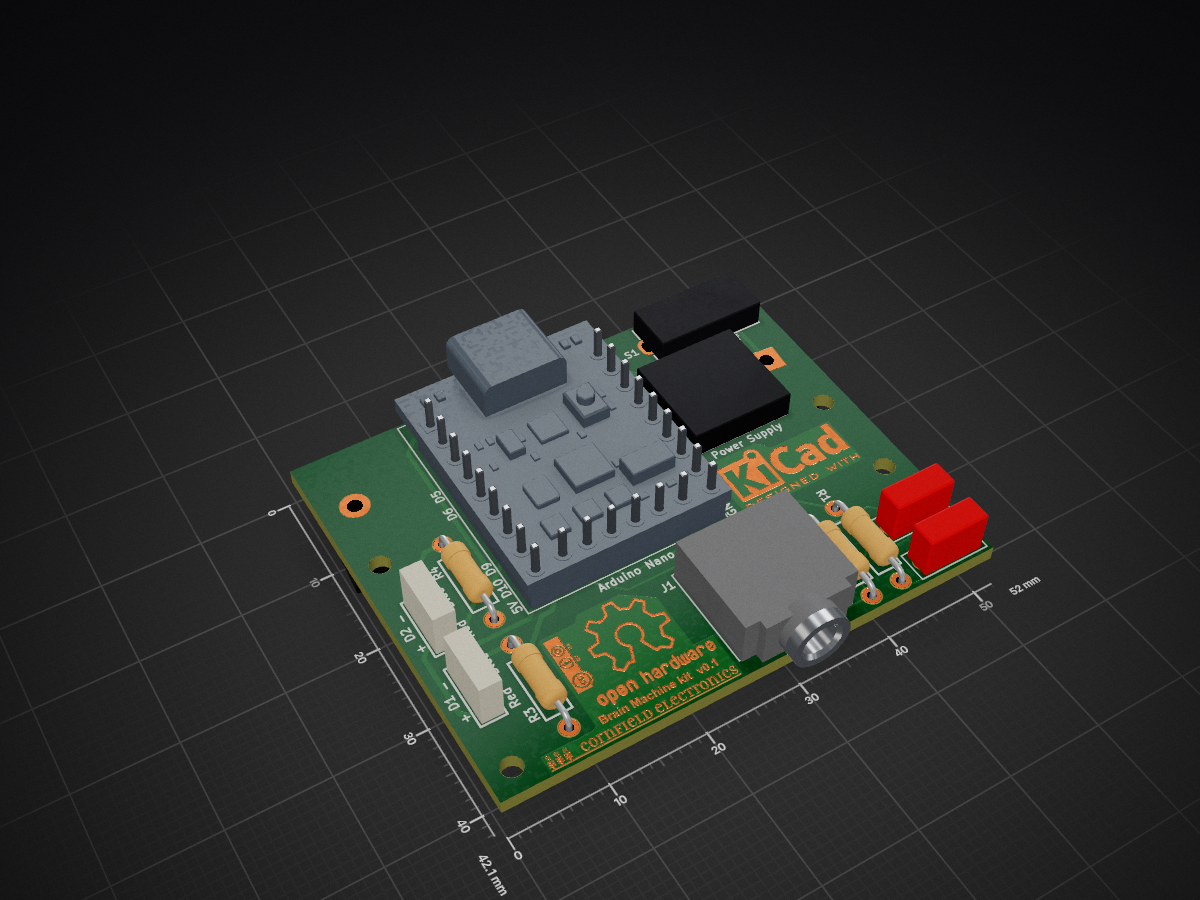
Brain Machine kit is an open-source printed circuit board by maltman23, from the maltman23/Brain_Machine_kit repository on GitHub. It is a 2-layer board of 52 × 42.1 mm with 21 parts on 32 nets, routed with 68 tracks and 0 vias.
Its parts include 4 resistors, 2 capacitors, 2 diodes, 1 connector and 1 switch. It belongs with the audio and music boards of this library.
A hackable Sound & Light Machine kit that is easy to make,
and comes pre-programmed with a really nice 14-minute meditation brainwave sequence.
Not only that, but you get to hallucinate beautiful colors and patterns along the way...
Great for learning to solder -- even for total beginners.
Great for hacking on to play with brainwave sequences.
Great for Meditating, Hallucinating, and Tripping Out!
This new version of the Brain Machine kit functions exactly like the other versions.
It comes pre-programmed with the same really nice meditation sequence.
The main differences between the new Brain Machine kit and the old one are -- the new one:
The Brain Machine comes pre-programmed with a brainwave sequence for a nice 14-minute long Meditation.
The sequence starts with lots of Beta (awake / conscious), which is where most people will be when they begin.
Then Alpha waves (dreamy / trancy) are added, to connect with subconscious Theta that will be coming up.
Then the Beta is reduced (for less conscious, making it easier to be move more into a trance).
Then some Theta (more subconscious) is added, and in the middle, there are some pulses of Delta (creativity).
Then the sequence is reversed, to come back up, nice and refreshed.
The Meditation Arduino sketch is included in this repository.
Early research over the last few years at MIT
and other research labs shows that "plaque" (which is one cause of Alzheimer's pathology) is reduced in mice.
Studies are ongoing for helping humans with Alzheimer's pathology.
40 Hz Gamma stimulation may also be helpful for "chemo brain fog".
There may also be some benefit to people with CFS/ME, or people with "brain fog" from long Covid.
A Gamma Arduino sketch is included in this repository. It plays Gamma waves (40.0 Hz) for one hour.
The sleep sequence starts out the same as the meditation sequence, but then keeps the brainwave frequencies at mostly Theta waves, with a little bit of Alpha, and with some pusling Delta. This is enough to get you to drift off to sleep.
A Sleep Arduino sketch is included in this repository. It plays for 29.5 miniutes.
The Brain Machine was originally a project I created by hacking the Adafruit MiniPOV3 kit,
which was a really cool kit, but is no longer available.
https://www.adafruit.com/product/20
This was in 2007, before Arduino was popular, and I used the MiniPOV3 kit as a platform for many interesting projects.
I used these intriguing projects to make it fun and easy to teach total beginners of all ages how to solder at my workshops all over the world.
The Brain Machine was one of these projects -- and it was popular.
I wrote up the project for MAKE Magazine, issue #10, in 2007:
https://makezine.com/article/home/fun-games/the-brain-machine/
After giving countless well-attended soldering workshops where Brain Machines, with the MiniPOV3 hack,
were very popular amongst participants,
in 2010 I got together with Limor Fried ("Ladyada") (who founded Adafruit Industries), to create a Brain Machine kit.
This kit was popular for quite a number of years. Although it is no longer available, the cool webpage for it is still up:
https://www.adafruit.com/product/287
In 2011, after Arduino became quite popular for making it much easier to make just about anything with microcontrollers,
Chris Sparnicht ("Laughter On Water"), created an Arduino version of the Brain Machine, based on my original project.
https://github.com/LaughterOnWater/Arduino-Brain-Machine
Many thanks, Chris!
This year (2025) I decided to create a new, much easier to make version of the kit I made with Limor.
The result is the project in this GitHub repository, with all documentation given.
It has been known since people started recording brainwaves (with an EEG) in the 1920s, that if you blink lights at brainwave frequencies, when a person watches the blinking lights (with their eyes closed), for most people, their brain will synchronize to the external brainwave frequencies. (This is called "entrainment".) And people subjectively say that they feel similarly as if their brain were generating those brainwave frequency on their own (for instance: a state of meditation). One interesting (and popular) side effect is that people hallucinate beautiful colors and patterns while enjoying the state they are in.
People started creating devices to generate brainwave frequencies as early as the 1950s. Here is one example -- Brion Gysin's Dreammachine:
https://en.wikipedia.org/wiki/Dreamachine
Later people added sound, in the form of "binaural beats".
When there are two different pitches generated in a physical space, the difference in frequency between two pitches causes a physical "beat frequency" which everyone can hear.
If instead, the two different pitches are presented separately to each ear,
the difference in the two pitches is (oddly) perceived inside most peoples' brains
as an imaginary beat frequency, which is called a "binaural beat".
In the 1970s, when microcontrollers started to become affordable, people started making commercial devices that created a sequence of brainwave frequencies, presented with blinking lights (in front of glasses) and binaural beats (with headphones). These devices were called "Sound & Light Machines". They were somewhat popular for some people, but also kind of expensive -- several hundred US dollars.
In the early 1990s I created my own Sound & Light Machine, using an inexpensive microcontroller that was available. I have been meditating since I was 13 years old, and it became an important part of my well-being and my life. I was at a university where I volunteered as a subject for brainwave studies. While there I learned that you can record brainwaves and watch as people go into and out of a meditative state (and other states, such as sleep). I thought it would be cool to make a device that played those frequencies back through LEDs and binaural beats through headphones -- using a sequence of brainwave frequencies that were recorded from me going into and out of a nice 15-minute meditation. The total cost was about US $5. I thought that others would like to be able to easily meditate by wearing and using my Sound & Light Machine -- especially if I promised them that they would hallucinate beautiful colors and patterns along the way. I considered manufacturing and selling them. But, I was too busy at the time.
Then, over 10 years later, after the first Maker Faire in 2006, after meeting Limor Fried, and seeing her MiniPOV3 kit, I thought it would be fun to use her kit as a platform to make it easy for total beginners to learn soldering, and to make several projects that I developed using the MiniPOV3 kit -- including what I now called the "Brain Machine".
As stated earlier, this turned into the Brain Machine kit that I created with Limor. It also inspired Chris "Laughter On Water" to make his Arduino version. And, many years later, I'm now making a new, Arduino-based Brain Machine kit.
To create the binaural beat frequencies that we desire, we choose a central pitch, and generate pitches for each ear, as needed (using the Arduino Tone library), which are half of the desired difference higher and lower from the central pitch. If we choose a central pitch of 200 Hz, we can generate the following pitches for each ear to create the desired binaural beat for our brains to synch up with (entrain to):
| Brainwave type | R Ear | L Ear | Beat |
|---|---|---|---|
| Gama: | 80.00 | 120.00 | 40.0 Hz |
| Beta: | 92.80 | 107.20 | 14.4 Hz |
| Alpha: | 94.45 | 105.55 | 11.1 Hz |
| Theta: | 97.00 | 103.00 | 6.0 Hz |
| Delta: | 98.90 | 101.10 | 2.2 Hz |
For this new version of the Brain Machine kit, I use the Arduino Nano SuperMicro as the controller.
It is a little bigger than a postage stamp, and is a complete Arduino Nano.
It also comes with 3 NeoPixel LEDs connected to Arduino Pin 2 (so to use Arduino Pin 2 you would need to unsolder the first NeoPixel).
It's a nice little board, available on Aliexpress:
https://www.aliexpress.com/item/1005006468917096.html
For people interested in playing with this nice little board, I created a Blink_Test program to blink all of the LEDs on this board, as well as document how to easily use it with the free Arduino software:
https://github.com/maltman23/ArduinoNanoSuperMini
Light and Sound Machines, such as this one, can be fun for many of us, but may be seriously dangerous for those prone to seizures or who are photosensitive. When in doubt, seek medical attention. You assume all liability for any damage done to your equipment, or to your own health, or to those whom you expose to this technology. Any and all notes, sketches or associated files within this repository are presented as is, with no promise or gurarantee of any particular result(s).
USE AT YOUR OWN RISK.
Creative Commons Attribution-Sharealike 4.0 International
CC BY-SA 4.0
https://creativecommons.org/licenses/by-sa/4.0/
| Qty | Value | Footprint | References |
|---|---|---|---|
| 2 | 1uF | Mitch_Library:Cap_THT_0.5mm | C1, C2 |
| 2 | 4.7K | Mitch_Library:Resistor_THT_0.25W | R1, R2 |
| 2 | 47 | Mitch_Library:Resistor_THT_0.25W | R3, R4 |
| 2 | White | Mitch_Library:LEDs_with_wires | D1, D2 |
| 1 | LOGO | Mitch_Library:Cornfield_Electronics_logo_19mm | G*** |
| 1 | LOGO | Mitch_Library:Open_Hardware_logo_12mm | G*** |
| 1 | SPST, 5-pin | Mitch_Library:SPST_Slide_Switch_5-pin | S1 |
| 1 | ~ | Mitch_Library:Battery_Holder_Keystone_2466_1xAAA_TH | B1 |
| 1 | ~ | Mitch_Library:0.9-5V_To_5V_DC-DC_Step-Up_Power_Module | MOD2 |
| 1 | ~ | Mitch_Library:3.5mm_CUI_SJ1-3525NG_Horizontal | J1 |
| 1 | ~ | Mitch_Library:Nano_V3_SuperMini | MOD1 |
The 15 most common of 21 parts.
gusmanb/logicanalyzer
24 channel, 100Msps logic analyzer hardware and software

mntmn/amiga2000-gfxcard
MNT VA2000, an Open Source Amiga 2/3/4000 Graphics Card (Zorro II/III), written in Verilog


hackclub/OnBoard
💡 Join 1,000 teenagers and make your first PCB with a $100 grant!

drandyhaas/KiCadRoutingTools
A set of Python/Rust tools to aid routing in KiCad

Arrow-air/project-quiver
Project Quiver documentation, designs, and project artifacts.


It measures 52 × 42.1 mm and has 2 copper layers, 1.6 mm thick.
21 parts. The full list of its parts is on this page, with links to each part's symbol and footprint where PCBKit's library has them.
From the maltman23/Brain_Machine_kit repository on GitHub, at the commit this page was made from: the board is KiCad/Brain_Machine_kit/Brain_Machine_kit/KiCad/Brain_Machine_kit.kicad_pcb and its schematic KiCad/Brain_Machine_kit/Brain_Machine_kit/KiCad/Brain_Machine_kit.kicad_sch. PCBKit opens the board in the browser, with nothing to install.
Its repository states no licence, so its author keeps all rights: ask maltman23 before reusing the design.