2 layers60 × 30 mm
Controller
google/mozc-devices
Circuit diagrams and firmware source code for Gboard DIY keyboards
11 parts3kApache-2.0

 jwestfall69/openkey-kabuki12
Kabuki CPU key re-programmer
Openkey kabuki is an open-source printed circuit board by jwestfall69, from the jwestfall69/openkey-kabuki repository on GitHub, published under the Unlicense licence. It is a 2-layer board of 18.3 × 51.4 mm with 11 parts on 47 nets, routed with 107 tracks and 1 via.
Its parts include 2 ICs, 1 capacitor, 1 connector and 1 switch. It belongs with the AVR (ATmega, ATtiny) boards of this library.
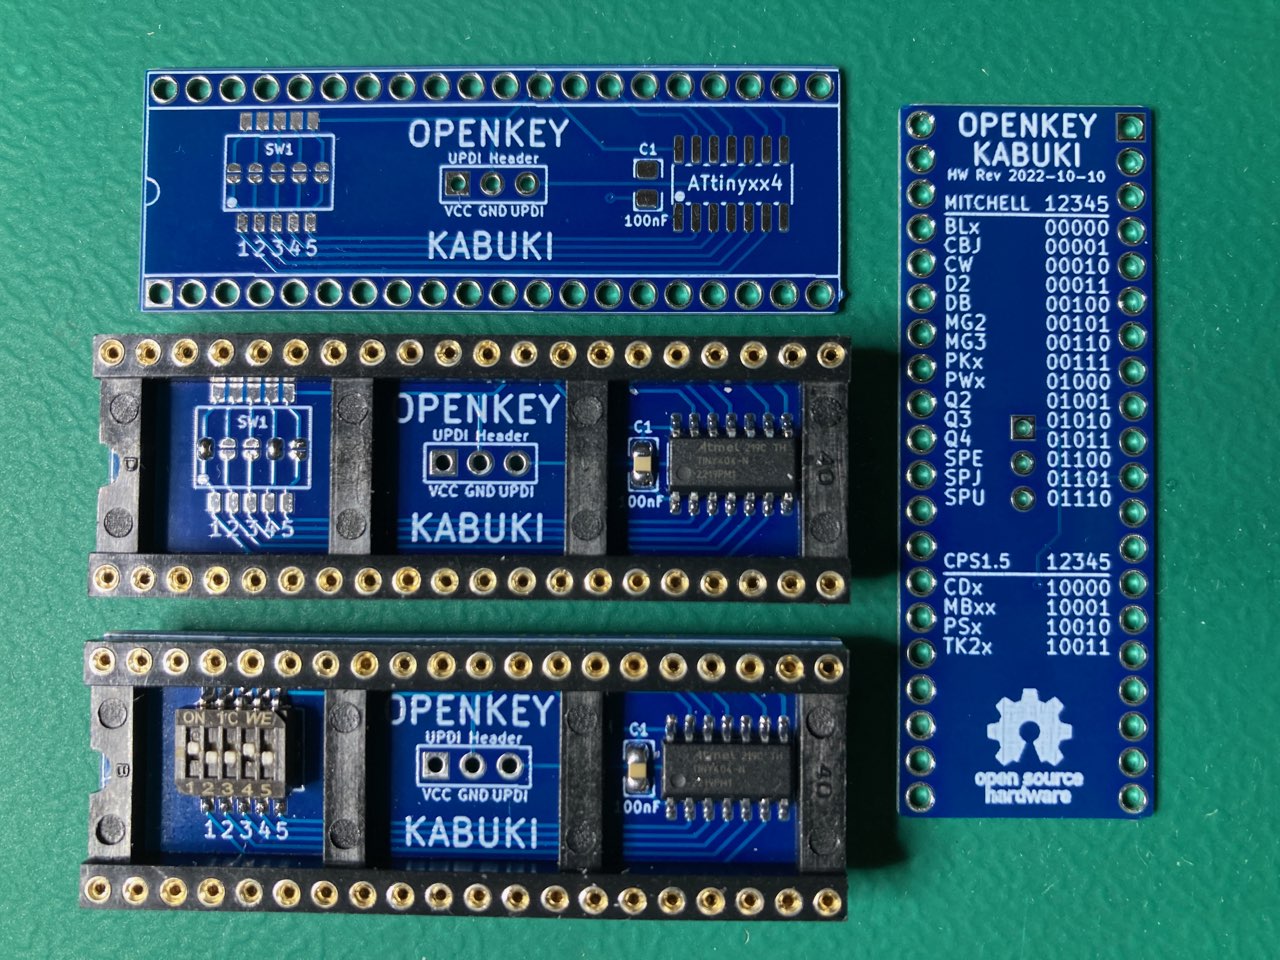
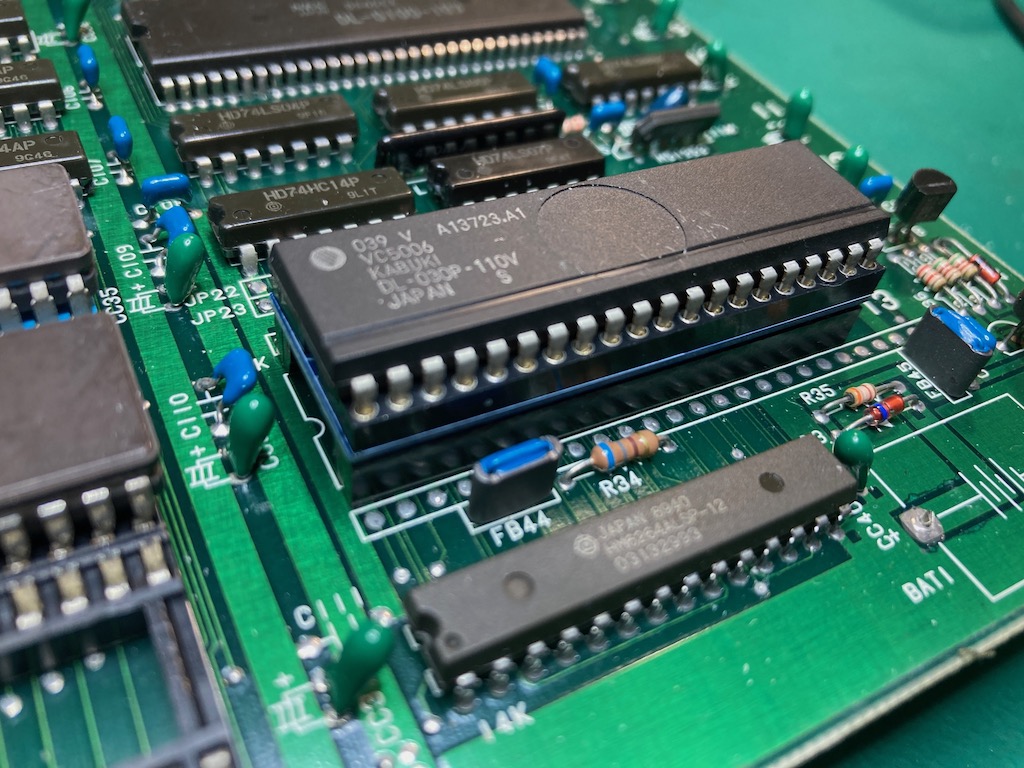
This is an opensource/hardware implementation of an on the fly kabuki CPU key programmer that consists of a PCB that sits between the CPU socket and the kabuki CPU. The kabuki CPU is found in Mitchell and CPS 1.5 arcade boards and contains keys for decrypting/decoding the program roms.
Installed:
This project is providing the same functionality as Undamned's InfiniKey-Kabuki. The lack of supply is what prompted me to make openkey-kabuki. If they ever end up coming back in stock please consider purchasing those to support Undamned's work.
Details on how to program a kabuki CPU's key data can be found in Eduardo Cruz's write up and youtube video.
Details on what to program can be found in MAME's decryption code for the kabuki CPU.
PCB: I would consider the design PCB done at this point. I'm open to any input on changes/improvements as this is my first PCB design.
Firmware: Need to get untested games tested
Documentation: Done
openkey-kabuki supports either having a 5 position switch or using solder jumpers for picking which game key to use. For the switch, ensure the switches are fully set. You should hear a click sound as you change the position.
Below is a list of supported games and what switches/jumpers must be used for each.
| Switch 12345 | Program ROM Labels | MAME Sets | Game Names | Tested / Working |
|---|---|---|---|---|
| 00000 | BLE BLJ | block blockj | Block Block | YES (conversion) |
| 00001 | CBJ | cbasebal | Capcom Baseball | |
| 00010 | CW | cworld | Capcom World | YES (conversion) |
| 00011 | D2 | dokaben2 | Dokaben 2 | YES (conversion) |
| 00100 | DB | dokaben | Dokaben | YES (conversion) |
| 00101 | MG2 | mgakuen2 | Mahjong Gakuen 2 Gakuen-chou no Fukushuu | YES |
| 00110 | MG3 | marukin | Super Marukin-Ban | YES (conversion) |
| 00111 | PK PKO | pkladiesl pkladies | Poker Ladies | YES (conversion) |
| 01000 | PWE PWJ PWU | pang pompingw bbros | Pang Pomping World Buster Bros | YES |
| 01001 | Q2 | hatena | Adventure Quiz 2 - Hatena? no Daibouken | YES (conversion) |
| 01010 | Q3 | qtono1 | Quiz Tonosama no Yabou | YES |
| 01011 | Q4 | qsangoku | Quiz Sangokushi | YES |
| 01100 | SPE | spang | Super Pang (World) | YES |
| 01101 | SPJ | spangj | Super Pang (Japan) | YES |
| 01110 | SPU | sbbros | Super Buster Bros | YES |
| 01111 | ??? | ??? | Ashita Tenki ni Naare (place holder) |
| Switch 12345 | Program ROM Labels | MAME Sets | Game Names | Tested / Working |
|---|---|---|---|---|
| 10000 | CDE CDJ CDT CDU | dino dinoj dinoa dinou | Cadillacs and Dinosaurs | |
| 10001 | MBE MBJ MBU MBDE MBDJ | slammast mbomberj slammastu mbombrd mbombrdj | Saturday Night Slam Masters Muscle Bomber Muscle Bomber Duo | YES |
| 10010 | PSE PSH PSJ PSE | punisher punisherh punisherj punisheru | Punisher | YES |
| 10011 | TK2A TK2E TK2J TK2U | wofa wof wofj wofu | Warriors of Fate | YES |
IMPORTANT: There is a compatibility issue with the older 92636D-3 revision of the D board. Specifics on this issue can be found here
When openkey-kabuki is used on a 92636D-3 board revision you will get:
Thus far I've only seen WOF using this older version of the D board.
The compatibility issue was tracked down to a bug in the D9K1 PAL thats on 92636D-3. The fix is to upgrade that PAL to D9K2, which is found on the newer revision of the D board (92636D-5).
You will want to pick 0.8mm PCB thickness instead of the default of 1.6mm. A 1.6mm thick PCB will make the legs on openkey-kabuki to be a little to short and cause it to not be fully secure in the CPU socket.
I've been using jlcpcb for PCB manufacturing. The only real downside I've seen with them is they charge a fee (~$17) if you pick a color other then green or black with 0.8mm PCB thickness. Also watch out, by default they will add an order number to the silk screen unless you tell them not to.
| Description | Part Number | DigiKey | Mouser | Notes |
|---|---|---|---|---|
| 40 Pin Dip Machine Socket | Adam Tech ICM-640-1-GT-HT | 2057-ICM-640-1-GT-HT-ND | The specific part number isn't required, but it must be a machined 40 pin dip socket with the cross members in the same locations as seen in the picture at the top of this page. This part from Aliexpress worked for me as well. | |
| ATtiny404 20Mhz | ATTINY404-SSN | ATTINY404-SSN-ND | 556-ATTINY404-SSNR | Other ATtiny tinyAVR 0/1/2-series models should be viable as well. The code compiles to just over 1K in size, so any that have 2k or more of flash should work. Just note I have only tested with 404s |
| 100nf / 0.1uf SMD Ceramic Capacitor 0805 Size | ||||
| 5 Position Slide Switch | Würth Elektronik 416131160805 | 732-3855-2-ND | 710-416131160805 | Optional not needed if using the solder jumpers to pick the game. This part more then doubles the BOM cost. |
NOTE: Additional components maybe needed if you need to revert any previously made desuicide modifications to the arcade PCB. Check the Installation section at the bottom for details.
The first thing you should do is a test fit of the socket into the openkey-kabuki PCB. I came across a couple PCBs in a batch that didn't fit and wasn't until after I had soldered the SMD components that I found this out.
As you can see in the first socket in the picture below the pins start out wide then go skinny. Normally the wide part is used to keep the socket up off a board, however the openkey-kabuki PCB has extra wide through holes to allow it to sit flush with the plastic part of the socket. Doing this allows the pins from the socket to be long enough to fit properly into the CPU socket of the arcade board.
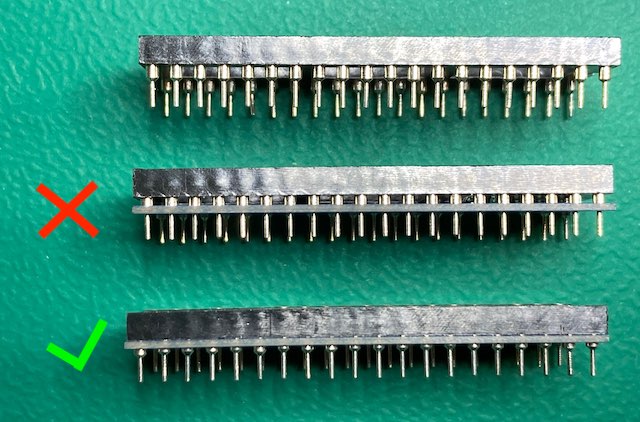
You should solder the SMD components first. Take special care to void getting any solder into any of the socket through holes.
When soldering the socket its best to not use a ton of solder. The below picture is a board where the socket hasn't been soldered in yet.
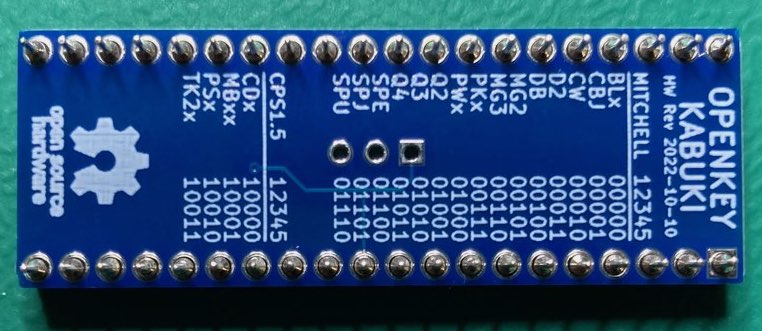
Note the small gap between the through holes and socket pins. Solder will naturally want to wick up into that gap. I generally just use enough solder so that the gap around the socket pin becomes filled.
Once you have completed soldering the socket you should check the skinny part of the pins to verify there aren't any solder blobs on them. These could cause damage to the CPU socket.
Programming is done with a UPDI programmer. I've been using this one:
Serial UPDI Programmer for ATmega 0-Series, or ATtiny 0-Series or 1-Series, or AVR DA or AVR DB
Note: This programmer (and likely others) has a switch for 3.3V and 5V. Set it to 5V.
The openkey-kabuki programming port is setup so you can wedge the pins from the above programmer directly into them to programming.
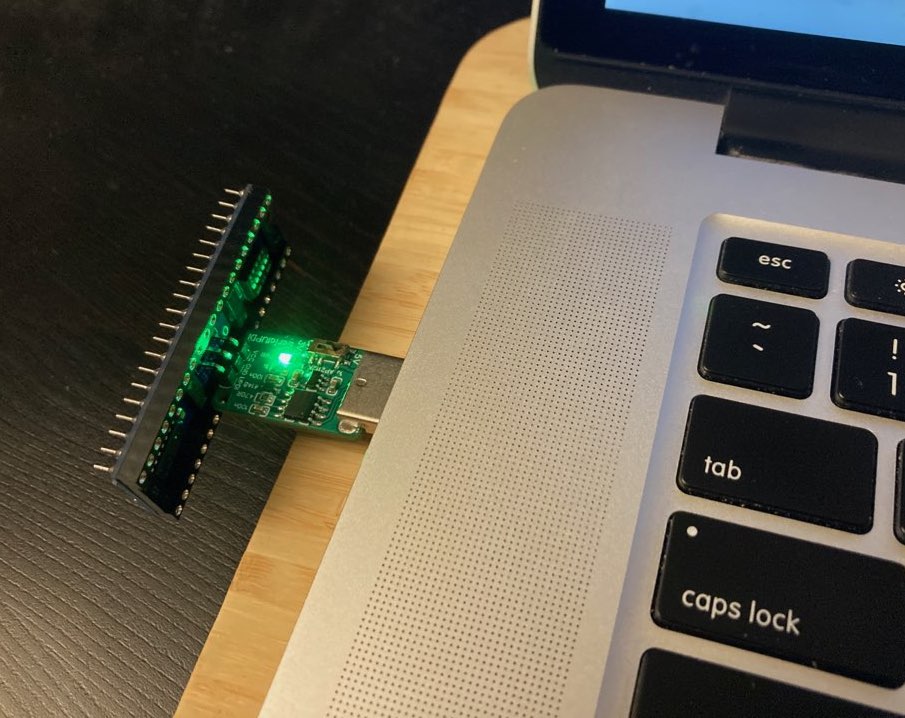
Of course be sure you properly orient the board so the labeled pin/holes match up. vcc to vcc, gnd to gnd, and updi to updi.
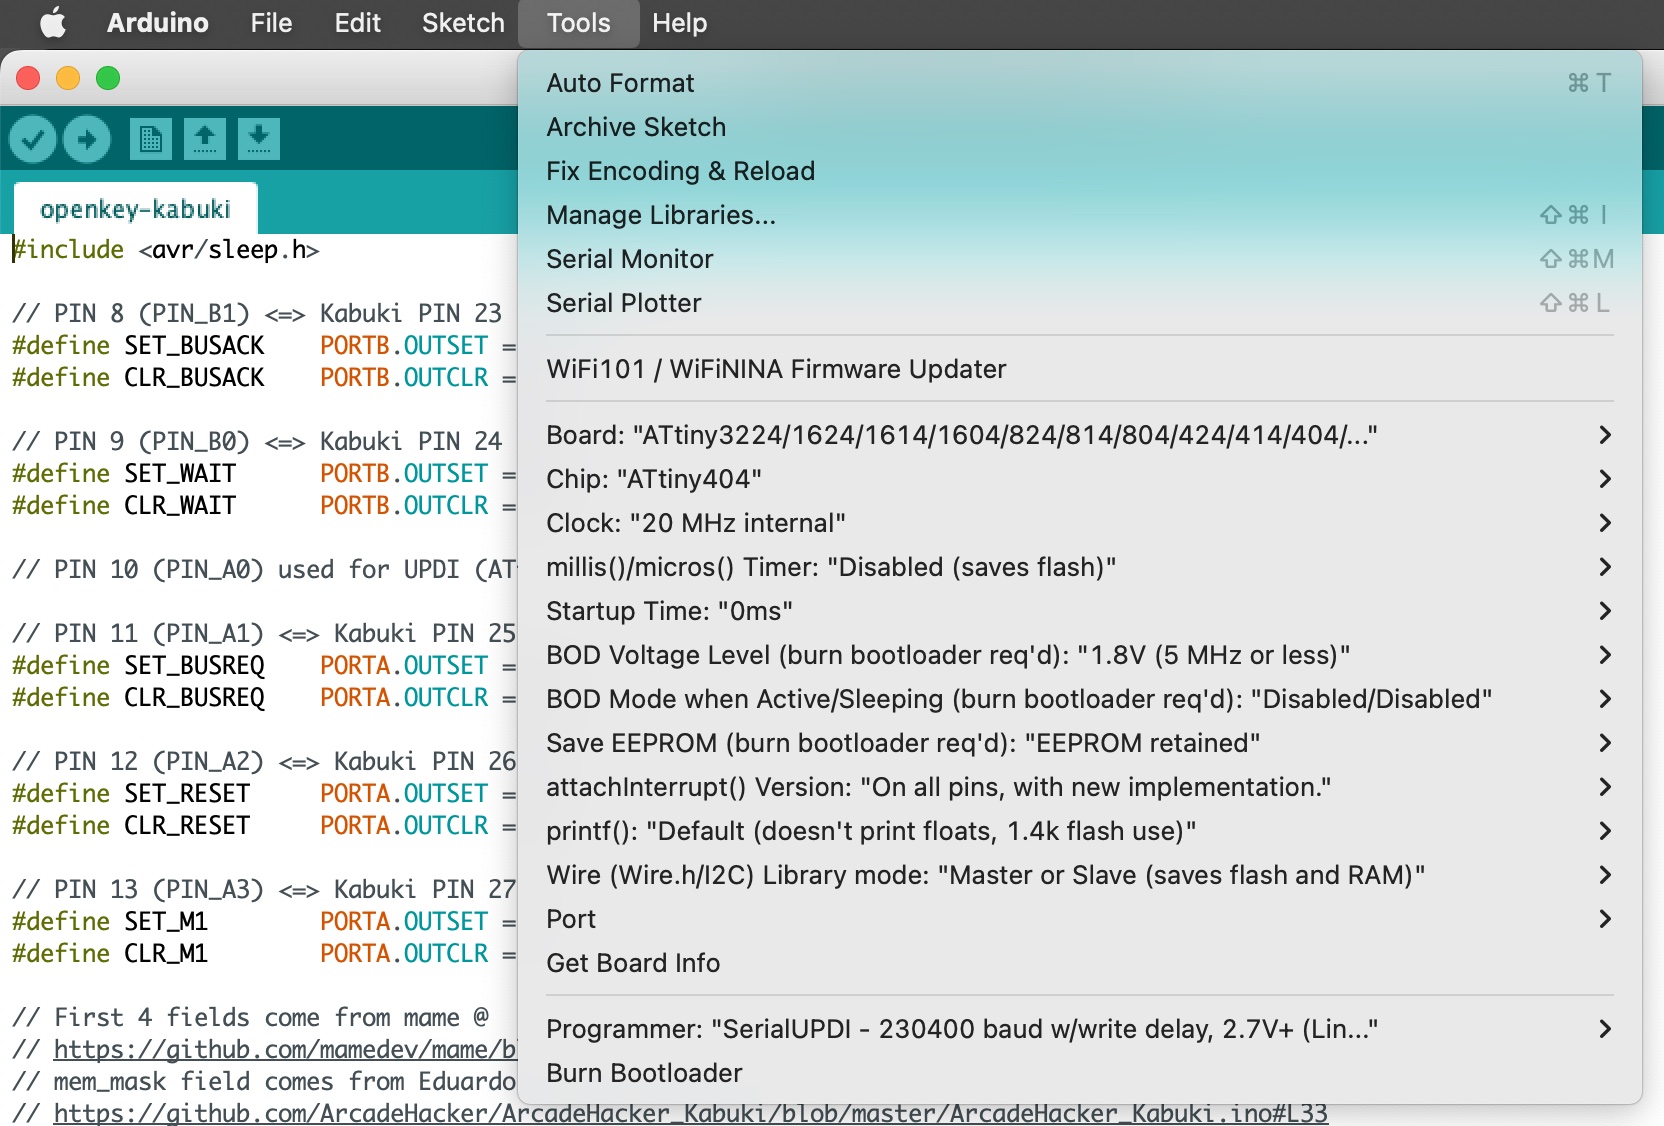
For software I've been using the Arduino IDE with megaTinyCore, which adds support for tinyAVR 0/1/2-Series MCUs.
NOTE: The makers of megaTinyCore currently recommend using Arduino IDE version 1.8.13 for best compatibility. 2.0 definitely does not work!
To install the megaTinyCore you, should just need to add http://drazzy.com/package_drazzy.com_index.json to "Additional Boards Manager URLs" in the settings for the Arduino IDE.
From there you need to configure the board/programming settings. I've been using these:
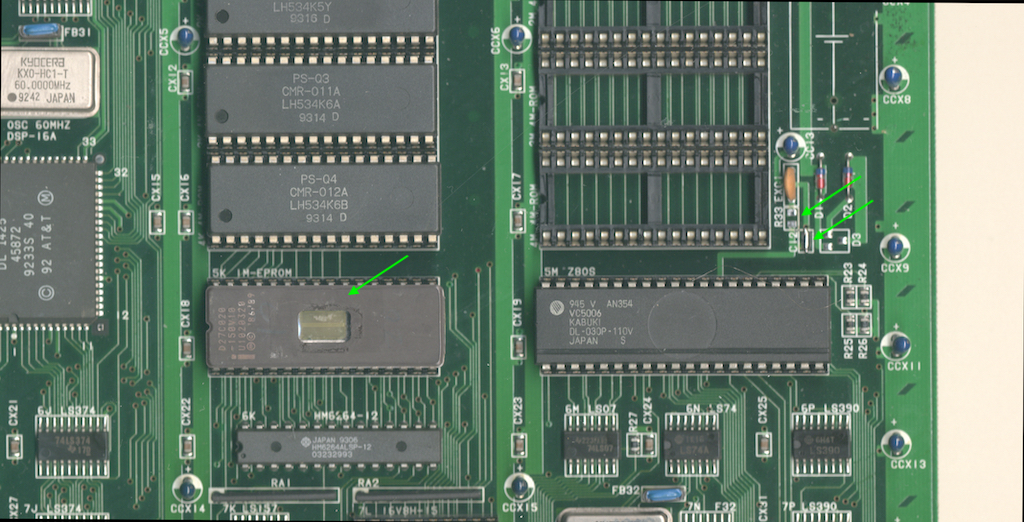
Prior to installing openkey-kabuki you should verify you don't have the The Dead Battery Society mod installed on your mitchell or cps 1.5 D board. Part of the DBS mod is to tie pin 28 of the kabuki CPU to GND. This pin is normally fed voltage from the battery/vcc to supply the CPU with power for its internal ram holding the key data. openkey-kabuki will not function unless this is reverted.
Below is how you can identify if the DBS mod is been installed and how to remove it.
This is what a dead battery society mod will look like
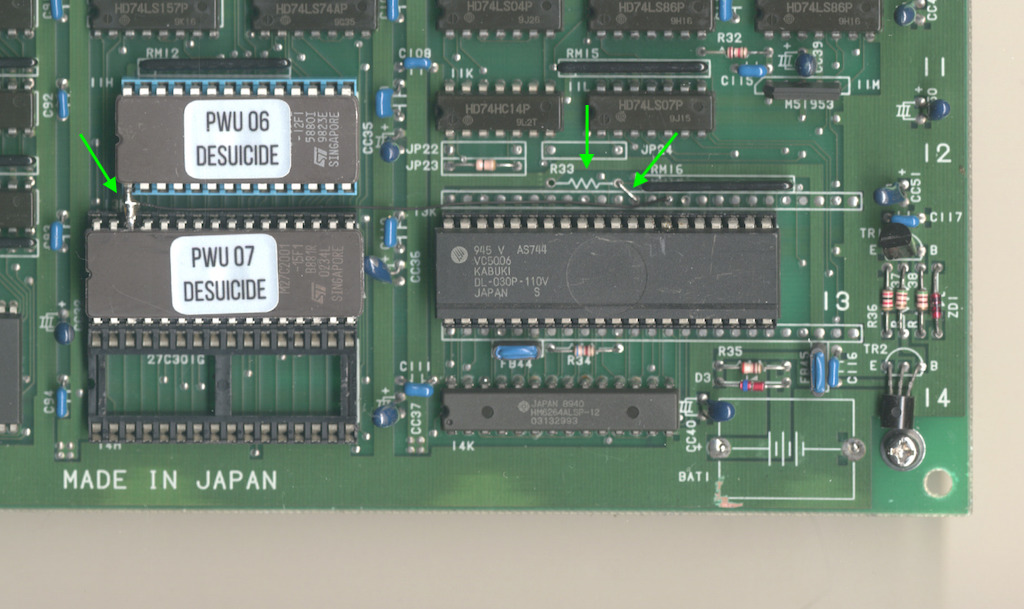
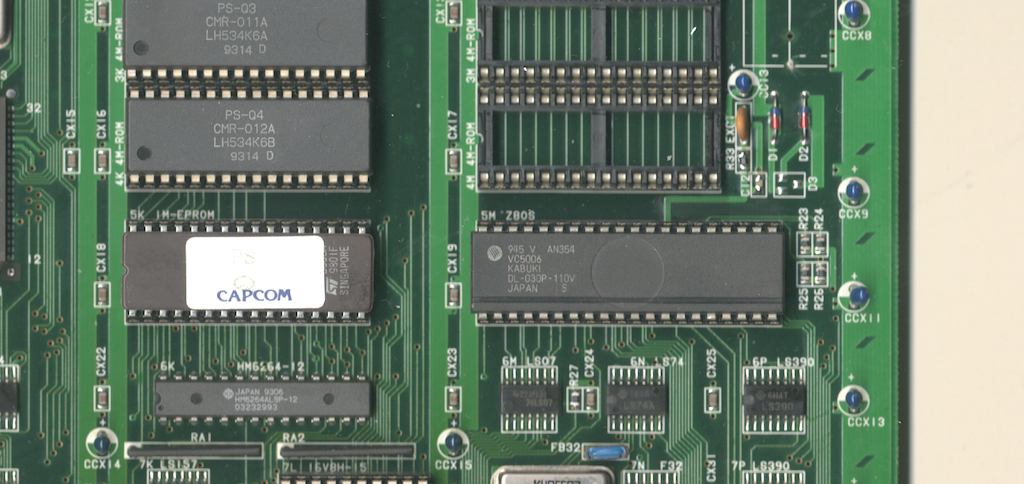
All of these things will need to be reverted in order to use openkey-kabuki. This is what an unmodified board should look like.
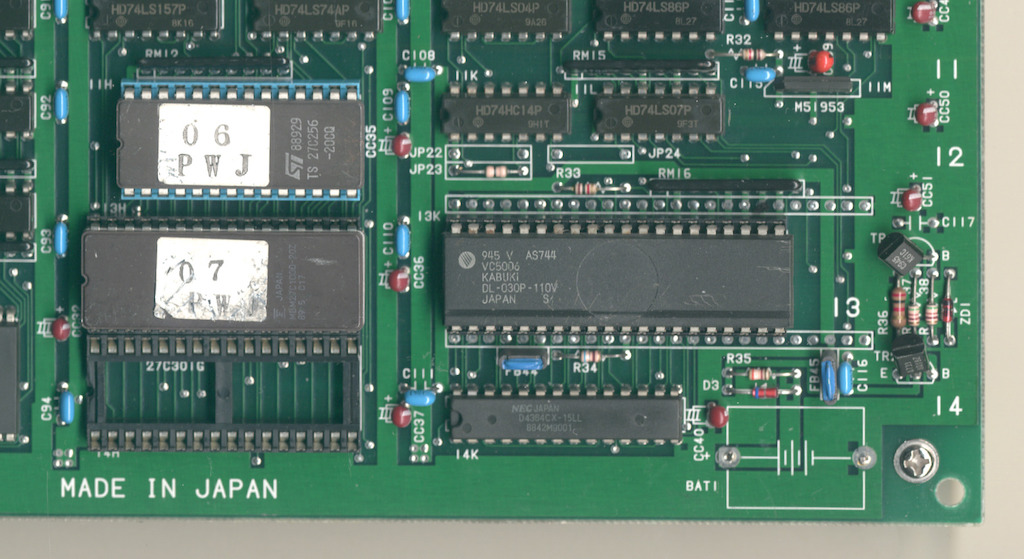
This is what the dead battery society mod will look like on the QSound board of a cps 1.5 game.
Top Side:
Bottom Side:
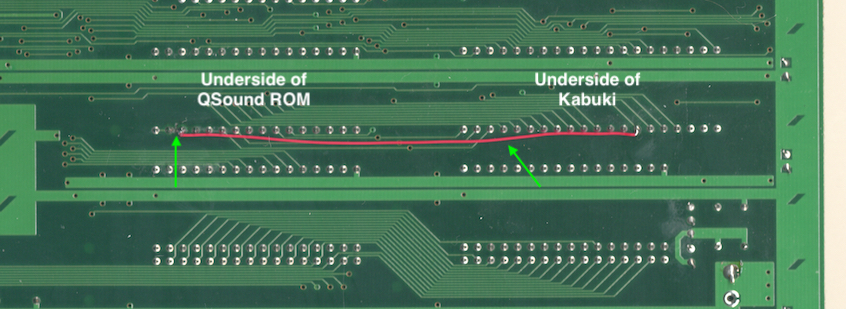
There will be additional changes specific to slam masters / muscle bomber which are not covered above.
Once reverted it should look like this
Top Side:
Bottom Side:
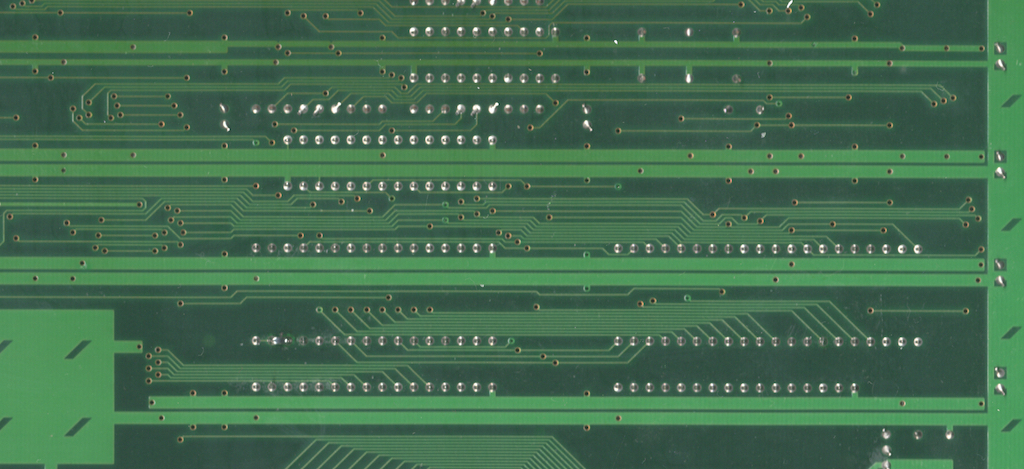
Its hard to tell from the picture, but pins 30 and 31 on the QSound program rom are jumper'd together.
| Qty | Value | Footprint | References |
|---|---|---|---|
| 5 | SolderJumper_2_Open | openkey:SolderJumper-2_P1.3mm_Open_Pad1.0x0.6mm | JP1, JP2, JP3, JP4, JP5 |
| 1 | 100nF | openkey:C_0805_2012Metric_Pad1.18x1.45mm_HandSolder | C1 |
| 1 | ATtinyxx4 | openkey:SOIC-14_3.9x8.7mm_P1.27mm | U1 |
| 1 | KABUKICPU | openkey:DIP-40_W15.24mm_Socket_Wide_Holes | U2 |
| 1 | UPDI Header | openkey:PinHeader_1x03_P2.54mm_Vertical | J1 |
| 1 | Wurth Elektronik 416131160805 | openkey:SW_DIP_SPSTx05_Slide_Wurth_416131160805_W7.62mm_P1.27mm | SW1 |
The 10 most common of 11 parts.
google/mozc-devices
Circuit diagrams and firmware source code for Gboard DIY keyboards


FrameworkComputer/ExpansionCards
Reference designs and documentation to create Expansion Cards for the Framework Laptop

hoglet67/RGBtoHDMI
Bare-metal Raspberry Pi project that provides pixel-perfect sampling of Retro Computer RGB/YUV video and conversion to HDMI

hackclub/OnBoard
💡 Join 1,000 teenagers and make your first PCB with a $100 grant!


tardate/LittleArduinoProjects
a collection of "Little Electronic & Arduino Projects", most involving electronics or an Arduino in one way or another!

basilfx/TRADFRI-Hacking
Hacking IKEA TRÅDFRI products, such as light bulbs, window blinds and other accessories.
It measures 18.3 × 51.4 mm and has 2 copper layers, 1.6 mm thick.
11 parts. The full list of its parts is on this page, with links to each part's symbol and footprint where PCBKit's library has them.
From the jwestfall69/openkey-kabuki repository on GitHub, at the commit this page was made from: the board is hardware/openkey-kabuki.kicad_pcb and its schematic hardware/openkey-kabuki.kicad_sch. PCBKit opens the board in the browser, with nothing to install.
Its repository publishes it under the Unlicense licence: you may reuse it on that licence's terms (keep the author's notice, and for a copyleft licence share your changes alike).