4 layers22 × 42 mm

 jspolsky/branchController215
Teensy 3.2 branch controller for up to 8 separate LED strips, based on instructions received over UDP.
BranchControllerPCB is an open-source printed circuit board by jspolsky, from the jspolsky/branchController2 repository on GitHub. It is a 4-layer board of 107.9 × 69.9 mm with 10 parts on 59 nets, routed with 168 tracks and 0 vias.
Its parts include 3 connectors, 1 resistor and 1 IC. It belongs with the lEDs and displays boards and the NXP (LPC, Kinetis, i.MX RT) boards of this library.
The Branch Controller is a small hardware board based on the Teensy 3.2 development board to allow it to control up to 8 separate pixel-addressible LED strips.
Although it can be used standalone to send its own patterns to the light strips, it really shines when connected, over ethernet, to a network. That allows you to generate the patterns on a computer (say, with a high powered graphics card) and send them to one or more Branch Controllers. In particular you can drive a lot more LEDs than any single controller can drive by using multiple Branch Controllers.
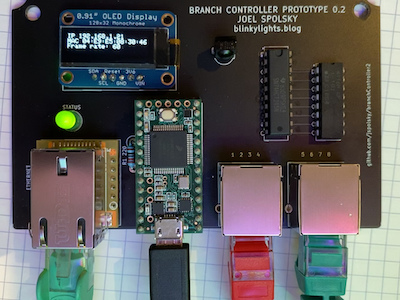
It is designed for WS2812b-style LED strips, with a single wire protocol. These are what Adafruit calls "NeoPixels".
Personally I like to use the WS2815 variant which runs on 12 volts and has a backup wire allowing any single pixel to fail.
Branch Controller does not handle APA102c-type strips, which use a two wire protocol consisting of both the signal and a clock.
Features:
Supports up to 4400 pixels (550 per strip) at a frame rate of 60 Hz, the theoretical limit of the protocol
Ethernet control. Connects to an ethernet network to receive pixel data over TCP/IP. This allows you to use many branch controllers controlled from a single PC
128x32 OLED display for diagnostics and network configuration
IR sensor allows you to use an IR remote control for basic controls
By default branchController assumes you have 8 strips of 550 pixels each. You can operate a single branchController with a 44 button IR remote control like this one:
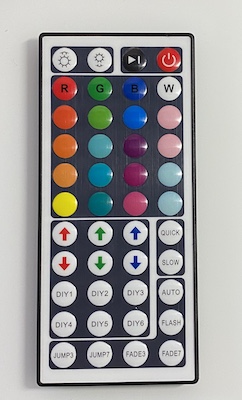
The brightness and color buttons work out of the box so you can use your branch controller to create basic solid colors.
Use the On/Off button on the remote to turn off the LEDs. When you press OFF, any changes you have made to the state of the branchController is saved to EEPROM so that it will come back in the same state when you power up. If you don't press off, the state is never saved.
The DIY1-6 buttons are reserved for internal test patterns and chases. You can edit the code for these to provide something that is a good backup if your PC or network fails.
DIY1 shows a test pattern where the first pixel is brown on the first strip, the first two pixels are brown on the second strip, etc. This is useful for making sure you have the 8 strips hooked up in the right order.
You can connect your branchController to a LAN using the built-in ethernet port and control it from any kind of computer that speaks TCP/IP.
When branchController starts up, it will look for a DHCP server and try to get an IP address and network configuration. If that works it will show you the IP address on the screen.
Every branch controller has a unique MAC address which will never change, so you can configure your DHCP server to always hand out the same IP address to the same branch controller, which makes it easier to sort out multiple branch controllers.
If you would like to use a static IP address:
If you don't like the default configuration, you can use a web browser to connect to your branchController and modify some things:
See http://fastled.io/docs/3.1/group___color_enums.html for options for color correction and color temperature.
If branchController successfully gets on the Internet, it will listen for TCP connections on port 7890, where it will receive data sent to it using the Open Pixel Control format, documented here. You can use Christopher Schardt's app L.E.D. Lab for iPhone or iPad to send cool animations -- all you need to do is set up the controller as if it were a FadeCandy controller.
We use TCP and not UDP for Open Pixel Control. The w5500 ethernet chip used in this design has a tiny buffer and will lose UDP packets if they are sent too fast. TCP solves this problem.
This code was built using PlatformIO, an open source platform for embedded development which is a zillion times better than using the Arduino IDE. You will still need Teensyduino to flash the Teensy. For more about the research behind this project, follow my blog, BlinkyLights.
Recently implemented:
These features are planned REAL SOON NOW:
Ideas for future improvements:
| Qty | Value | Footprint | References |
|---|---|---|---|
| 2 | RJ45 AE10388-ND | branchController:ASSMANN_A-2004-1-4-LP-N-R | J1, J2 |
| 1 | 220 Ω | Resistor_THT:R_Axial_DIN0411_L9.9mm_D3.6mm_P7.62mm_Vertical | R1 220 |
| 1 | Adafruit 4400 32x128 OLED | branchController:AdaFruit4400LED | J3 |
| 1 | Grn Status LED | LED_THT:LED_D5.0mm | STATUS |
| 1 | Level Shifter | branchController:SN74HCT245N | SN74HCT245N |
| 1 | RES ARRAY | branchController:4116R-1-101LF | 100 OHM |
| 1 | TSOP34438 IR SENSOR | OptoDevice:Vishay_MOLD-3Pin | IR |
| 1 | Teensy3.2 | teensy:Teensy30_31_32_LC | TEENSY 3.2 |
| 1 | WIZ850io Ethernet | branchController:WIZ850io | U4 |

nanographs/Open-Beam-Interface
Just what you need to control the beam and get an image.


clydeshaffer/gametank
design files for the gametank hardware implementation

lukasloetkolben/OpenpilotHardware
Welcome to the Openpilot Hardware Collection!

COVESA/Open1722
Open-source implementation of the IEEE 1722 protocol, for streaming audio/video, tunneling CAN/LIN messages and enabling remote access to peripherals

system76/thelio-io-hardware
KiCad electrical design of Thelio Io board

It measures 107.9 × 69.9 mm and has 4 copper layers, 1.6 mm thick.
10 parts. The full list of its parts is on this page, with links to each part's symbol and footprint where PCBKit's library has them.
From the jspolsky/branchController2 repository on GitHub, at the commit this page was made from: the board is kicad/branchControllerPCB.kicad_pcb. PCBKit opens the board in the browser, with nothing to install.
Its repository states no licence, so its author keeps all rights: ask jspolsky before reusing the design.