The Tick
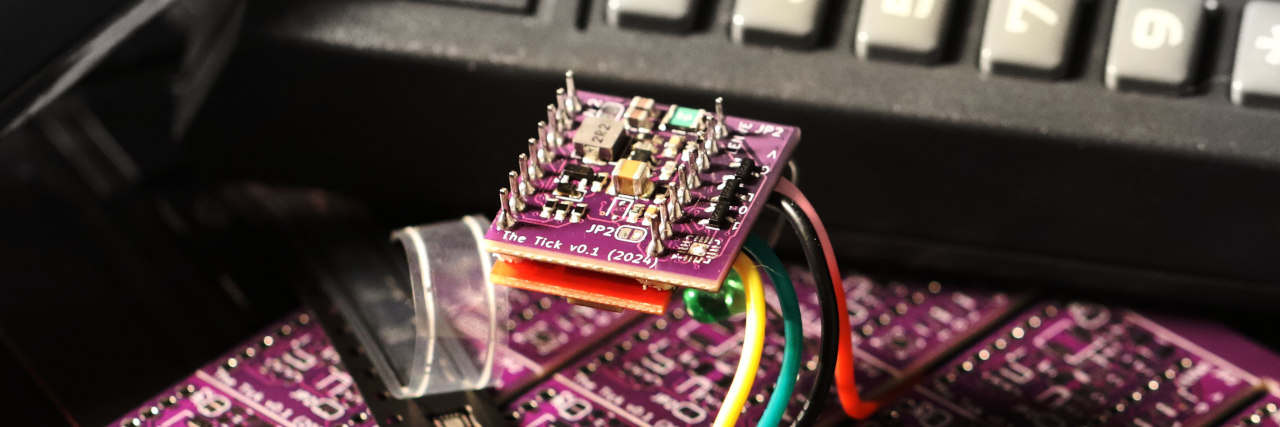
The Tick is the next evolution in covert access control system implants. Designed for a seamless integration behind card readers, The Tick silently intercepts, logs, and replays access credentials with greater efficiency and stealth than ever before. Compatible with a wide range of RFID systems, provides invaluable (to red teamers) insights into facility (in)security, while enabling advanced credential injection. Whether for security auditing, red teaming, or mobile access control testing, The Tick delivers a compact, powerful, and flexible solution in an ever-connected world.
Comparison to other projects
| BLEKey | ESP-RFID-Tool | ESPKey | The Tick |
|---|
| supported protocols | Wiegand | Wiegand | Wiegand | Wiegand + Magstripe Clock&Data + a bit of OSDP |
| wireless interfaces | BLE | WiFi | WiFi | BLE + WiFi |
| configurable D0/D1 lines | ❌ | ❌ | ❌ | ✅ |
| max power supply voltage | battery powered | 🔥 | 18V DC | 25V DC |
| max data line voltage | 5V | 5V | 5V | 16V |
| SoC | nRF51822 | ESP8266 | ESP8266 | ESP32C3 |
| firmware | properly structured code | time-efficient code soup | time-efficient code soup | slightly-organized code soup |
| arachnophobia-safe | ✅ | ✅ | ✅ | ❓ (partially, hidden mugga-mode) |
Hardware revisions
The device is in ongoing development - its design, made using KiCad EDA, is getting gradualy optimized and adjusted to incoming feedback and challenges experienced by both the maintainers and users.
Due to a differences in pin mapping, a correct versions must be declared in platformio.ini.
There're currently 2 major hardware revisions "in the wild":
Revision 0.2
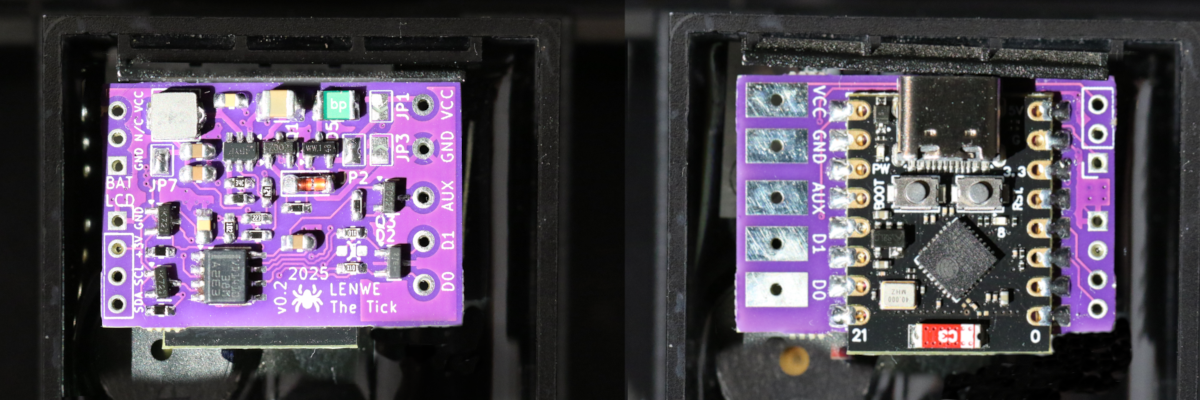 This is the current revision of the device. The rectangular purpler boards with RS485 transceiver in SOIC-8, that are easy to assemble by hand without a solder paste stencil or hot air, using common parts. The connectors footprint has been adapted for larger KYOCERA AVX 9176-000, adequate for common wire gauges. It features additional circuit for automaticly switching power sources, making the device operation more foolproof.

This batch of PCBs was generously provided by PCBWay. Thank you Liam for reaching out with sponsorship, kind words about the project and providing nicer tone of the soldermask! From uploading a design to delivering ready-made panelized PCBs into my hands 8000 km away was about 5 days, with a weekend included.
You can contact me to receive one free of charge, or order them directly through PCBWay Community sharing platform.
release files
Revision 0.1
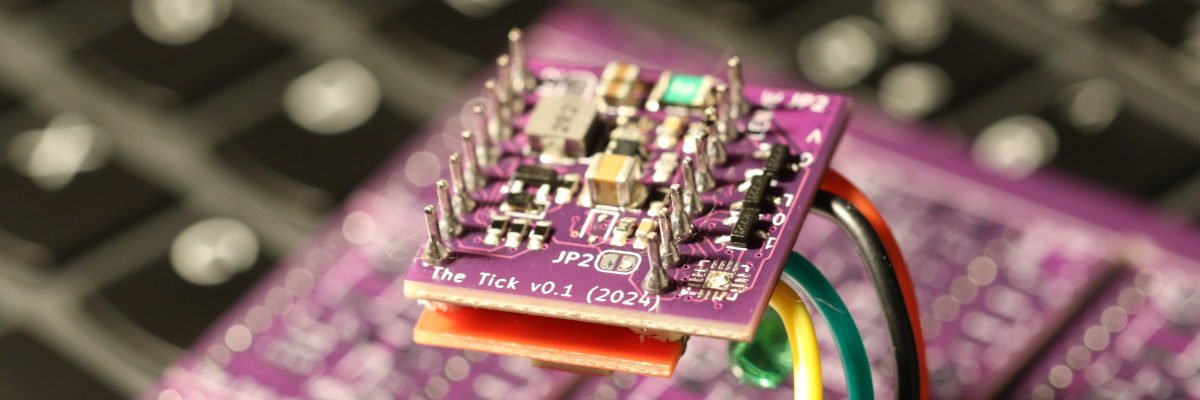
Initial and currently most common hardware release. The square purple boards with (hard for hand soldering) RS485 transceiver in QFN16. It does not yet feature a dedicated I2C connector and may have KYOCERA AVX 9175-000 series connectors installed, that are too small for regular PACS wiring. I'd advise a small feature backport - populating a JP2 solder jumper on the bottom side of the PCB with a Schottky diode will allow powering the reader from USB.
This is the revision @jzdunczyk used in her Behind Closed Doors - Bypassing RFID Readers34 talk on Black Hat Asia 2025.
release files
Revision 0.0
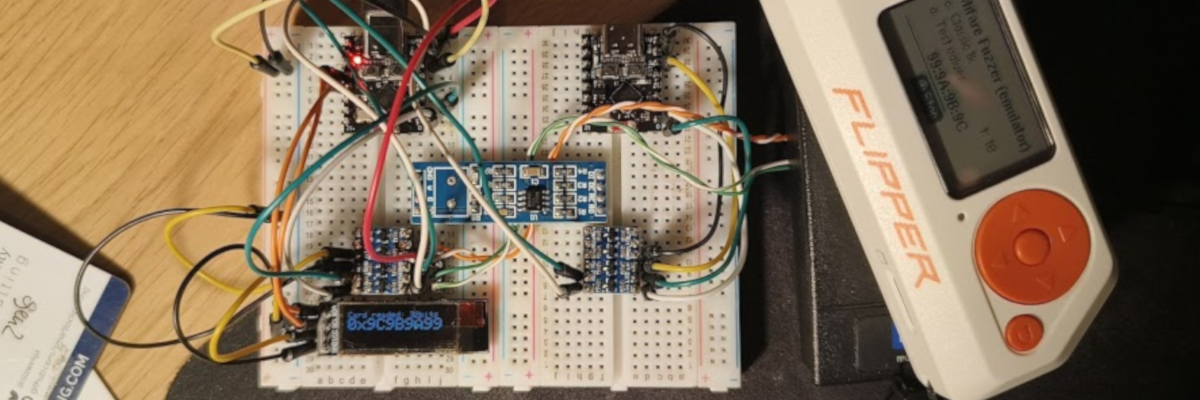
An ESP32C3, random level converter, RS485 transceiver and a bunch of wires is a good start and fully sufficient platform for testing the software features.
Software
Firmware of this device started as a simple port of ESPKey for ESP32C3, that gradually grew into extensible and multi-protocol software project, with own improved hardware.
Features
Currently, the firmware can be built with following features:
Communication interfaces
| build flag | description |
|---|
| USE_BLE | BLEKey-style Bluetooth Low Energy support |
| USE_WIFI | ESPKey-style WiFi (hotspot or client) support |
| USE_HTTP | HTTP user interface |
Firmware upgrade
| build flag | description |
|---|
USE_OTA | Arduino-style over-the-air upgrade |
| USE_OTA_HTTP | HTTP endpoint for upgrading firmware |
There's an USB connector on-board, that even features embedded JTAG interface, but why not...
External reporting
| build flag | description |
|---|
| USE_MDNS_RESPONDER | broadcasts MDNS, so hostname instead of IP address can be used for a connection |
| USE_SYSLOG | reports interactions to syslog server |
| USE_LCD | reports interactions to a handy I2C OLED display |
Wire protocols
| build flag | description |
|---|
| USE_WIEGAND | provides support for Wiegand interface sniffing and transmitting |
| USE_CLOCKANDDATA | provides support for clock&data interface sniffing and transmitting |
| USE_OSDP + USE_OSDP_PD | provides support for OSDP Peripheral Device mode |
USE_OSDP + USE_OSDP_CP | provides support for OSDP Control Panel mode |
In Wiegand mode,
the device can receive (sniff) and transmit messages of any length.
Assignment of D0 and D1 lines can be corrected in the configuration file after the device installation, if needed.
The device was sucessfuly tested with 5V and 12V PACS systems, that uses different card number lengths.
In Clock&Data mode,
he device can receive and transmit messages of any reasonable length.
Assignment of DATA and CLOCK lines can be corrected in configuration file after the device installation, if needed.
The device was sucessfuly tested with 12V Clock&Data system, running in Magstripe and UNITEK-emulation modes.
Support for Paxton decoding is based on samples provided by en4rab.
In OSDP Peripheral Device mode,
the device enumerates and serves as a simple OSDP PD.
Card numbers can be transmitted using HTTP and BLE interfaces for testing purposes.
Build instructions
Open the project in PlatformIO and press "Upload", then "Upload Filesystem Image". The code is Arduino-flavoured, but took too long to compile using Arduino IDE.
HTTP interface
If built with USE_HTTP flag, the device provides a quite-eye candy, simple HTTP interface, based on almost-REST API and built using jQuery and Bootstrap.
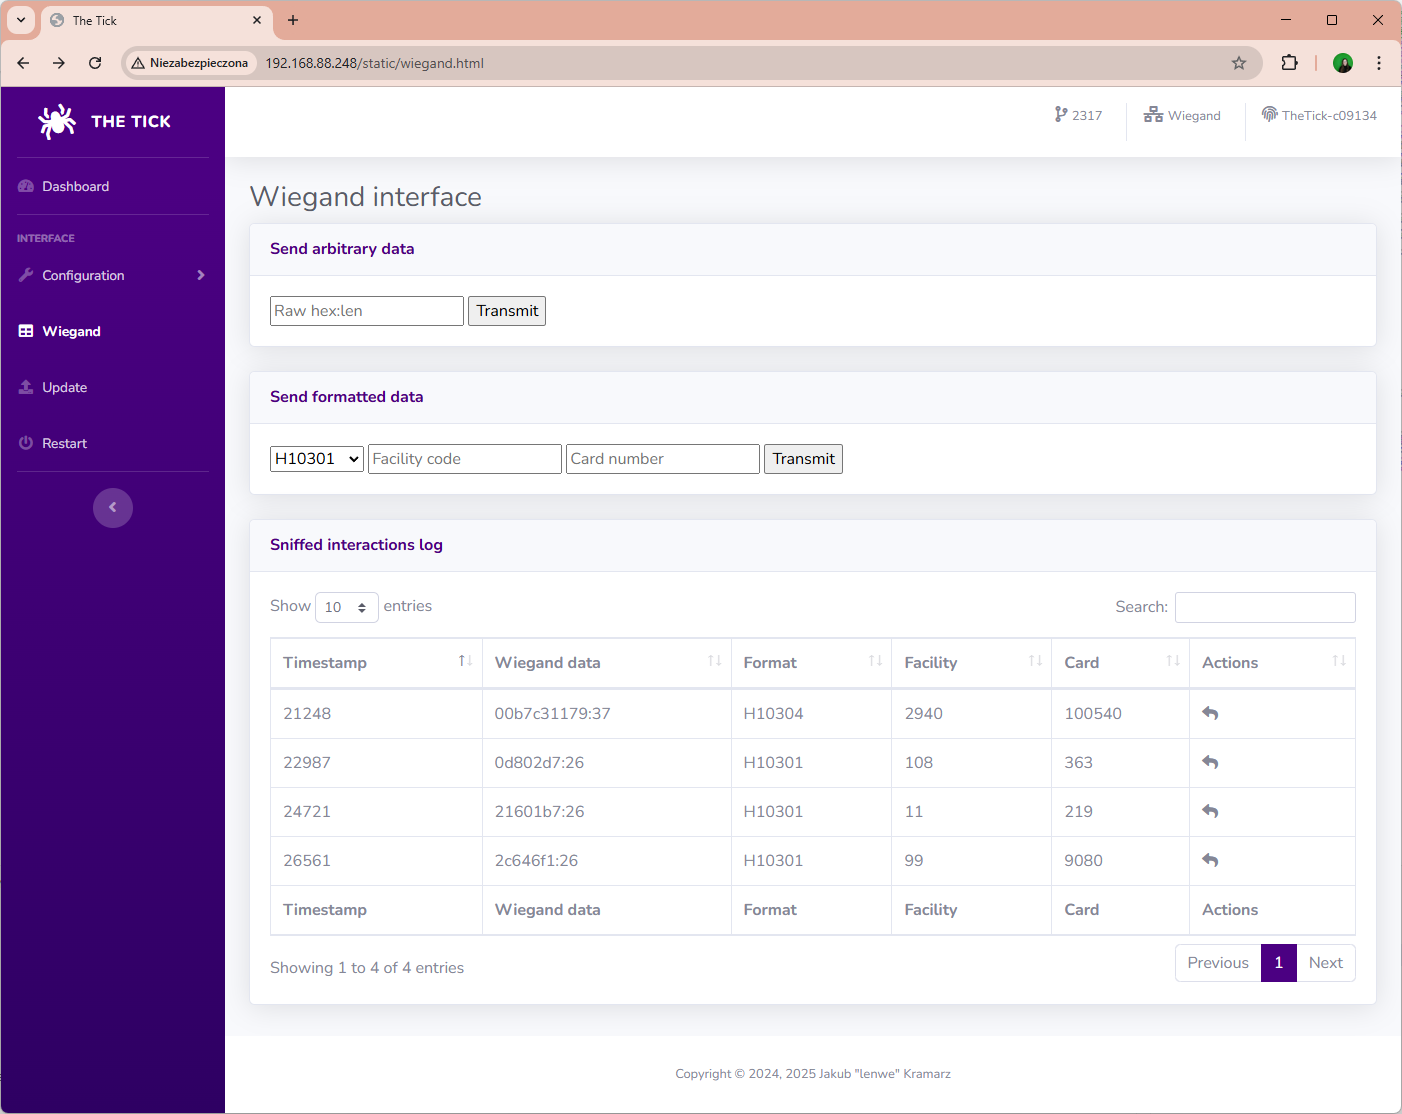
Currently, it offers following features:
- review and modification of application configuration files,
- review of sniffed reader interactions,
- replay of acquired credentials,
- sending arbitrary card numbers (raw or encoded in common formats)
BLE interface
If built with USE_BLE flag, the device exposes a custom Bluetooth Low Energy interface:
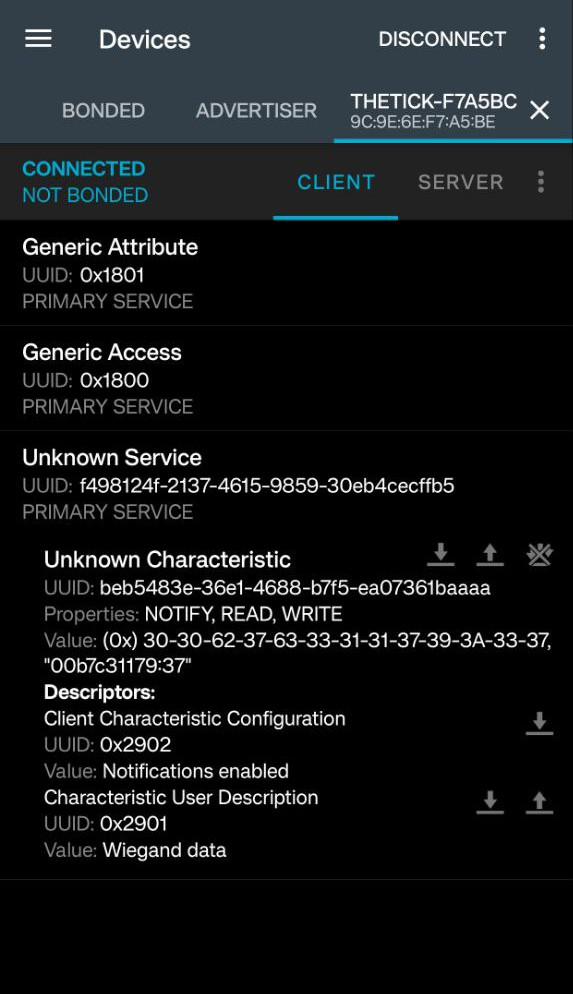
Currently, it offers following features:
- reading the last sniffed card,
- notifying about new interactions,
- sending arbitrary card number.
Currently, by default, device requires bonding with pre-configured passkey and use of secure connections.
Feature-wise it is simillar to BLEKey by Mark Baseggio and Eric Evenchick, but running on a decade-younger hardware.
By default, functions are exposed in service f498124f-2137-4615-9859-30eb4cecffb5 as characteristic beb5483e-36e1-4688-b7f5-ea07361baaaa. These UUIDs can be modified in the device configuration.
There is planned a Flipper Zero client, that will be publicly released shortly after BLE Central role will be incorporated in its firmware (probably never).
OTA upgrade
By properly configuring the build flags, the firmware can feature OTA-upgrade. BLE may need to be sacrificed to fit two copies of firmware in device flash.
It is possible to use Arduino-style OTA (but I never did) or upload firmware images over HTTP endpoint, depending on the build configuration.
Configuration reset
- You need to get the timing Just Right™,
- Start watching new emergency number spot from IT Crowd,
- When ambulance appears on the screen, connect The Tick to power source (e.g. USB) or press RST button,
- When each of digits "881 999" appears on the screen, briefly press "BOOT" button,
- Wait few seconds - the device will start with empty configuration and log files and expose WiFI hotspot.
Hardware
Hand soldering procedure
When hand-soldering without the paste stencil and a hot-plate, to limit accidential damage:
- start with assembling DC-DC converter,
- verify if it works correctly,
- close apropriate solder bridges,
- populate Wiegand level converter,
- populate ESP32-C3 module,
- program the device,
- check if correct voltage levels are visible in HTTP interface,
- proceed with populating RS485 transceiver,
- verify that Wiegand still works,
- finish with the connectors.
It also fits the cheapest G3061 hot-plate you can get and solders nicely with hand-applied solder paste.
ESP32-C3
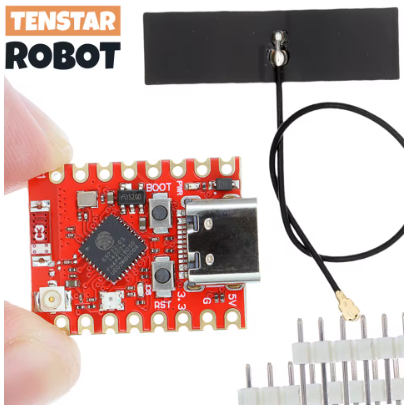
The device utilizes ESP32-C3FH4 on a ready-made TENSTAR ESP32-C3 SuperMini Plus module.
Some of the non-Plus modules comes with incorrect antenna design, resulting in impresively poor WiFi range.
For a better range, implementing an antenna mod may be a good option.
DC-DC converter
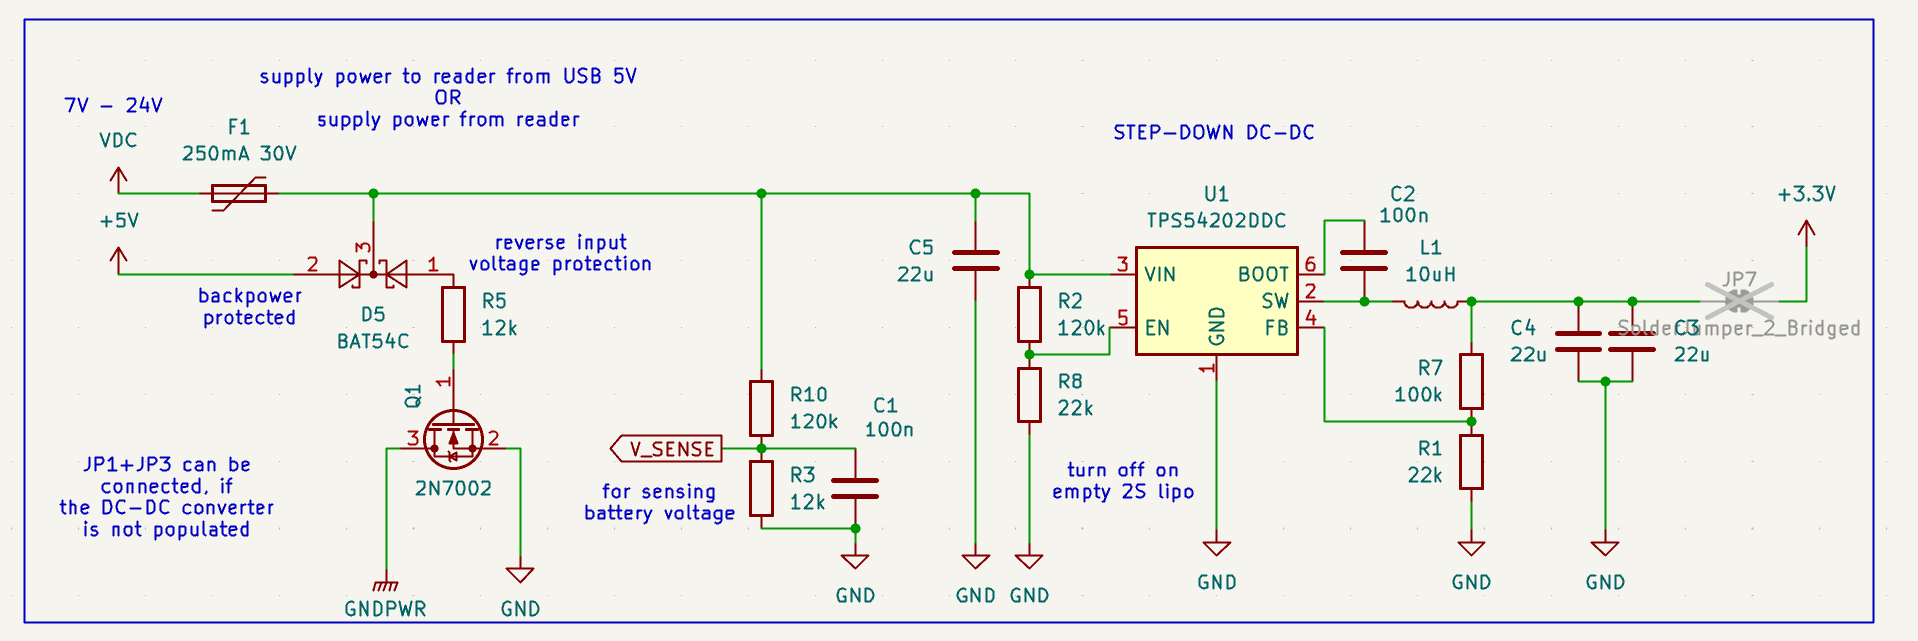
As no linear voltage regulator in used, both power consumption and heat dissipation is minimal.
The device is also protected against reverse polarity - it just doesn't start, but doesn't blow up.
The power supply can use two pin-compatible PMICs:
Schematics of revisions 0.1 and 0.2A:
- Uses LMR51430 synchronous buck step-down converter, rated at up to 36V.
- It runs at 1.1 MHz switching frequency, and uses relatively small 2.2uH inductor.
- Is probably a bit low-noise and more power-efficient.
Schematics for revision 0.2B:
- Uses TPS54202 synchronous buck step-down converter, rated at up to 28V.
- It runs at 500 kHz switching frequency, and uses common 10uH inductor.
- Is definitely more cost-effective.
Both designs were verfied to work just fine, so I'd recommend assembling using whatever is available.
Maximum voltage if further limited by voltage rating of installed capacitor and polyfuse, but components from the BOM are sufficient to safely run it with 24V-powered long-range readers.
Battery operation
The device DC-DC converter is configured to turn off at approximately at 6V and start at 6.4V, to provide an overdischarge protection if the device is operated from 2S lithium-ion polymer battery pack. The additional load (e.g. the connected reader) is not covered by this protection.
Battery voltage can be measured using device ADC and read in device web interface.
3-pin connector present on the board follows the same pinout, as balancer plugs presents on the battery packs.
Level shifter
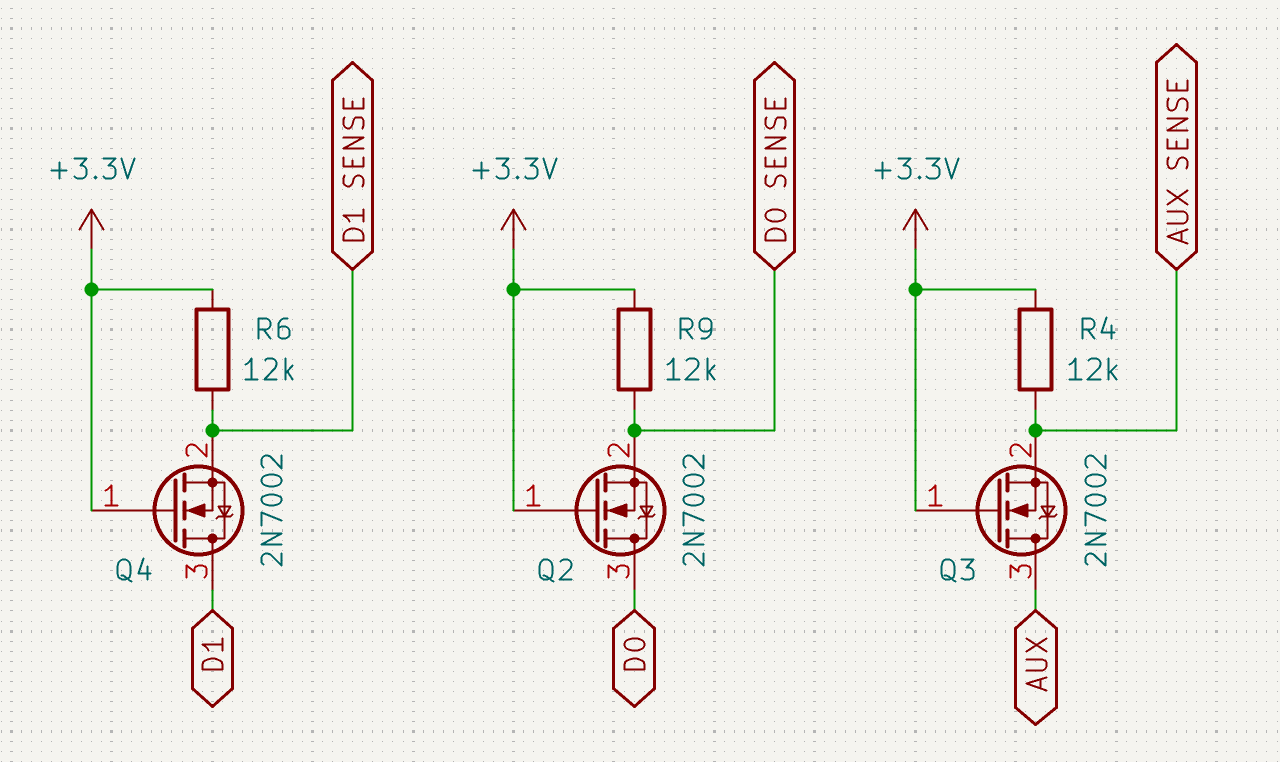
Absolute maximum drain-source voltage rating for 2N7002 N-channel MOSFET transistor is 60V.
The board is definitelty not designed for such volatage and I advise against connecting it to live installations of such voltage levels, but it is much more than 5-12V usually found in access control systems anyway.
Voltage shifter is derived from "Bi-directional level shifter for I²C-bus and other systems" design described in Philips Semiconductors application note AN97055.
This solution:
- works properly in installations with external pull-up (e.g. provided by the reader sharing the same line) regardless of the voltage levels,
- provides a convenient way of pulling it down to GND,
- does not provide a way of pulling the line up to VCC.
RS-485 transceiver
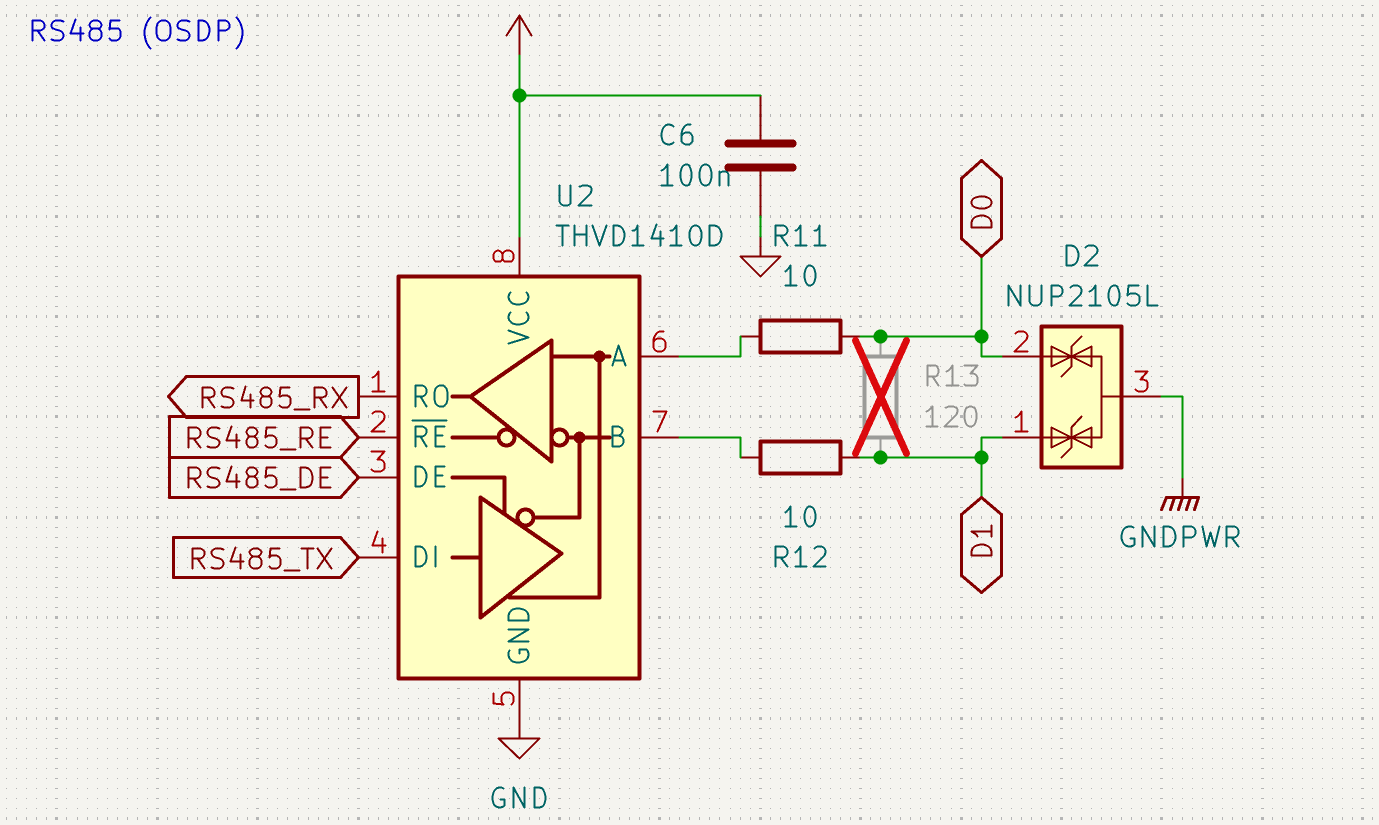
The device design incorporates THVD1410 / THVD2410 transceiver intended for interacting with OSDP systems.
Populating the transceiver on the PCB limits maximum safe communication lines voltage to 18V / 70V respectivly.
It is configured in half-duplex, low-speed mode. Bus terminator can be populated to the PCB, but is usually not required for proper operation.
In non-OSDP modes, the device firmware configures the transceiver into high impedance mode to avoid interferrence.
LCD support
The device supports connecting SSD1306-based 128X32 OLED to visualize reader interactions.
Two Wire Interface Bus is available on a dedicated LCD connector.
Solder bridges
The PCB revision 0.2A features 4 solder bridges for configuring power routing:
- when operating a board with fully populated DC-DC converter, solder bridges JP2 and JP7 should be closed,
- when using a simplified version, JP3 must be closed to connect grounds and JP1 may be closed to provide 5V to the connected reader.
Connectors
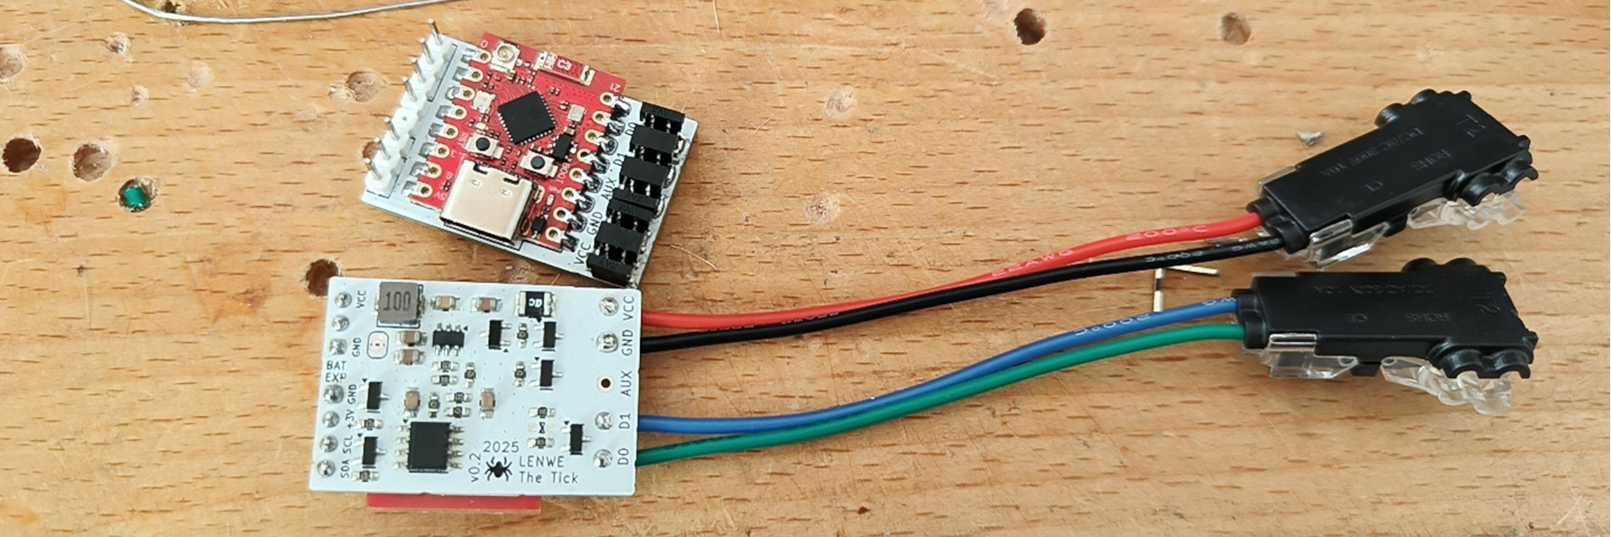
The current PCB revision uses KYOCERA AVX insulation displacement connectors of 9176-000 series that support wires up to 20 AWG. This configuration is inteded for field-use.
If IDC connectors are not needed or there're special requirement for adapting device for thicker wires, footprint incorporates holes for connecting a wire:
- For firmly connecting devices on a desk, I personaly use a short 22 AWG silicon cable with WAGO 221 series splicing connectors.
- For easily connecting to non-standard cables, I'd recommended to use "automotive" IDC T2 tap connectors.
Contributing
If you want to contribute to a project and make it better, your help is very welcome. Contributing is also a great way to learn more about social coding on Github, new technologies and and their ecosystems and how to make constructive, helpful bug reports, feature requests and the noblest of all contributions: a good, clean pull request.
I recognize that contributing to hardware projects can be more challenging than software, especially without access to the necessary components. If you're interested in helping out but lack the hardware, drop me an email — I may be able to send you a PCB to get started.
License
Software License
The software for "The Tick" is licensed under the GNU General Public License (GPL) v3.0. This license allows you to freely use, modify, and distribute the software, provided that any distribution or derivative works are also licensed under the GPL.
For more details on the GNU GPL v3.0, please refer to the GNU General Public License v3.0.
UI Libraries And Template License
The user interface of "The Tick" utilizes jQuery and Bootstrap, both of which are licensed under the MIT License. This permissive license allows you to freely use, modify, and distribute the code, with minimal restrictions.
For more details on the MIT License, please refer to the MIT License.
Hardware License
The hardware design for "The Tick" is licensed under the CERN Open Hardware Licence Version 2 - Strongly Reciprocal (CERN-OHL-S v2). This license permits the use, distribution, and modification of the hardware design, with the condition that any derived works must also be licensed under the same terms.
For more details on the CERN-OHL-S v2, please refer to the CERN Open Hardware Licence Version 2 - Strongly Reciprocal.


