
2 layers81.3 × 70.4 mm
Protomicro
fo-am/penelopean-robotics
Penelopean robot swarms for weaving ancient Greek looms and maypole dancing.
21 parts9

Penelopean robot swarms for weaving ancient Greek looms and maypole dancing.
Proto is an open-source printed circuit board by fo-am, from the fo-am/penelopean-robotics repository on GitHub. It is a 2-layer board of 50.8 × 44 mm with 36 parts on 30 nets, routed with 157 tracks and 0 vias.
It belongs with the robots and motor control boards of this library.
Penelopean robots are modular, reconfigurable, dis-assemblable and soft. They are part of the Penelope Project, a Study of Weaving as a Technical Mode of Existence.
See a video of our first swarm robotics maypole dancing test.
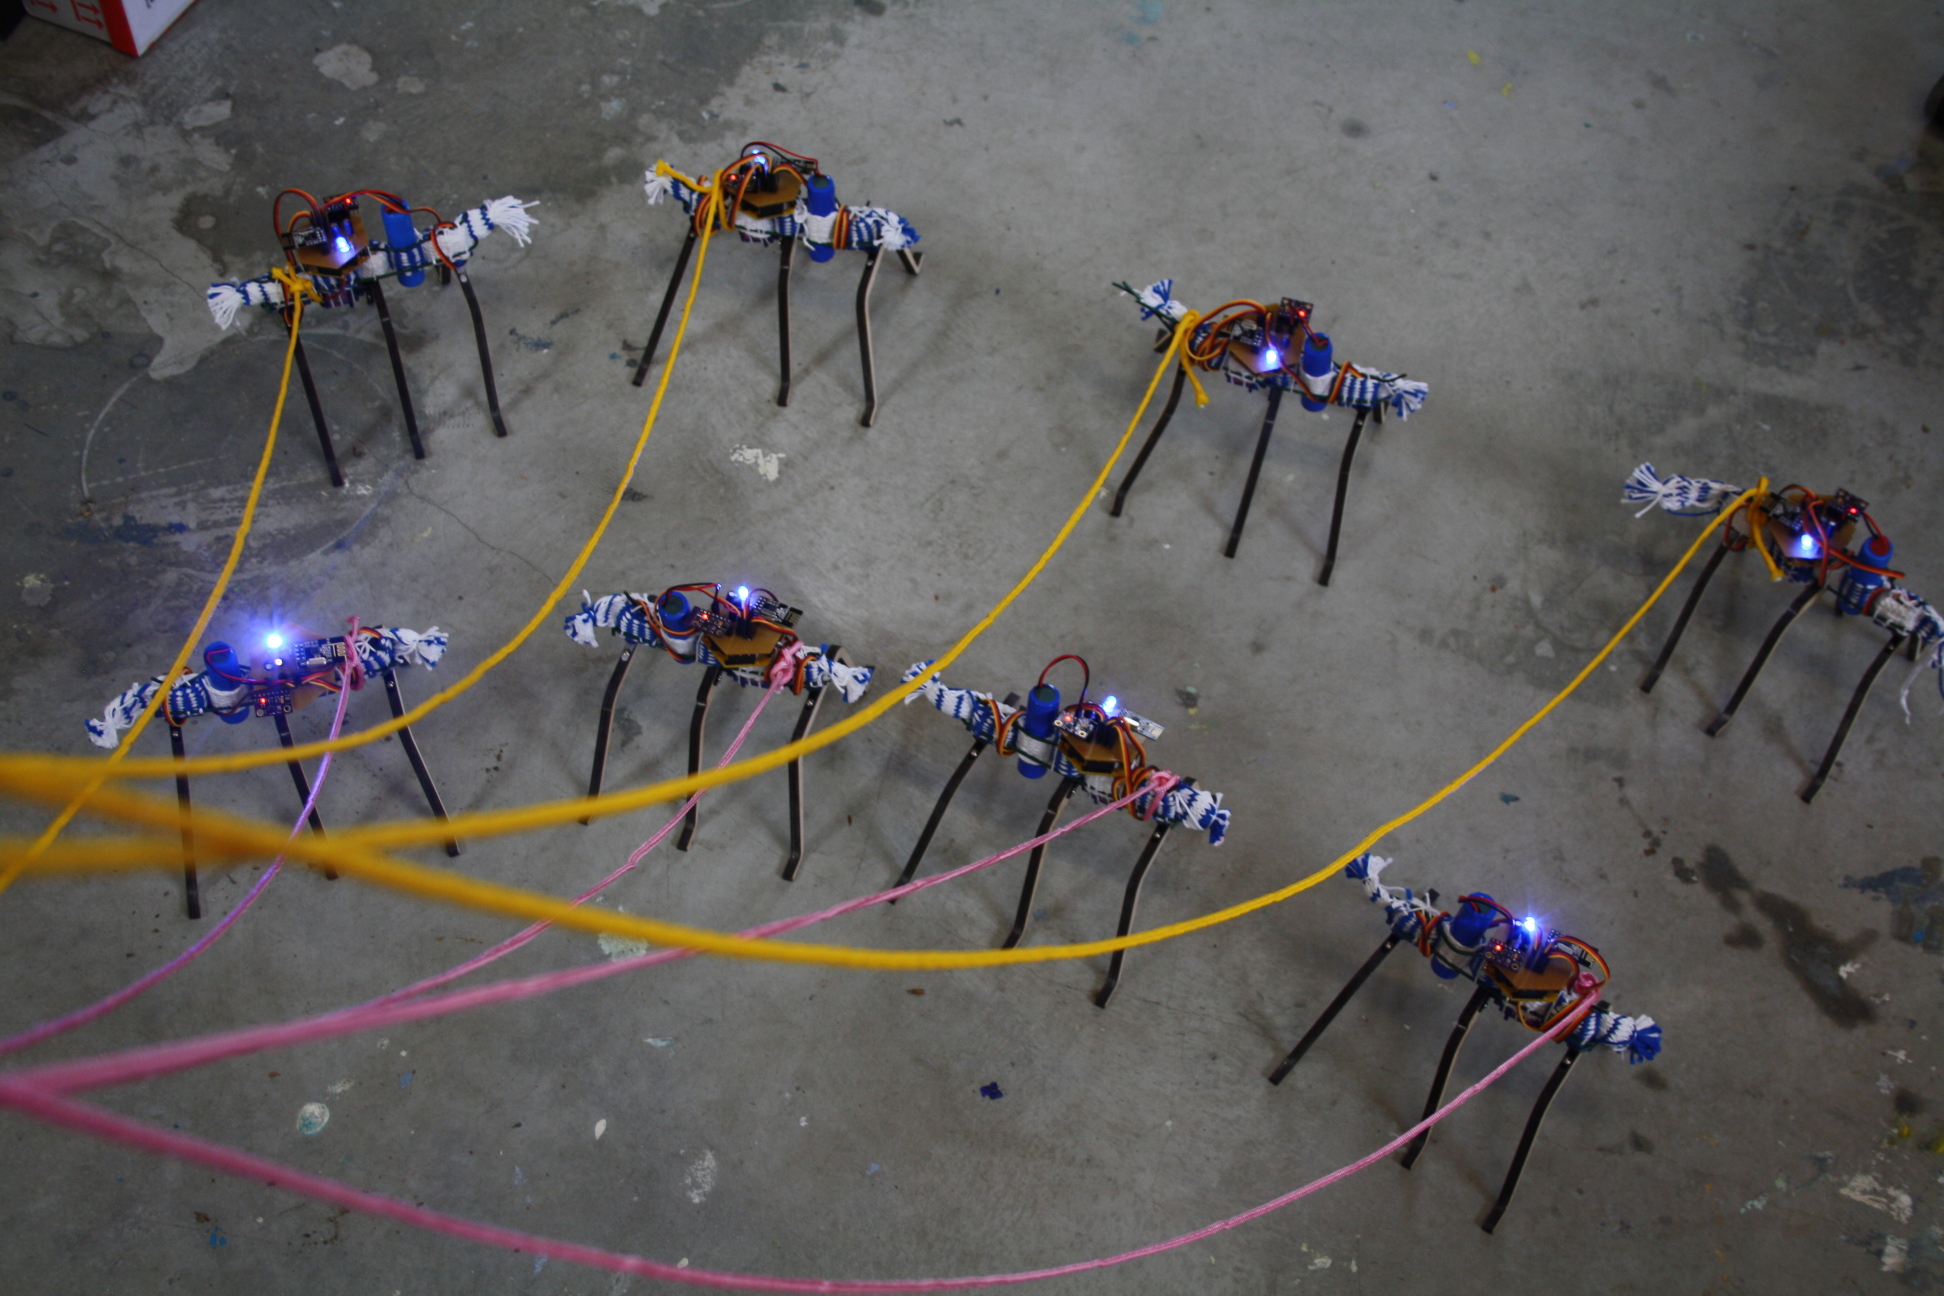
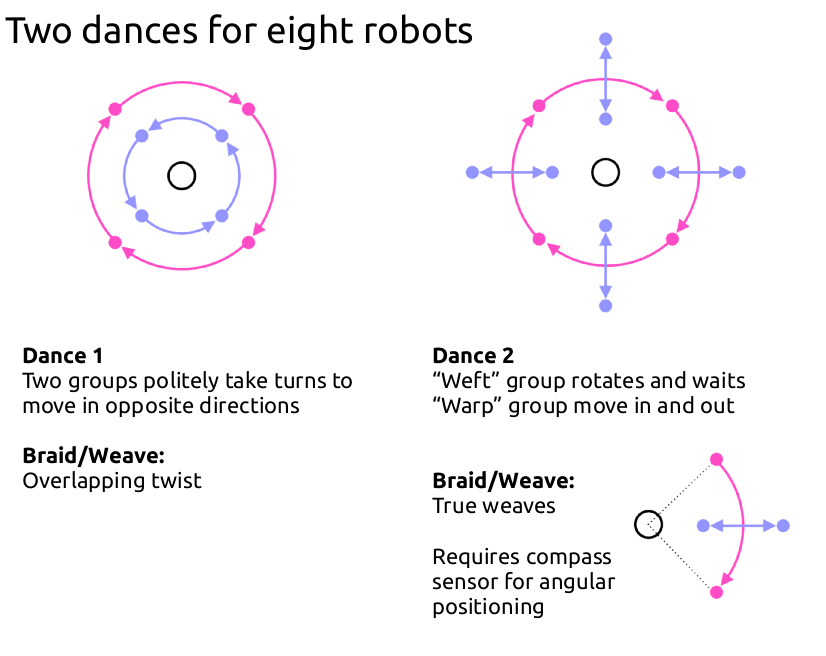
Penelopean robot swarms are designed for weaving ancient Greek looms and maypole dancing. They can be livecoded remotely by a Raspberry Pi and can be synced to musical beats for performances. Here is an example of two maypole dances to create weaves we are currently working on:
All source code and hardware files are here, each robot is made from:
Each robot is constructed using tablet weaving, an ancient human technology dating back to neolithic times (and one of the few forms of weaving that has never been mechanised).
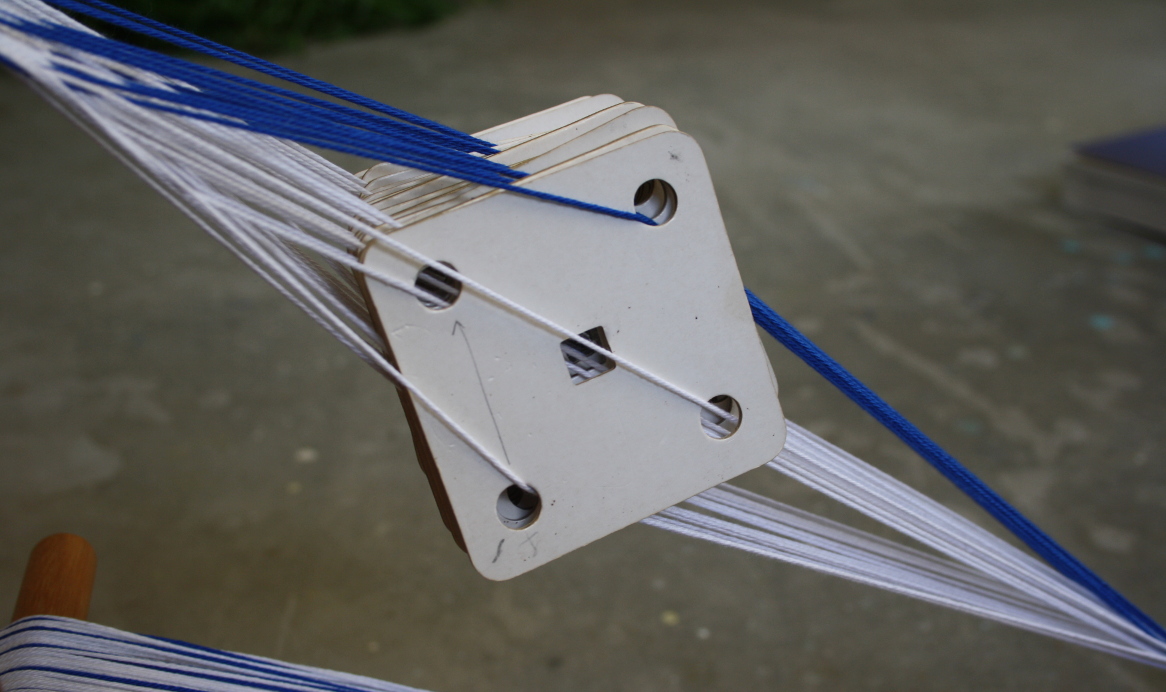
Tablet looms are simple to set up, and consist of a stack of cards with holes punched in the corners through which the warp yarn passes. See here for a description of how to set up tablet loom.
Usually tablet weaving produces a strong braid. For the penelopean robotics we use a technique known as Icelandic double weave, where we weave with the cards rotated at 45 degrees and use two wefts at the same time. This converts the usually flat "2D" weave into a "3D" structure, which we can use to support all the components for the robot.
The exact spacing required will depend on the kind of yarn you are using (I recommend 100% cotton or other plant based yarns - as wool is too fluffy) but using this yarn I measured out 10 wefts to hold an SG92R microservo and 8 for the 18mm diameter cylindrical battery.
Here is an attempt at notating the steps required in full. We start with a supporting weave using normal single weft weaving, and then start splitting to to hold the 3 servos and a battery, finishing with an final supporting weave [todo: later version included a spacer to make the legs equidistant]
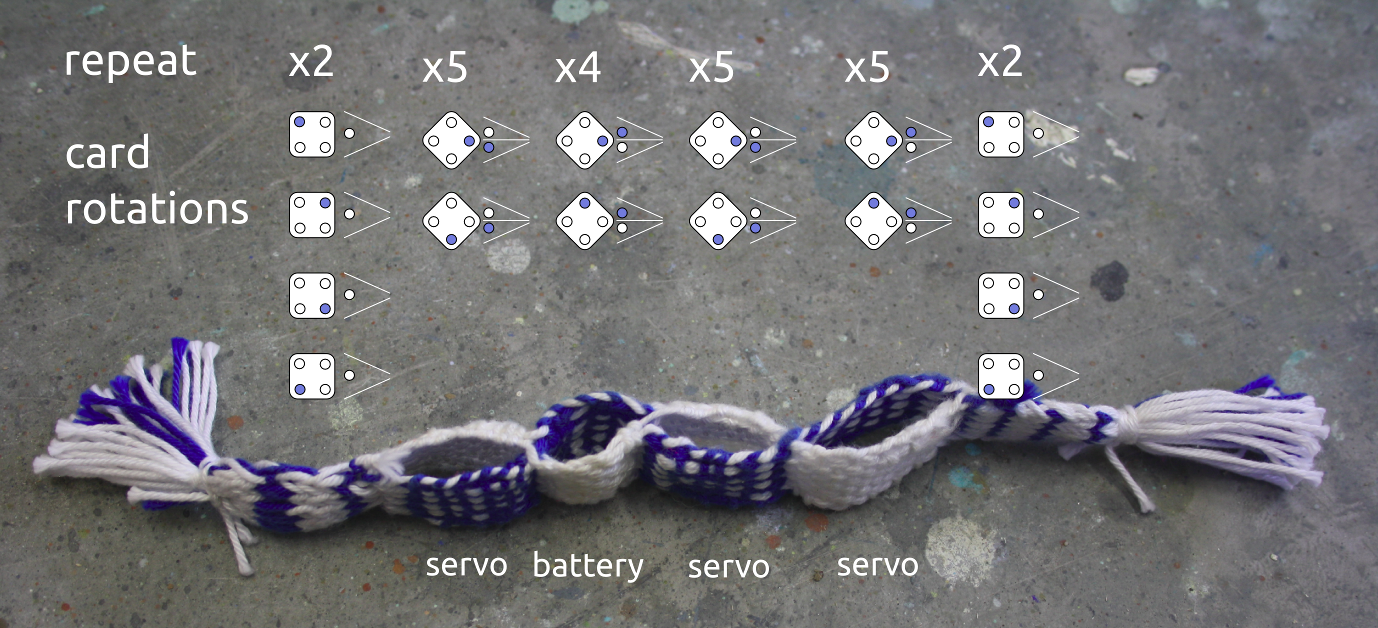
As the structure is woven into the fabric it is strong and able to cope with the forces involved. The final stage is to stitch the components into the structure to hold them in place along with some thick wire to give the legs something to push against.
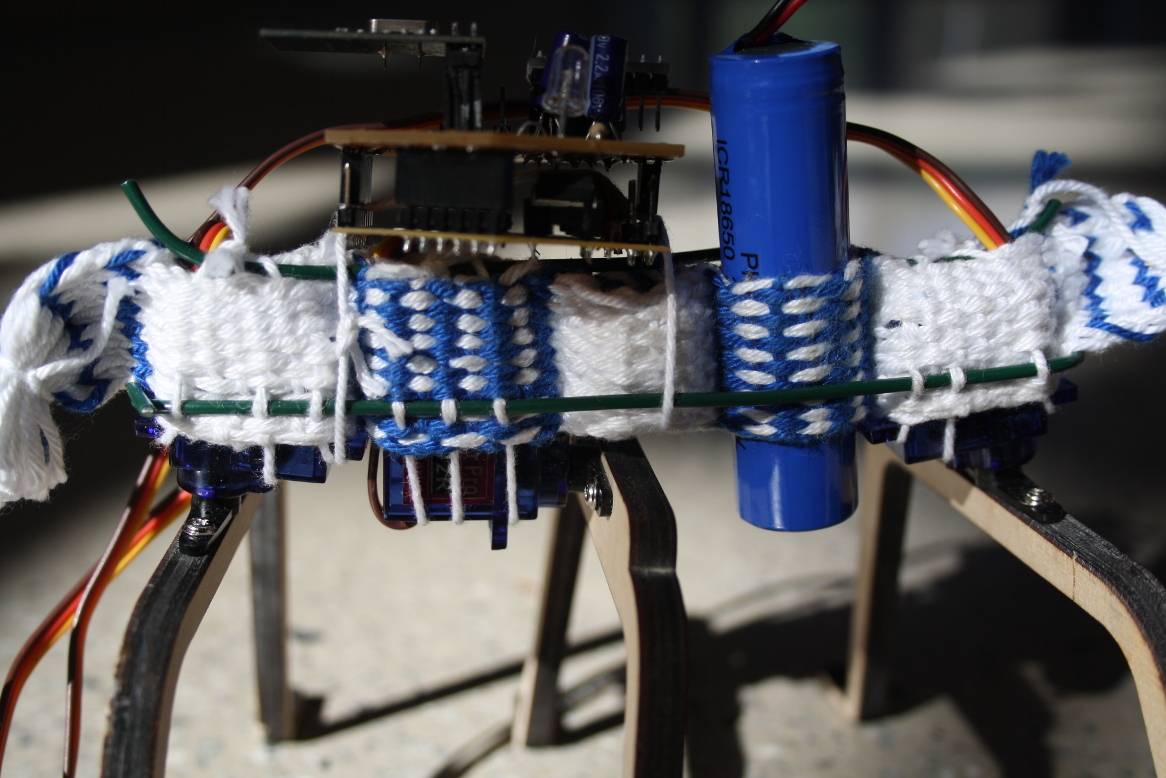
[todo: bioresin research]
The swarm of robots is controlled by a Raspberry Pi running a python program which is in charge of distributing commands to the robots.
[under development]
The robot servos are controlled via a "movement pattern sequencer" which interprets symbols representing angles of rotation. This is designed to allow different kinds of movement to be experimented with as well as synchronisation with music, across the swarm.
By default a pattern consists of a 12 byte array, where each servo is controlled by 4 symbols that are looped.
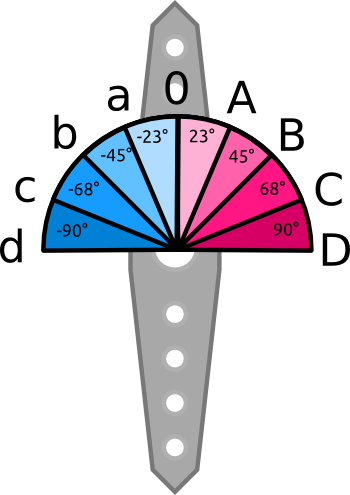
Various predefined patterns can be selected via bytecode programs (see NEXT_PATTERN below) which correspond to:
0000 0000 0000 : All stop - all servos to their central position.
AAaa AaaA AAaa : Walk forward
AAaa aAAa AAaa : Walk backwardsOne of the problems with having numerous robots is updating and distributing code changes to them. In order to make this process more versatile we use a livecoding system where bytecode can be sent over radio and written directly to memory. This bytecode is interpreted by a machine running on the robot which can be halted and reset over radio (separately to the main process, running the radio, controlling servos and reading sensors etc, which continues as normal).
The robot bytecode (called yarn) has access to a set of registers that describe the current state of the robot, including the movement sequencer and sensor information. Registers can also be written to that change the current servo motion pattern or light the LED for example.
Writing the bytecode directly is considered a temporary inconvenience before a compiler for a decent high level language is designed.
| Name | Address | Read/Write | Description |
|---|---|---|---|
| ROBOT_ID | 0 | r | Identifier of this robot (same code as the last byte of the radio pipe address) |
| PC_MIRROR | 1 | r | A copy of the program counter for debugging. Writing to this has no effect. |
| LED | 2 | r/w | The state of the onboard blue LED. |
| COMP_ANGLE | 3 | r | Current absolute compass angle from the magnetometer. |
| COMP_DELTA_RESET | 4 | w | Resets the relative compass angle calculation. |
| COMP_DELTA | 5 | r | Relative compass angle calculation, from last reset. |
| STEP_COUNT | 6 | r | How many times the current movement sequence has run (not really a step as each sequence has two steps). |
| STEP_COUNT_RESET | 7 | w | Resets the step counter register to zero. |
| NEXT_PATTERN | 8 | r/w | Stores a pattern ID for use when the current motion sequence has finished. Can be one of NULL (Keep the last pattern), ALL_STOP (Cease all servo movement), WALK_FORWARDS: Move forward or WALK_BACKWARDS (Move backwards) |
| A | 9 | r/w | User defined register for convenience. A is currently used as the maypole dance status to synchronise multiple groups of robots. |
| B | 10 | r/w | User defined register for convenience. |
| C | 11 | r/w | User defined register for convenience. |
| D | 12 | r/w | User defined register for convenience. |
| SERVO_MS_PER_STEP | 13 | r/w | This controls the overall speed of the motion sequencer - in milliseconds per step. |
| SERVO_1_AMP | 14 | r/w | See below |
| SERVO_2_AMP | 15 | r/w | See below |
| SERVO_3_AMP | 16 | r/w | Separate control over the amplitude of each servos movement. Set these to zero will immediately prevent any movement while the sequencer still runs. This is a fixed point value where 1000 (the default) is equal to one, so setting to 2000 will double the amplitude and range of the servo. |
| SERVO_1_BIAS | 17 | r/w | See below |
| SERVO_2_BIAS | 18 | r/w | See below |
| SERVO_3_BIAS | 19 | r/w | Sets the effective zero degrees position of each servo. This can be used either for fine tuning or in the case of the middle servo (2) can be used to steer the robot when walking. |
| SERVO_1_SMOOTH | 20 | r/w | See below |
| SERVO_2_SMOOTH | 21 | r/w | See below |
| SERVO_3_SMOOTH | 22 | r/w | To prevent sudden movements from breaking the robot or causing it to jump, each servo has a smoothing (low pass filter) applied in software to the desired rotation. This can be removed by setting this to zero, this is a fixed point number where 200 (0.2) is the default value. |
Yarn bytecode is a 16 bit stack based microcode language.
| Bytecode instruction name | Example | Description |
|---|---|---|
| nop | nop | No operation, do nothing for one cycle |
| jmp | jump label | Unconditional jump |
| jpr | jpr -2 | Unconditional jump relative (can be negative) |
| jpz | jpz label | Jump only if the top of stack is zero. |
| jprz | jprz 10 | Jump relative if the top of the stack is zero. |
| Bytecode instruction name | Example | Description |
|---|---|---|
| ldl | ldl 1207 | Load literal value on to stack |
| ld | ld STEP_COUNT | Load the contents of address on to the sta |
| ldi | ldi A | Load indirect: the contents of the address pointed to by value (for arrays). |
| st | st NEXT_PATTERN | Stores the top of the stack in the supplied address |
| sti | sti A | Stores indirectly the stack top to the address at this location |
| dup | dup | Pushes the value at the top of the stack to duplicate it |
| Bytecode instruction name | Example | Description |
|---|---|---|
| lt | lt | Less than: Pushes 1 if the top of the stack is less than the stack item beneath it (pops both values) otherwise pushes 0 |
| gt | gt | Greater than: Pushes 1 if the top of the stack is less than the stack item beneath it (pops both values) otherwise pushes 0 |
| lte | lte | Less than or equal: Pushes 1 if the top of the stack is less than or equal to the stack item beneath it (pops both values) otherwise pushes 0 |
| gte | gte | Greater than or equal: Pushes 1 if the top of the stack is greater than or equal to the stack item beneath it (pops both values) otherwise pushes 0 |
| slt | slt | Signed version of lt |
| sgt | sgt | Signed version of gt |
| slte | slte | Signed verion of lte |
| sgte | sgte | Signed verion of gte |
| Bytecode instruction name | Example | Description |
|---|---|---|
| add | add | Pops the top two stack items and pushes the sum of them |
| sub | sub | Pops the top two stack items and pushes the top subtracted from the second |
| inc | inc | Adds one to the top of the stack |
| dec | dec | Subtracts one from the top of the stack |
| and | and | Bitwise ands the top two stack items |
| or | or | Bitwise ors the top two stack items |
| xor | xor | Bitwise xors the top two stack items |
| not | not | Bitwise nots the top stack item |
| rr | rr | Rotates the top stack item one bit to the right |
| rl | rl | Rotates the top stack item one bit to the left |
| sin | sin | Pushes the sine of the top stack item in degrees |
| cos | cos | Pushes the cosine of the top stack item in degrees |
| tan | tan | Pushes the tangent of the top stack item in degrees |
| rnd | rnd | Pushes and random number |
| inci | inci | Increments value in address in-place |
| deci | deci | Decrements value in address in-place |
| incp | incp | Increments value in address in-place and pushes it on the stack, convenience for looping |
| decp | decp | Decrements value in address in-place and pushes it on the stack, convenience for looping |
| Qty | Value | Footprint | References |
|---|---|---|---|
| 16 | Conn_01x07 | Pin_Headers:Pin_Header_Straight_1x07_Pitch2.54mm | J12, J31, J32, J33, J34, J35, J36, J38, J39, J40, J42, J45, J46, J47, J48, J49 |
| 5 | Conn_01x08 | Pin_Headers:Pin_Header_Straight_1x08_Pitch2.54mm | J13, J20, J21, J22, J23 |
| 3 | Conn_01x04 | Pin_Headers:Pin_Header_Straight_1x04_Pitch2.54mm | J6, J11, J14 |
| 2 | Conn_01x01 | Pin_Headers:Pin_Header_Straight_1x01_Pitch2.54mm | J9, J10 |
| 2 | Conn_01x02 | Pin_Headers:Pin_Header_Straight_1x02_Pitch2.54mm | J15, J16 |
| 2 | Conn_01x05 | Pin_Headers:Pin_Header_Straight_1x05_Pitch2.54mm | J1, J8 |
| 1 | Conn_01x03 | Pin_Headers:Pin_Header_Straight_1x03_Pitch2.54mm | J19 |
| 1 | Conn_01x06 | Pin_Headers:Pin_Header_Straight_1x06_Pitch2.54mm | J18 |
| 1 | Port B | Pin_Headers:Pin_Header_Straight_1x06_Pitch2.54mm | J3 |
| 1 | Port C | Pin_Headers:Pin_Header_Straight_1x07_Pitch2.54mm | J4 |
| 1 | Port D | Pin_Headers:Pin_Header_Straight_1x08_Pitch2.54mm | J5 |
| 1 | Power/i2c | Pin_Headers:Pin_Header_Straight_1x04_Pitch2.54mm | J2 |
fo-am/penelopean-robotics
Penelopean robot swarms for weaving ancient Greek looms and maypole dancing.

fo-am/penelopean-robotics
Penelopean robot swarms for weaving ancient Greek looms and maypole dancing.

fo-am/penelopean-robotics
Penelopean robot swarms for weaving ancient Greek looms and maypole dancing.

fo-am/penelopean-robotics
Penelopean robot swarms for weaving ancient Greek looms and maypole dancing.

hoglet67/RGBtoHDMI
Bare-metal Raspberry Pi project that provides pixel-perfect sampling of Retro Computer RGB/YUV video and conversion to HDMI

hackclub/OnBoard
💡 Join 1,000 teenagers and make your first PCB with a $100 grant!


tardate/LittleArduinoProjects
a collection of "Little Electronic & Arduino Projects", most involving electronics or an Arduino in one way or another!


Neumi/open_echo
Open Source echo sounder / depth sounder / SONAR for bathymetry and research. Arduino based and compatible.


It measures 50.8 × 44 mm and has 2 copper layers, 1.6 mm thick.
36 parts. The full list of its parts is on this page, with links to each part's symbol and footprint where PCBKit's library has them.
From the fo-am/penelopean-robotics repository on GitHub, at the commit this page was made from: the board is pcb/proto.kicad_pcb. PCBKit opens the board in the browser, with nothing to install.
Its repository states no licence, so its author keeps all rights: ask fo-am before reusing the design.