4 layers160 × 145 mm
Carrier
OrbitalCommons/gumstick
Gumstick: ESP32 + iCE40UP5K FPGA module (v1 DF40 board-to-board, v2 M.2 gold-finger draft) and its programming carrier. KiCad 10.
222 parts1MIT
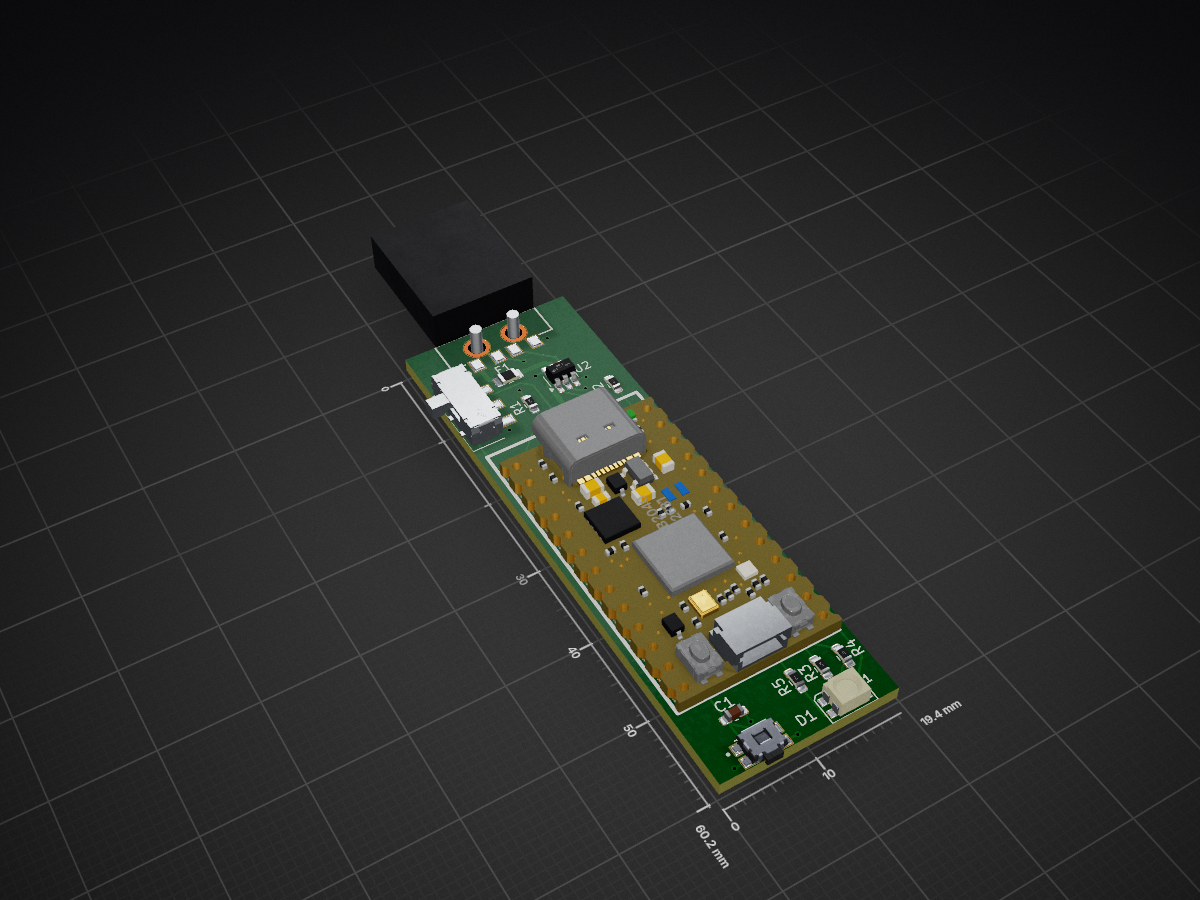
 dd060606/RedUSB1
RedUSB is a DIY USB macro device: a custom PCB built around an Adafruit KB2040 (RP2040) that acts as a programmable USB HID keyboard.
RedUSB is an open-source printed circuit board by dd060606, from the dd060606/RedUSB repository on GitHub. It is a 2-layer board of 19.4 × 60.2 mm with 14 parts on 32 nets, routed with 80 tracks and 10 vias.
It is built around the USBLC6-2SC6 and JS102011SAQN. Its parts include 5 resistors, 2 ICs, 2 switches, 1 capacitor and 1 diode.


RedUSB is a DIY USB macro device: a custom PCB built around an Adafruit KB2040 (RP2040) that acts as a programmable USB HID keyboard. You write simple scripts in a Ducky-Script–style language, drop them onto the device like a USB stick, and play them back as real keystrokes.
A single physical switch flips the device between two personalities:
.txt scripts onto it.The firmware is written in Rust (no_std) and runs bare-metal on the RP2040.
STRING, DELAY, REPEAT, key combos (GUI r, CTRL ALT t, ...), and more.LAYOUT.IF_OS / ELSE / END_IF (best-effort detection).The mode switch (GPIO8) selects the personality at power-up:
| Switch | Mode | USB device | Button does |
|---|---|---|---|
| To GND (low) | Config | Mass storage (REDUSB drive) | Cycle the selected script |
| Open (high) | Attack | HID keyboard | Run the selected script |
Flipping the switch while plugged in reboots the device into the other mode.
The device mounts as a FAT drive named REDUSB. Copy script files (.txt) onto it. Each button press selects the next script, and the LED shows its slot color so you know which one is armed. The selection is saved to flash and survives power cycles.
The device enumerates as a USB keyboard. About a second after the host finishes setting it up, the selected script runs automatically. You can also press the button at any time to re-run it.
Safety: because the script auto-runs on connect, make sure the right script is selected and the intended window is focused before you plug into attack mode. Only use this on machines you are authorized to test.
KiCad sources, the 3D model, and production/assembly files live in PCB/ and 3D/.
RedUSB/
├── 3D/            Mechanical / enclosure model
├── PCB/           KiCad project and fabrication files
├── Firmware/      Rust firmware (Cargo workspace)
│   ├── core/      Hardware-independent logic: FAT, Ducky engine, layouts (host-tested)
│   └── firmware/  RP2040 binary: USB, flash storage, LED, button, modes
├── scripts/       Ready-to-run test / example scripts
└── README.mdInstall the Rust toolchain (the correct target is pinned by rust-toolchain.toml), then the two build/flash helpers:
cargo install flip-link      # linker used by the firmware
cargo install elf2uf2-rs     # builds the UF2 and copies it to the board
All firmware commands below are run from the Firmware/firmware/ directory.
cargo run --release builds and flashes in a single step : the project's Cargo runner converts the firmware to a .uf2 and copies it to the board, so there's no separate build command to remember.
RPI-RP2 drive:
cargo run --releaseTo just compile without flashing (for example to check it builds), use
cargo build --release.
Scripts are plain .txt files placed in the root of the REDUSB drive (config mode). Filenames follow the FAT 8.3 convention (up to 8 characters before the extension), and scripts are sorted by name, so prefixes like 1_, 2_ give a predictable order. Up to 16 scripts are tracked.
See the scripts/ folder for ready-to-run examples that exercise every feature.
REDUSB drive appears..txt script(s) onto it.| Command | Example | Meaning |
|---|---|---|
REM | REM a comment | Comment, ignored |
STRING | STRING hello | Type text (no newline) |
STRINGLN | STRINGLN hello | Type text, then Enter |
DELAY | DELAY 500 | Wait 500 ms |
DEFAULT_DELAY | DEFAULT_DELAY 50 | Pause after every command |
REPEAT | REPEAT 3 | Repeat the previous command 3 more times |
LAYOUT | LAYOUT FR | Keyboard layout for STRING (US or FR) |
| Key / combo | GUI r, CTRL ALT t, ENTER, F5 | Press a key, optionally with modifiers |
IF_OS … ELSE … END_IF | IF_OS WINDOWS | Run a block only on a given OS |
OS_REPORT | OS_REPORT | Type the detected OS and USB enumeration counters (diagnostic) |
Modifiers: CTRL, SHIFT, ALT, GUI/WINDOWS, ALTGR. The default layout is French (AZERTY).
Config mode : selected script slot:
| Slot | 0 | 1 | 2 | 3 | 4 | 5 | 6 | 7 |
|---|---|---|---|---|---|---|---|---|
| Color | Red | Green | Blue | Yellow | Cyan | Magenta | White | Orange |
(Slots 8–15 use the same colors, blinking. A slow white "breathing" glow means no scripts are present.)
Attack mode:
| LED | Meaning |
|---|---|
| Dim selected-slot color | Idle, ready |
| Solid white | Script running |
| Red flash (1.5 s) | No script to run |
| Magenta flash | Keystroke timed out (host not accepting input) |
| Orange flash | Script line could not be parsed |
| Yellow flash | Script file could not be read from flash |
| Cyan flash | Malformed IF_OS / ELSE / END_IF |
For everyday use the LED is enough. For detailed logs, the firmware emits defmt over RTT, which needs an SWD debug probe (for example a second Raspberry Pi Pico flashed as a debug probe) wired to the KB2040's SWD pads:
cargo install probe-rs-tools
probe-rs attach --chip RP2040 target/thumbv6m-none-eabi/release/firmware
Host-side logic in core/ is unit-tested:
cd Firmware/core && cargo testMIT © dd060606
| Qty | Value | Footprint | References |
|---|---|---|---|
| 2 | 150R | Resistor_SMD:R_0603_1608Metric_Pad0.98x0.95mm_HandSolder | R4, R5 |
| 2 | 27R | Resistor_SMD:R_0603_1608Metric_Pad0.98x0.95mm_HandSolder | R1, R2 |
| 1 | 100nF | Capacitor_SMD:C_0603_1608Metric_Pad1.08x0.95mm_HandSolder | C1 |
| 1 | 220R | Resistor_SMD:R_0603_1608Metric_Pad0.98x0.95mm_HandSolder | R3 |
| 1 | 500mA | Fuse:Fuse_0805_2012Metric_Pad1.15x1.40mm_HandSolder | F1 |
| 1 | 629004113921 | 629004113921:629004113921 | J1 |
| 1 | EVQ-P7A01P | EVQ_P7A01P:SW_EVQ-P7A01P | S1 |
| 1 | JS102011SAQN | JS102011SAQN:SW_JS102011SAQN | S2 |
| 1 | LOGO | LOGO | G*** |
| 1 | USBLC6-2SC6 | Package_TO_SOT_SMD:SOT-23-6_Handsoldering | U2 |
| 1 | WL-SFTW_3528_PLCC4 | LED_SMD:LED_RGB_Wuerth-PLCC4_3.2x2.8mm_150141M173100 | D1 |
| 1 | kb2040 | kb2040:kb2040 | U1 |
OrbitalCommons/gumstick
Gumstick: ESP32 + iCE40UP5K FPGA module (v1 DF40 board-to-board, v2 M.2 gold-finger draft) and its programming carrier. KiCad 10.

MeesCode/gameboy-pcb
custom gameboy-esque pcb running an stm32 and my own tiny game engine

Michael-Lloyd/macropad
A simple macropad powered by an 18650, with bluetooth capabilities.


StuckAtPrototype/Racer
These are structured into their own files. I could have used submodules, but decided against it.

LNH-team/Lost-NDS-TV
The Lost Nintendo DS Television Output, brought back to life
It measures 19.4 × 60.2 mm and has 2 copper layers, 1.6 mm thick.
14 parts, built around the USBLC6-2SC6 and JS102011SAQN. The full list of its parts is on this page, with links to each part's symbol and footprint where PCBKit's library has them.
From the dd060606/RedUSB repository on GitHub, at the commit this page was made from: the board is PCB/RedUSB.kicad_pcb and its schematic PCB/RedUSB.kicad_sch. PCBKit opens the board in the browser, with nothing to install.
Its repository states no licence, so its author keeps all rights: ask dd060606 before reusing the design.