Skip to the content
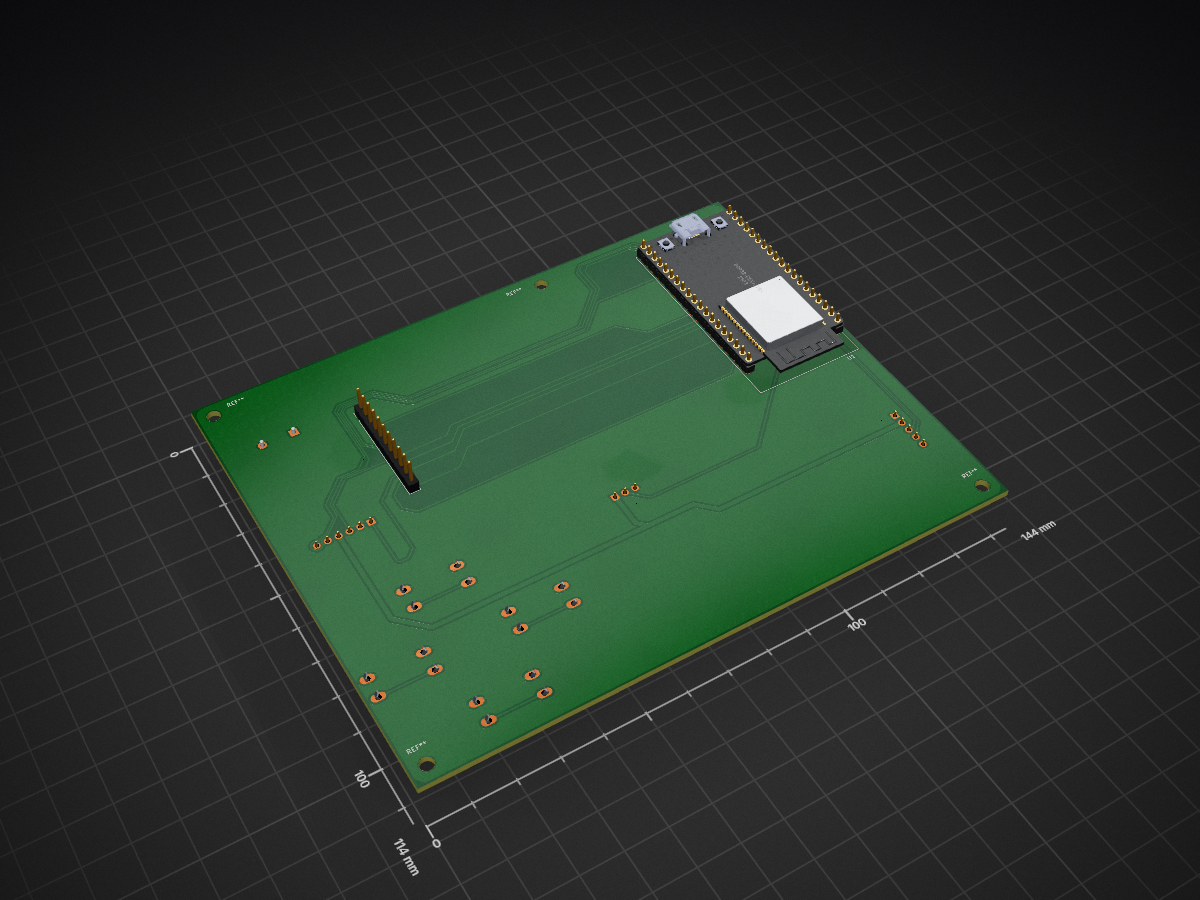
2 layers144 × 114 mmSet In Stone, the printed circuit board in 3D

This is a minigame in which you will have to follow the directions of the machine. It will have buttons, joysticks, potentiometers, and a switch, all of which you will have to interact with.

Size
144 × 114 mm
Copper layers
2
Thickness
1.6 mm
Parts
14
Nets
38
Pads
85
Tracks, vias
249, 3
Pours
2
Routed
Yes
KiCad
KiCad 10.0 (file 20260206)
Created
8 Jun 2026
Updated
28 Jun 2026

Overview

Set In Stone is an open-source printed circuit board by TheDiamondAce, from the TheDiamondAce/Set-In-Stone repository on GitHub. It is a 2-layer board of 144 × 114 mm with 14 parts on 38 nets, routed with 249 tracks and 3 vias.

Its parts include 4 switches, 3 connectors and 1 IC. It belongs with the ESP32 boards of this library.

README

README.md

Set In Stone

Set In Stone (3)

Motivation

Starting off with the motivation, I wanted to challenge myself, making something big for my second project, upon which I decided to ultilize my skills of CAD over 2 years on onshape and also my newfound knowledge of C++ hardware coding I wanted to do a minigame of sorts, learning how modules work and interact with microcontrollers. I realized that most modules use a combination of using eletrical charges to output or input values into code. Which I found to be a revalation suprisingly

What is this?

This project is a minigame similar to Simon Says and Bop it combined, you have to do multiple inputs to get a point, making it harder and harder as you progress. It is a reaction game of sorts, benefiting the people with great hand to eye coordination

How to Build?

To build this, you first need to get the pieces as listed in the BOM, you will have to download the code from the Code folder and need to 3D print the enclosure/chassis as well as the button caps. Then, you will need to get the required modules and follow the wiring diagram as shown below here. For the PCB, you will need to first remoe the 3 wires on the left hand of the tft display since you wont need it for the build. Then after you remove it, you will need to solder the modules onto the PCB, however, the parts that you fit to the LID first are the joystick and the display. Then after you connect the PCB to the modules and also to the lid, you will need to get the usb c extension cable and fit it into the usb c gap in the bottom. After, its just a matter of plugging into a power source through the cable, then plug and play!

What am I proud of?

Most definitely the code first, then the CAD, but not far behind. The reason for this is because I think for the first time, I actually understood the code sorta, and figured out what each thing does, actually using struct functions and enum functions, in an actual way. (Update) Okay, so the first thing I'm proud of now is the PCB as this is the first time i've ever done PCB tinkering, and I'm glad to say, it was a success! Usually, when I coded, I never really bothered to use such types of functions, but with this project, I realized that, im getting better at coding. For CAD, I really am happy that I managed to get all of the constraints to a precises level to my standards. Also the way I designed it was sorta challenging for me at my level.

What is the next steps?

Im thinking of making it so that there will be more audio and a spritesheet on the display with a mascot, being happy or mad whenever you get something right and wrong. Im also thinking of adding bluetooth audio so that I can implement a simon says mechanic, making it so that on certain cases, you dont press unless the stone says lmao, but not soul says haha.

Anything else

Nah

Ur CAD Diagrams and Wiring?

Oh shoot yeah ur right

CAD Pictures

Isometric

image

Front

image

Back

image

Side

image

BOM

NameDescriptionQuantityPriceWhyLink
JoystickA module that uses potentiometers and a stick to measure values1$8.79So you can do stuff to memorize for the minigamehttps://www.amazon.com/DKARDU-Dual-axis-Joystick-Control-Breakout/dp/B0B5GLYPLT/ref=sr_1_6_sspa?dib=eyJ2IjoiMSJ9.azZ62n4Tl8ZwkrheJyqyCndrP1SV71A4xyAr-iuhJYzian_VPAm1-wcJa1kETLtxM4eNGt-xxm1leb5CyeYzA3nBElRKq_MmfamtrXjfZvH7wPZkzrT96BrQEydKYWCSkKjlWEekTF7VWtR9tcMjoZKWhNFTWNypkJJN8fer6AzldJ-0Q4IYCG_6cRPB-GjUYue5LsoKmklUHP6XbxF4PJ9gZ4sy5qI4osEVQvxmUko.qd12qxOC_v7GZmm8GlitAnJ3g7_pRsO_EVmVD7kz0sU&dib_tag=se&keywords=KY-023&qid=1781695753&sr=8-6-spons&sp_csd=d2lkZ2V0TmFtZT1zcF9tdGY&psc=1
12mm ButtonA tactile switch that either connects a cirucuit or disconnects depending on input4$12.07So you can click stuff to memorize for the minigamehttps://www.amazon.com/Uxcell-a11111400ux0132-Momentary-Tactile-Button/dp/B0090VQLDK
12mm Button Caps (Red Green Yellow Blue)The caps to indentify which button is which (Will be 3D printer most likely)4$0.00To know which button is which.can 3D print through hackclub or by yourself
PotentiometerA module that uses potentiometers and a stick to measure values through rotation1$9.99Another cool function that gives varation and intresting mechanicshttps://www.amazon.com/TWTADE-Adjustable-Potentiometer-Resistance-XH2-54-3P/dp/B082FCRQS2/ref=sr_1_11?dib=eyJ2IjoiMSJ9.TaTUlh95QswS_FIIMPYmhtrGpujREngP3Xc1oQRyB9rYfzo5Gjz4PTvWpn5iXK9dcDXyauCQyVTScgKtQiiCgd3LLyPBGxHL-tvGMzznu9_sFYWY9xP6C6awwAKLKjAjD54kWNmqUPUcvBHwoTWNZ5n1v20SmyDv5QPkhg_GJn26vWFLQ7iqdO7V3fx2rxiDINDQcKF5Hye8oN6JiOwa8UQbfrgA9xlyOhBGqnJD3KQ.hsZpGYPSabo9mENvFcCT4852xHdjX3BdothB3Qju_3g&dib_tag=se&keywords=potentiometer&qid=1781262502&sr=8-11&th=1
TFT LCD 2.4 inch ILI9341 TouchDisplay used to show what inputs to press next and as well as score and timer1$12.39To see what inputs to do next and other datahttps://www.amazon.com/ACEIRMC-ILI9341-Display-Touch-240X320/dp/B0C4D5S6G5/ref=sr_1_10_sspa?crid=1KKGFFL8GGC72&dib=eyJ2IjoiMSJ9.aNbS-hCnwROiq-lihDWLj0bSTkExzZcUEg9Thz-MRRtS2XSDTZusdgq0aD1F0WmFP2z1icua7XtMO6m0dMOpn8SqrOFp1HIlcN4kiqw6-RlV7hZO4ruwCns7e_xrwwarWxaiSyrChwiIRUrUY_RlX9OKgmKKALx-gO4lSBbiMaZfKv6a7KsmvzFghX94ueB0tjP9qSX40MXT01v37X8MMYSJqIt6UnkreQ59ftwFdiegDUDVujNbTPq7P3rk02P9OOVeiCEMzoFH8qXlYbO1NNMZsi5VeRhwTNT7sHwGj98.L9Ilfuyvs66CsTIbDNYf3OsazpswS6k4iaS05y2B6dk&dib_tag=se&keywords=ili9341&qid=1781262418&s=electronics&sprefix=ili%2Celectronics%2C409&sr=1-10-spons&sp_csd=d2lkZ2V0TmFtZT1zcF9tdGY&psc=1
-ESP 32The Microcontroller that will control all functions of the minigame as well as logic.1$9.99To control the whole minigame and logichttp://amazon.com/HiLetgo-ESP-WROOM-32-Development-Microcontroller-Integrated/dp/B0718T232Z/ref=sr_1_3?crid=1USIEYMJJ17B2&dib=eyJ2IjoiMSJ9.qMJJKscaTbDZH8KOrPXaSvvBOSev_9dSPToXjxjL2hvyn1gBn6UPJN0hkgfCA46MeGIMW0m_k8uVP6ohS8y2Ybx0WAhwI7WeRI7HGIEx1FzRCBDUpYc9OEv48KKiBbsEpRw-msTD6rmtDv4Xvt-FdBguBvBYlMMj4hzZRICsg1IFudiHZVD_F8MFEsmYWqc5av-fzu7UHVx2QYcllMYcUQXPrnJ9yVsP_ArNuaKStI0.KplrsOIrBP554ZSAFR6EYMaRAuKfkU4c-5f2bEqIvqA&dib_tag=se&keywords=esp32&qid=1781262965&sprefix=esp%2Caps%2C477&sr=8-3&th=1
Half BreadboardA module used to have extra ports and have more leeway in circuit connections1$5.99For extra ports to connect GND and PWR and other wires too.https://www.amazon.com/WWZMDiB-SYB-170-Breadboard-Plates-Multicolored/dp/B09YXQJMTG/ref=sr_1_3?crid=2AKGMD1N41ZHO&dib=eyJ2IjoiMSJ9.EQvCK09g_r0CejNbKABqFdsxqhs5KyJ1I0W1Q395qgARL8M_eCKhoj9mKheDOgAb_PUbl3fS3TNz_-PkcA5Ur8CU2_LE8D1_eW4bH6tGqQ7fgX-P_ELVVSjGnskkUdkdZKxuxYHAbqnzcsl53FGLHvlJk3CfdosCvz8g7-GZr3ywx0Ic_oW_dglX5jAHgBxu-roh24M2mq6ot_Jl_-sd2wQRqCW9XuF1Zhf4ILJQ5lI.RYnkEh1qahxXQ1VyEr87oe8Coe7Rg22-y_Lfwkx4oYs&dib_tag=se&keywords=half+breadboard&qid=1781695848&sprefix=half+breadboard%2Caps%2C403&sr=8-3
Dupont Female-Male WiresUsed to connect modules to microcontroller and circuits.~40$6.99Bruh, so the whole thing can get some electricity.https://www.amazon.com/Solderless-Multicolored-Electronic-Breadboard-Protoboard/dp/B09FPJM3L9?th=1
3D Printer Enclousure.The host for all modules necessary in the build1$0.00To put all of the modules into one areacan print through hackclub or by yourself with step file
M7 Jam Nut7mm in diameter Jam nut. (Optional because potentiometer has this.)1$0.00To Screw in the Potentiometernot necessary since potentiometer link has the jam nut already
M4 Screw4mm in diameter Screw4$9.99To Screw in the Joystick Module and display.https://www.amazon.com/mxuteuk-450PCS-Screws-Assortment-Socket/dp/B0CS67BLQJ/ref=sr_1_3?crid=1H3GBSELCRPJT&dib=eyJ2IjoiMSJ9.WS2IYPVxCSdSo7wd5Ro8qswOwSorxoGo4OOJvZ9bUqPprJ30Ccqh94VnURS4gSkMOYPS-ZEDVI7dUfj0_-NAmAo7UKL2-5WZ9QllNB-5f-a9xEkRlvXgIX7IboPFqkcX9JXqOVSzvbsQEum2MjjYmuCvdaien_4XW7I09f5VQ7svLen--Tr_Kp-oOPXzIEYotNzGKD5c1CMrQCy695_CdF8zfiQV0dCKJ3mnVq9N8lY.zClPtqKY4btAdvUcQPcIhxSYIAlmEpf7oDnjbVvqnpU&dib_tag=se&keywords=m3%2Band%2Bm4%2Bjam%2Bnut%2Band%2Bscrews&qid=1781696093&sprefix=m3%2Band%2Bmjam%2Bnut%2Band%2Bscrews%2Caps%2C394&sr=8-3&th=1
M4 Jam Nut4mm in diameter Jam Nut4$0.00~. ~. ~. ~~~~ (the link above has both the jam nut and screws)
M3 Screw3mm in diameter Screw for Electronics4$0.00For PCB~~~ (the link above has both the jam nut and screws)
M3 Jam NutTo tighten the 3mm screw4$0.00For PCB~~~ (the link above has both the jam nut and screws)
PCBA electrical component custom made for a specific task1$62.32So the whole thing can be connected seamlessly if not using a breadboard and jumper wires.https://www.pcbway.com/orderonline.aspx?outsideid=4bd99289-acd0-49fe-ba78-ffb373cdaed3
THE LINKS USED MIGHT HAVE MULTIPLE PIECES SINCE THEY ARE THE BEST BANG FOR BUCK ON AMAZON.***
TOTAL PRICE=$138.52
(MINUS $5.99 if using breadboard and $62.32 IF USING BREADBOARD!!)

Wiring Diagram

Breadboard Prototype Wiring

Wiring Diagram

Schematics PCB Diagram

image

PCB Footprint Diagaram

image

Parts

14
QtyValueFootprintReferences
1Blue ButtonButton_Switch_THT:SW_PUSH-12mmSW1
1BuzzerBuzzer_Beeper:Buzzer_12x9.5RM7.6BZ1
1Conn_01x06Connector_PinSocket_2.54mm:PinSocket_1x06_P2.54mm_VerticalJ3
1ESP32-DEVKITC-32DESP32-DEVKITC-32D:MODULE_ESP32-DEVKITC-32DU1
1Green ButtonButton_Switch_THT:SW_PUSH-12mmSW2
1JoystickConnector_PinSocket_2.54mm:PinSocket_1x05_P2.54mm_VerticalJ2
1R_PotentiometerConnector_PinSocket_2.54mm:PinSocket_1x03_P2.54mm_VerticalRV1
1Red_ButtonButton_Switch_THT:SW_PUSH-12mmSW4
1TFT ILI9341 Cap TouchConnector_PinHeader_2.54mm:PinHeader_1x11_P2.54mm_VerticalJ1
1Yellow ButtonButton_Switch_THT:SW_PUSH-12mmSW3

The 10 most common of 14 parts.

Similar boards

  • 2 layers116.8 × 30 mmType d, the printed circuit board in 3D

    Type d

    google/mozc-devices

    Circuit diagrams and firmware source code for Gboard DIY keyboards

    14 parts3kApache-2.0
  • 2 layers32 × 22 mmDiff driver, the printed circuit board in 3D

    Diff driver

    rene-dev/stmbl

    AC Servo Driver for STM32F4

    14 parts990GPL-3.0
  • 2 layers34 × 45 mm2032Charger, the printed circuit board in 3D

    2032Charger

    hackclub/OnBoard

    💡 Join 1,000 teenagers and make your first PCB with a $100 grant!

    14 parts915
  • 2 layers34 × 109.9 mmTdisplay s3, the printed circuit board in 3D

    Tdisplay s3

    landonr/homeThing

    Wifi Smart Home Remotes that run on ESPHome

    14 parts551GPL-3.0
  • 2 layers45.3 × 42.7 mmMainPcb, the printed circuit board in 3D

    MainPcb

    adamb314/ServoProject

    Getting the most out of your hobby servo

    14 parts545
  • 2 layers42.5 × 28.8 mmC5VRX JACK DIY, the printed circuit board in 3D

    C5VRX JACK DIY

    Twotoz/C5VRX

    Ultra-minimal, zero-CPU 5.8 GHz analog FPV video receiver using ESP32-C5 Wi-Fi 6 PHY MODEM_DIAG, BitScrambler WBFM demodulation & resistor DAC CVBS

    14 parts515GPL-3.0
  • 2 layers62 × 24 mmMai button, the printed circuit board in 3D

    Mai button

    whowechina/mai_pico

    Pico controller for Maimai

    14 parts475

Questions

How big is the Set In Stone PCB?

It measures 144 × 114 mm and has 2 copper layers, 1.6 mm thick.

What parts does the Set In Stone use?

14 parts. The full list of its parts is on this page, with links to each part's symbol and footprint where PCBKit's library has them.

Where can I download the Set In Stone KiCad files?

From the TheDiamondAce/Set-In-Stone repository on GitHub, at the commit this page was made from: the board is PCB-Set-In-Stone-KiCAD/Set_In_Stone.kicad_pcb and its schematic PCB-Set-In-Stone-KiCAD/Set_In_Stone.kicad_sch. PCBKit opens the board in the browser, with nothing to install.

Can I use the Set In Stone design in my own project?

Its repository states no licence, so its author keeps all rights: ask TheDiamondAce before reusing the design.