
2 layers158 × 11 mm
Daylight Matchstick
VoronDesign/Voron-Hardware
Cool Hardware designed by the Voron Design group
22 parts1.1kGPL-3.0
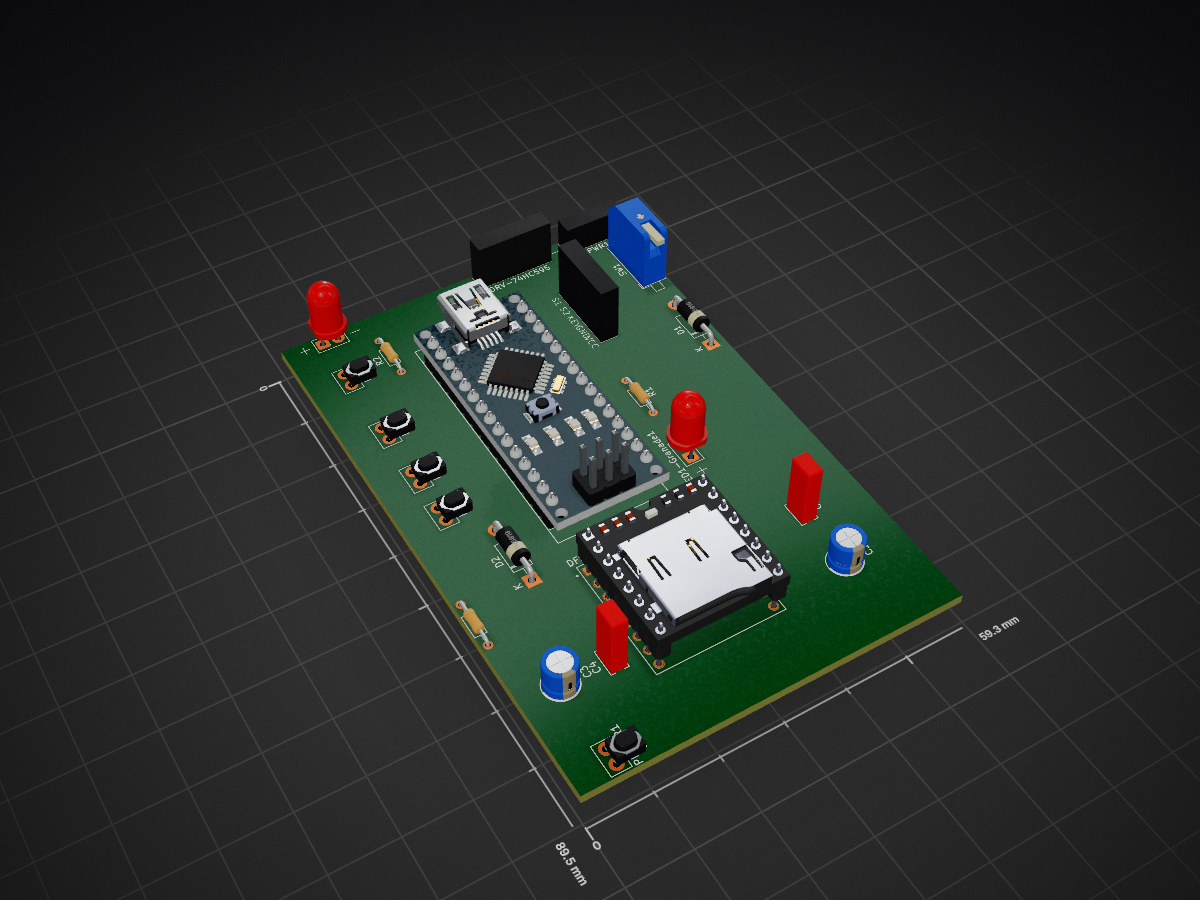
Light and Sound module for M41A rifle from Aliens movie, based on Arduino
M41A is an open-source printed circuit board by ByPS128, from the ByPS128/Arduino-Aliens-M41A-Rifle repository on GitHub, published under the MIT licence. It is a 2-layer board with 22 parts on 47 nets.
Its parts include 4 capacitors, 4 diodes, 3 resistors and 1 switch. It belongs with the AVR (ATmega, ATtiny) boards of this library.
the project is a simple simulator of rifle and grenade launcher firing mockups of the popular M41A weapon from the legendary Aliens movie. The hardware is implemented using an Arduino Nano and a DF Player (also known as the DF Robot) along with a few other peripherals.
There are many M41A mock-ups on the market, including 3D printed ones. The version I was sounding did not have a working grenade launcher and it also did not have a retractable slide. We used the magazine space to house the electronics and so this version of the 3D printed rifle has quite a lot of limitations. However, the software is easy to adapt for a larger application with multiple input signals.
I made a 3D models of magazine foot where I placed:
You can use my 3D models for 3D printing if compatible with yours models of M41A rifle.
I will be glad if you use them, see here at Printables.com:
https://www.printables.com/cs/model/940214-m41a-rifle-magazine-foot-for-arduino-implementatio
I am using OnShape to create models, here is direct link if you are interested in: https://cad.onshape.com/documents/143c32e288eb70a4674d24e8/v/e97b14a1ca8f76a05194cd48/e/891a4cec0397cb99cd8f56b7
Here is updated video of the project in action with description of all functions:
https://www.youtube.com/watch?v=IwG0UBBIASA
I developed the scheme in KiCad (free). It's my first schematic, so please excuse me if I didn't choose some brands correctly. Alternatively, please modify the scheme and make a pull request. The schematic source files are in the KiCad directory.
Schema preview:
To prevent the display from flickering after switching on the circuit, or even a flicker in the speaker, I recommend using an electrolytic and ceramic capacitor in parallel. Each type has different characteristics and they complement each other:
100 µF electrolytic capacitor: This capacitor is able to smooth out low frequency peaks and provide a stable power supply. Electrolytic capacitors have high capacitance and are suitable for low frequency filtering.
100 nF ceramic capacitor: This capacitor is capable of smoothing out high frequency peaks and noise. Ceramic capacitors have lower capacitance but are faster and more efficient for filtering high frequencies.
Approximately 870-1050 mA (considering all components at maximum power)
Calculation of capacitor capacitance required It is common practice for filter capacitors to use 100-200 µF for every 100 mA of current draw.
Electrolytic capacitor C3 Required capacitance: (1050 mA / 100 mA) * 100-200 µF = 1050-2100 µF Ceramic capacitor C4 Capacitance required: 100 nF to 1 µF (for high frequency noise)
Recommended capacitance: 1000 µF to 2200 µF This value will provide sufficient power supply filtering for all components.
Recommended capacitance: 100 nF to 1 µF This value will help with high frequency noise filtering.
Schema file resides here: /KiCad/M41A/M41A.kicad_sch
and here is PDF version: /KiCad/M41A-Schematic.pdf
If you would like to open the schema, import the libraries I created. I couldn't find schematic marks for some components, so I created them with their footprints. The library is in the directory: /KiCad/Project_Library.kicad_sym
I decided to use DF Player for playing sounds for several reasons:
However hend I made the experience that not every clone works properly. I was unlucky and the very first one I bought was built on the MH2024K-24SS chip. This has huge latency from the instruction to play the audio to the actual start of playback takes a second.
And that's unusable. That's why I bought a few more from different stores and came across a module with a TD5580A chip and it responds instantly. And that's why I recommend you use it.
I used the protocol handler from an existing library and modified it to suit me better.
I used a 3W speaker. The specification of the DF Player says that the built-in amplifier will drive the 3W speaker to the maximum. If you wanted to use a more powerful speaker, you would have to insert another amplifier between the player and the speaker and use a separate power supply.
You can find the documentation for the DF player in the DOC directory, including communication protocol specs.
For displaying the remaining bullets in the rifle's magazine, I used, how else, red segment displays. And to get rid of a bunch of wires and resistors, I used a driver that is beautifully compact, works perfectly. It contains a 74HC595 circuit for each segment. The displays used shared anode, so the segment lights up when its pin is at logic zero.
https://www.aliexpress.us/item/3256805033000283.html
I used this one, with built-in RC filter. Thanks to the filter, the dream was not to treat false presses.
https://www.aliexpress.us/item/3256805548024336.html
I used high brightness 5mm, warm white, 30mA LEDs https://www.gme.cz/v/1492064/OptoSupply-OSM5DK5201A-LED-5mm-tepla-bila
I made some sounds in multiple variations. This is so that the simulation does not appear monotonous. So every time I start shooting, a different option comes up. They repeat over time, but for the shot I made it so that each new playback plays a different file. Similarly, the pulling of the weapon's bolt is solved, the sound of squeezing the trigger with an empty magazine is also solved.
The program is somehow built and expects concrete files on the sd card. DF Player uses mtak that I select a directory and a file in it. This is defined by numbers. So the directories are numbered and always with two digits, i.e. "01". I don't use them anymore. It would be easy to use the rotary encoder to select a different directory and thus select a different set of sounds, and suddenly the sounds could be from a specific existing weapon, or totally crazy sci-fi sounds, etc. In directory 01 there are files that must also be numbered in 3 places, i.e. 001, 002, etc. In the constants of the application, it is then defined which number has which sound. For example (excerpt from AppConstants.h)
// I have some sounds in multiple variants and I randomly choose which variant to play.
// For this there are FIRST and LAST containers, which define the file numbers of the sounds of a given type.

// Sound file interval for rifle fire
static const int SAMPLE_RIFLE_FIRE_FIRST = 1;
static const int SAMPLE_RIFLE_FIRE_LAST = 6;

// Sound file interval for cock sound
static const int SAMPLE_COCK_FIRST = 10;
static const int SAMPLE_COCK_LAST = 14;

// Sound file interval for empty magazine, you rpes rifle fire and this empty file will play
static const int SAMPLE_EMPTY_MAGAZINE_FIRST = 20;
static const int SAMPLE_EMPTY_MAGAZINE_LAST = 24;Files must start with a number, but can continue with any name that describes the sound. This is what my SD card looks like:
001-Shoot-95.wav
002-Shoot-95.wav
003-Shoot-95.wav
004-Shoot-95.wav
005-Shoot-95.wav
006-Shoot-95.wav
010-Cock-01-Sniper.wav
011-Cock-02.wav
012-Cock-03.wav
013-Cock-04.wav
014-Cock-05.wav
020-Empty.wav
021-Empty.wav
022-Empty.wav
023-Empty.wav
024-Empty.wav
030-MagazineEject-01.wav
031-MagazineEject-02.wav
040-MagazineLoad-01.wav
041-MagazineLoad-02.wav
042-MagazineLoad-03.wav
050-MagazineReload-01.wav
051-MagazineReload-02.wav
053-MagazineReloadCock-01.wavBut in reality, the application, as its source codes define, uses the following files: (Starting to play unused sounds is commented out in the application.)
001-Shoot-95.wav
002-Shoot-95.wav
003-Shoot-95.wav
004-Shoot-95.wav
005-Shoot-95.wav
006-Shoot-95.wav
010-Cock-01-Sniper.wav
011-Cock-02.wav
012-Cock-03.wav
013-Cock-04.wav
014-Cock-05.wav
020-Empty.wav
021-Empty.wav
022-Empty.wav
023-Empty.wav
024-Empty.wav
053-MagazineReloadCock-01.wav
054-MagazineReloadCock-02.wav
060-GranadeFire-01.wav
065-GranadeLoad-01.wav
066-GranadeExplosion-01.wav
093-VolumeSaved.wav
It is also essential to use the DriveSort app: Anerty's Lair - DriveSort which sorts the files on the SD card so that they are physically organized in sequence. This has a major impact on the delay/latency before the sound starts playing.
I searched in sound banks which provides free sounds for free download and use. For example, I searched for gun cocking sounds under the keyword "cock" and one of the many useful ones I found is, for example, this one: https://artlist.io/sfx/track/battle-rifles---fn-fal-cocking-gun/80693
It will probably take you some time to find the right sounds that you will like and fit for your application.
The firing of the M41A rifle is specific sound and is difficult to imitate. So I bought the game "Aliens Colonial Marines" and used the sounds from it.
To edit the sounds, I used the AudaCity software, which is free and can do everything necessary in it. https://www.audacityteam.org/
DF Player can play many formats including MP3 in CD quality and stereo. (It even has a simple equalizer, but I haven't used it, but you can, I have implemented functions to adjust the equalizer, just use them.)
The connection I used is monophonic, so using files containing stereo tracks is unnecessary workload for DF Player, and also such files are larger, which means that more power and time are needed to upload and process the file. And this app (M41A) works well only when it responds instantly. So, for these reasons, even after several attempts and tests, I decidedto use uncompresed WAV format, 8bit, mono with 22050 sample rate. It sounds as good from that 3W speaker as the 16bit mono 44100. If you used a better speaker, then it is possible that you would use a better quality sound.
If you would use better quality sounds, there is no need to change anything in the application. The detection of the audio file format is fully under the control of DF Player.
When I wrote about organizing files on the SD card above, I mentioned the 01 directory that I use.
But you can easily have more such directories and the same numbered files in them. These can contain the same but higher quality sounds. By simply changing the value of one constant, you tell the application to use a different directory. And so you can easily test which sounds are better in your application.
The constant is named DEFAULT_DIRECTORY_NUMBER and resides in DFPlay.h file
| Qty | Value | Footprint | References |
|---|---|---|---|
| 2 | 100 nF | Capacitor_THT:C_Rect_L4.0mm_W2.5mm_P2.50mm | C2, C4 |
| 2 | 1N5819 | Diode_THT:D_DO-41_SOD81_P10.16mm_Horizontal | D1, D2 |
| 2 | 220 | Resistor_THT:R_Axial_DIN0204_L3.6mm_D1.6mm_P7.62mm_Horizontal | R1, R2 |
| 2 | LED | ProjectLibrary:LED Leads 2x 2.54 | LED1-Granade1, LED2-Rifle1 |
| 1 | 100 µF | Capacitor_THT:CP_Radial_D5.0mm_P2.50mm | C1 |
| 1 | 1000 | Resistor_THT:R_Axial_DIN0204_L3.6mm_D1.6mm_P7.62mm_Horizontal | R3 |
| 1 | 2000 µF | Capacitor_THT:CP_Radial_D5.0mm_P2.50mm | C3 |
| 1 | 3W | ProjectLibrary:Speaker Leads 2x 2.54 | SPEAKER1 |
| 1 | 5V | ProjectLibrary:Battery 4x 2.54 | PWR1 |
| 1 | Arduino_Nano_v3.x | Module:Arduino_Nano | A1 |
| 1 | Cock | ProjectLibrary:Button Leads 2x 2.54 | BTN3 |
| 1 | DFPlayer | ByPS-Library:MODULE_DFR0299 | DFPlayer1 |
| 1 | Granade fire | ProjectLibrary:Button Leads 2x 2.54 | BTN4 |
| 1 | Magazine reload | ProjectLibrary:Button Leads 2x 2.54 | BTN2 |
| 1 | Rifle Fire | ProjectLibrary:Button Leads 2x 2.54 | BTN1 |
| 1 | RotaryEncoder_Switch | ProjectLibrary:RotaryEncoder Leads 5x 2.54 | RE1 |
| 1 | SW_PWR_ON_OFF | Button_Switch_THT:SW_DIP_SPSTx01_Piano_10.8x4.1mm_W7.62mm_P2.54mm | SW1 |
| 1 | ~ | ProjectLibrary:Segment Display Leads 5x 2.54 | DRV-74HC595 |
VoronDesign/Voron-Hardware
Cool Hardware designed by the Voron Design group

hoglet67/RGBtoHDMI
Bare-metal Raspberry Pi project that provides pixel-perfect sampling of Retro Computer RGB/YUV video and conversion to HDMI

hackclub/OnBoard
💡 Join 1,000 teenagers and make your first PCB with a $100 grant!

abhishek-kakkar/BeagleLogic
A Software Suite that implements a logic analyzer with the PRU on the BeagleBone / BeagleBone Black.

Chrismettal/flipper-zero-backpacks
Backpack-style addon boards for the Flipper Zero!


CRImier/MyKiCad
My KiCad boards. Can't be bothered uploading individually anymore, so here you go.
22 parts. The full list of its parts is on this page, with links to each part's symbol and footprint where PCBKit's library has them.
From the ByPS128/Arduino-Aliens-M41A-Rifle repository on GitHub, at the commit this page was made from: the board is KiCad/M41A/M41A.kicad_pcb and its schematic KiCad/M41A/M41A.kicad_sch. PCBKit opens the board in the browser, with nothing to install.
Its repository publishes it under the MIT licence: you may reuse it on that licence's terms (keep the author's notice, and for a copyleft licence share your changes alike).