
4 layers81.2 × 96.6 mm
 9elements/OSKAR12
Open Source Keyboard Appliance powered by Rust
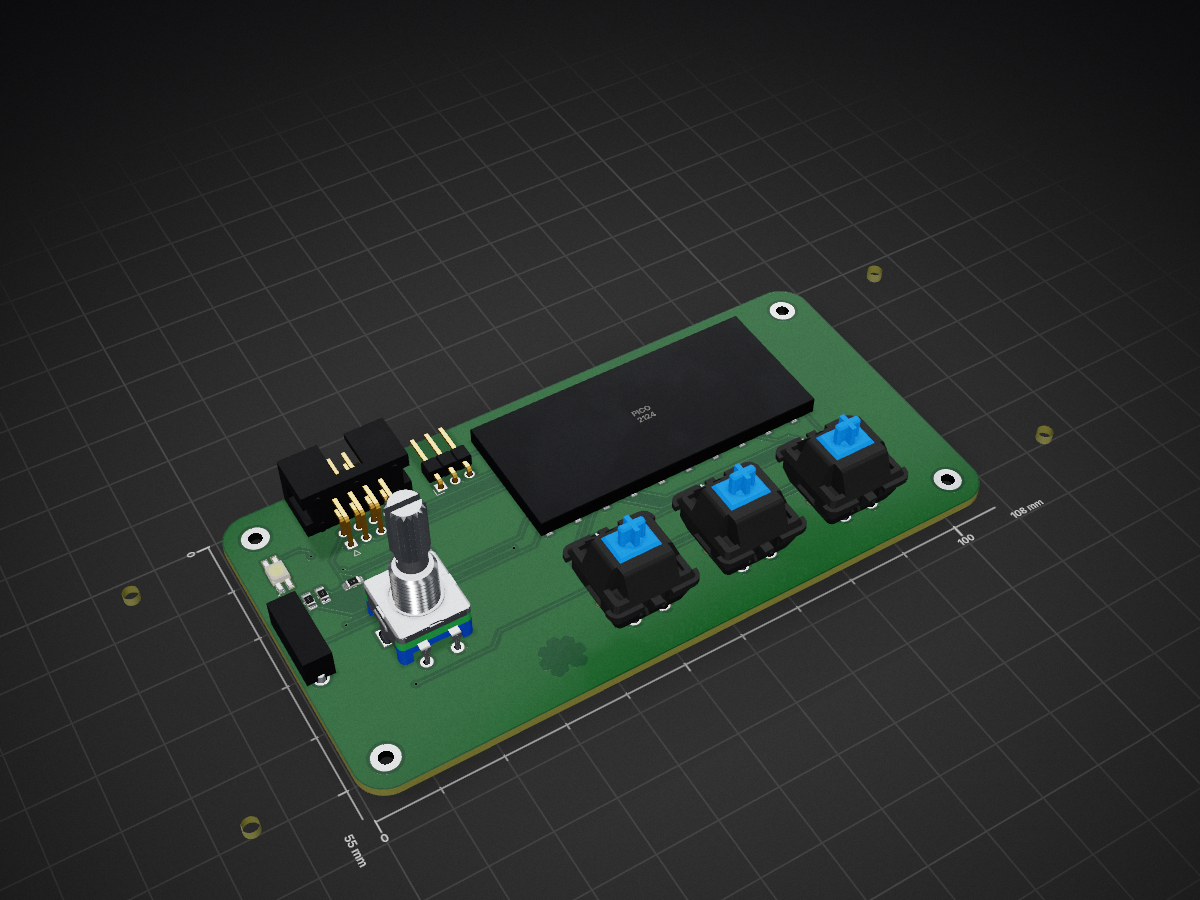
MacroKeyPad is an open-source printed circuit board by 9elements, from the 9elements/OSKAR repository on GitHub, published under the Apache-2.0 licence. It is a 2-layer board of 108 × 55 mm with 28 parts on 47 nets, routed with 208 tracks and 27 vias.
It is built around the SK6812-EC20. Its parts include 8 resistors, 4 switches, 3 connectors, 1 IC and 1 diode. It belongs with the keyboards and input boards and the RP2040 boards of this library.
OSKAR is a firmware for the Raspberry Pi Pico that combines the 9elements picoprog project and additional HID code into a firmware for our multi-feature Macro-Keypad.
Before you can compile and use OSKAR, you need to install the following dependencies:
# Only Linux
sudo apt install build-essential libudev-dev pkg-config

# All systems
cargo install flip-link elf2uf2-rsTo compile the firmware, follow these steps:
git clone https://github.com/9elements/OSKAR.git
cd OSKARcargo run --releasetarget/thumbv6m-none-eabi/release directory.To flash the firmware onto the Raspberry Pi Pico, follow these steps:
Connect the Raspberry Pi Pico to your computer while holding the BOOTSEL button. This will put the Pico into USB mass storage mode.
Copy the UF2 file to the Pico:
# Linux
cp target/thumbv6m-none-eabi/release/oskar.uf2 /path/to/pi/volume

# macOS
cp target/thumbv6m-none-eabi/release/oskar.uf2 /Volumes/RPI-RP2/
The Device features a 3-position selection switch on its left side. When the switch is moved all the way to the back it simply acts as the picoprog featuring SPI and UART capabilities (Green LED). Moved all the way to the front it acts as a Macro Keyboard (Red LED). With the switch in the middle position the device combines both features at once (purple LED).
The standard firmware of the Keyboard has the encoder configured as volume knob with mute on press. The keys 1-3 (from left to right) are configured as o s and f (for open source firmware).
At the top of the file src/hid.rs there is a constant struct called KEYLAYOUT.
const KEYLAYOUT:KeyLayout = KeyLayout {
    encoder_left: KeyType::Media(MediaKey::VolumeDecrement),
    encoder_right: KeyType::Media(MediaKey::VolumeIncrement),
    encoder_button: KeyType::Media(MediaKey::Mute),
    key1: KeyType::Keycode(KeyboardUsage::KeyboardOo),
    key2: KeyType::Keycode(KeyboardUsage::KeyboardSs),
    key3: KeyType::Keycode(KeyboardUsage::KeyboardFf),
};
The struct holds the current configuration of the Keyboard, each key can be configured to any keycode of the enum KeyType located in src/hid_codes.rs
for example:
const KEYLAYOUT:KeyLayout = KeyLayout {
    encoder_left: KeyType::Media(MediaKey::VolumeDecrement),
    encoder_right: KeyType::Media(MediaKey::VolumeIncrement),
    encoder_button: KeyType::Media(MediaKey::Mute),
    key1: KeyType::Keycode(KeyboardUsage::KeyboardF10),
    key2: KeyType::Keycode(KeyboardUsage::KeyboardF11),
    key3: KeyType::Keycode(KeyboardUsage::KeyboardF12),
};
Which could then be used to be configured as hotkeys in your operating system.
Once the firmware is running, you can use any terminal program to communicate with the UART and SPI peripherals via USB. The device will appear as a USB CDC (Communications Device Class) device. Currently /dev/ttyACM0 (macOS: /dev/tty.usbmodemOSFC20241) is a debug console that prints information about the Pico's current operation.
To communicate with the UART peripheral, open the corresponding serial port (e.g., /dev/ttyACM1 on Linux, /dev/tty.usbmodemOSFC20243 on macOS) with your terminal program. For now the Baud is fixed at 115200 but can be changed in code. Dynamic reconfiguration is still planned.
To interact with the Raspberry Pi Pico for reading and writing SPI flash chips, you can use tools like flashrom or flashprog. These tools support the serprog protocol, which allows communication over a serial interface.
flashrom or flashprog e.g.:# Debian or Debian-based Linux distributions
sudo apt-get install flashrom
# macOS with Homebrew
brew install flashromflashrom -p serprog:dev=/dev/ttyACM2 -r backup.binThis command reads the contents of the SPI flash chip and saves it to backup.bin.
flashrom -p serprog:dev=/dev/ttyACM2 -w firmware.binThis command writes the contents of firmware.bin to the SPI flash chip.
Make sure to replace /dev/ttyACM2 with the correct serial port if your device is connected to a different port or if you're on a different operating system (on macOS it will be /dev/tty.usbmodemOSFC20245).
This project is licensed under the Apache 2.0 License. See the LICENSE file for details.
| Qty | Value | Footprint | References |
|---|---|---|---|
| 8 | 10K | Resistor_SMD:R_0805_2012Metric_Pad1.20x1.40mm_HandSolder | R1, R2, R3, R4, R5, R6, R7, R8 |
| 3 | ~ | key-switches:Cherry_MX_SK6812_MINI_E | SW1, SW3, SW4 |
| 2 | LOGO | LOGO | G***, G*** |
| 1 | Conn_01x03 | Connector_PinHeader_2.54mm:PinHeader_1x03_P2.54mm_Horizontal | J2 |
| 1 | Conn_02x04_Odd_Even | Connector_IDC:IDC-Header_2x04_P2.54mm_Horizontal | J1 |
| 1 | Pico | MCU_RaspberryPi_and_Boards:RPi_Pico_SMD_HEADER | U1 |
| 1 | RotaryEncoder_Switch | Rotary_Encoder:RotaryEncoder_Alps_EC11E-Switch_Vertical_H20mm | SW2 |
| 1 | SK6812-E | SK6812-E:LED_SK6812-E | D2 |
| 1 | SLW-1274547-4A-RA-D | Switch:SLW12745474ARAD | J3 |
The 19 most common of 28 parts.
It measures 108 × 55 mm and has 2 copper layers, 1.6 mm thick.
28 parts, built around the SK6812-EC20. The full list of its parts is on this page, with links to each part's symbol and footprint where PCBKit's library has them.
From the 9elements/OSKAR repository on GitHub, at the commit this page was made from: the board is hardware/pcb/MacroKeyPad.kicad_pcb and its schematic hardware/pcb/MacroKeyPad.kicad_sch. PCBKit opens the board in the browser, with nothing to install.
Its repository publishes it under the Apache-2.0 licence: you may reuse it on that licence's terms (keep the author's notice, and for a copyleft licence share your changes alike).

theohg/PD240W
PD240W is a complete hardware and firmware project converting USB-C Power Delivery into a programmable 240W (48V 5A) bench power supply, featuring C++ code for Raspberry Pi Pico, custom PCB Gerbers, and a 3D-printable…

ageppert/Brushless-Motor-Biz-Card
A brushless motor and driver built in to a business card form-factor for learning and experimenting!

mizma/ergoSHIFT
11 button leverless controller with shifted home position

ReSummit/Seismos
A split keyboard that evolves the concept of the Zebra keyboard, but fancier

user-will/PCB_CANNONBALL
An ESP32-C3 dev board with more sensors and features then you could know what to do with


marceldale/nest-mini-v2-voice
Open voice satellite board for the Google Nest Mini (2nd gen): local Home Assistant voice assistant with ESP32-S3 + XMOS XU316, ESPHome, Voice PE compatible. Open hardware, prototype stage.