
4 layers40 × 68 mm

 4ms/SWN43
Spherical Wavetable Navigator source code
SWN is an open-source printed circuit board by 4ms, from the 4ms/SWN repository on GitHub. It is a 2-layer board of 130.6 × 112 mm with 614 parts on 619 nets, routed with 8,352 tracks and 934 vias.
It is built around the STM32F765ZGT6, TLV171ID and PCA9685PW, with the TL082, NJM2068M and BAT54S among its other parts. Its parts include 286 resistors, 172 capacitors, 35 ICs, 23 diodes and 3 connectors. It belongs with the STM32 boards of this library.


Firmware for the Spherical Wavetable Navigator, a Eurorack-format module from 4ms Company.
You need to install the GCC ARM toolchain. This project is known to compile with arm-none-eabi-gcc version 8.2.1 (8-2019q4) and 7.3.1 (7-2018q2).
If you're new to embedded development and not comfortable on the command line, you may wish to install an IDE. ST has an official IDE based on Eclipse called STM32CubeIDE. Or you can roll-your-own Eclipse using GCC ARM with Eclipse. There are also commerical software packages which can be easily found by searching.
Another option is to use a fully-featured text editor such as VSCode or Sublime Text. You can configure these to run commands to compile and flash/program your project onto your SWN, too. There are ARM debugging extensions available, too. On the other hand, if you're happiest using the command line and prefer to write code with vim, emacs, etc, you can also do everything without having to lift your hand from the keyboard except to twiddle knobs on the SWN.
4ms has a virtual machine that provides a consistant development environment for compiling. Check out this project and follow the instructions in its README: 4ms-dev-env. The SWN repo comes pre-cloned when you start this virtual machine.
First, follow the instructions on vagrant's site to install vagrant and VirtualBox.
Then, building the SWN project is as simple as this:
git clone https://github.com/4ms/4ms-dev-env.git
cd 4ms-dev-env
vagrant up
vagrant ssh
cd SWN
make
At present, the 4ms-dev-env is only setup to compile, not to flash (program), or debug. If you decide to use the virtual machine to compile, you'll still need to use your local system to program the compiled code onto SWN. Skip down to the Programmer section.
For Mac OSX, you can use brew to install the gcc-arm toolchain. First, install brew if you haven't already:
ruby -e "$(curl -fsSL https://raw.githubusercontent.com/Homebrew/install/master/install)"Then, install the gcc-arm toolchain v7.3.1:
brew tap nitsky/stm32
brew install arm-none-eabi-gcc
Continue below to Clone the Projects
Alternatively, you can follow the Linux orMac OSX instructions below to get v8.2.1.
For Linux or Mac OSX, download GNU ARM Embedded Toolchain version 8-2018-q4-major from Launchpad.
Direct links: Mac OSX gcc-arm 8.2.1 ... Linux gcc-arm 8.2.1.
Then unzip them: Double-clicking them on MacOS might work, or type this:
cd ~/Downloads ##whatever your download directory is
tar jxf gcc-arm-none-eabi-8-2018-q4-major-*.tar.bz2
Next, move the unzipped directory to somewhere sensible and add the bin/ dir to your PATH:
mv gcc-arm-none-eabi-8-2018-q4-major $HOME/myprojectdir
echo "export PATH=$HOME/myprojectdir/gcc-arm-none-eabi-8-2018-q4-major/bin:\$PATH" >> $HOME/.bash_profile
source $HOME/.bash_profile
Of course, modify the above with the actual directory you want to put the toolchain, and your shell start-up script if you're using zsh or something else.
Continue below to Clone the Projects
Download the GNU ARM Embedded Toolchain version 8-2018-q4-major from Launchpad. Download the Installer for your Windows verion (don't download the .zip file, download the .exe file).
Run the installer, and continue below.
If you are using the virtual machine, this will already be cloned for you, so skip ahead.
Make sure git is installed on your system. (OSX: type "brew install git" into the Terminal).
Create a work directory, and enter it:
mkdir myhackdir && cd myhackdirClone the SWN repository:
git clone https://github.com/4ms/SWN.git
cd SWNMake your changes to the code in the SWN directory. When ready to compile, make the project like this:
makeThis creates an main.elf, main.bin, and main.hex file in the build/ directory. See the Programmer section below for how to get these files onto your SWN.
Once you compile your firmware, you need to flash it to your SWN. You will need a hardware device that connects to your computer's USB port. The other side of the programmer has a header that conencts to the SWN's 4-pin SWD header.
You have several options:
The ST-LINK v2 from ST corporation is the offical programmer from ST (who makes the chip that needs programming). The ST-LINK v2 has a 20-pin JTAG header, and you need to connect four of these to your SWN. More details on this are below.
The ST-LINKv2 programmer can be used with ST-LINK software for Mac, Linux, or Windows; or ST-UTIL software for Windows; or STM32CubeProgrammer software for any platform.
The STM32 Discovery boards are low-cost (around US$25) and work great as a programmer and debugger. The 'Disco' board is essentially an ST-LINKv2, plus some extra stuff. While the ST-LINK v2 is encased in a plastic enclosure, the Discovery board is open and could potentially be damaged if you're not careful. Read the Discovery board's manual to learn about setting the jumpers to use it as an SWD programmer (rather than an evaluation board). ST makes many variations of the Discovery board, and to my knowledge they all contain an ST-LINK programmer.
The Discovery board programmer is essentially an ST-LINKv2, so it can be used with all the same software that the ST-LINKv2 can (see above section).
Another option is SEGGER's J-link programmer. There is an educational version which is very affordable and a good choice for a programmer if you meet the requirements for education use. There are various professional commercial versions with a number of useful features. The J-link uses SEGGER's propriety software, Ozone, which not only will flash a hex or bin file, but can be used as a powerful GUI debugger if you use it to open the .elf file. There also are command-line commands for flashing. J-Link software runs on Mac, Linux, and Windows.
The SWN has an audio bootloader built-in, so you can just compile your project using make wav and then play the wav file into the audio input of the SWN while in bootloader mode (see SWN User Manual for detailed procedure). No additional hardware or software is necessary.
This works well and is the safest option. However it's very slow (up to 5 minutes per update, or 11+ minutes if you include all new factory wavetables). If you are going to be making a series of changes, this will be a very slow process!
When ready to build an audio file for the bootloader, make it like this:
make wavThis requires python to run. It creates the file main.wav in the build/ directory. Play the file from a computer or device into the SWN by following the instructions in the User Manual on the 4ms SWN page.
Depending on the hardware you chose, one or more of the following software options will work:
This software works with the ST-LINK v2 and the Discovery board to flash your SWN.
MacOS:
brew install stlinkLinux:
Use your package manager to install stlink-tools. See stlink README for direct links.
Windows:
Download the latest binary (v1.3.0). If that link doesn't work anymore, or you want to try a newer version, go to stlink-org/stlink github page.
Programming using st-link
You can flash the compiled .bin file by typing:
st-flash write build/main.bin 0x08010000This writes the main.bin file starting at the 0x08010000 sector, which is the first sector of the application code.
Debugging
The gcc-arm toolchain includes a gdb debugger, but you'll need a server to use it. The st-link software includes st-util which will provide this. OpenOCD and J-link are two other options. Configuring debugging is beyond the scope of this README, but there are plenty of tutorials online. See the stlink README for a quick start.
If you're using a J-Link or J-Trace hardware programmer to flash your SWN, download and install Ozone. Ozone is a GUI debugger which can program, too. For command-line options, consider J-Link Software and Documentation Pack, which contains the GDB server and other tools.
To program your SWN, open Ozone and then use the Project Wizard to create a new project. Select the STM32F765ZG for the chip. Use the default settings elsewhere. On the page that lets you select a file, select the main.elf file that you compiled. You can then save this project. To program, just click the green power/arrow symbol at the upper left.
You also can use the CLI tools to flash the hex/elf file, see J-Link documentation for details.
J-Link and Ozone is available for Mac, Windows, and Linux.
The STM32CubeProgrammer is ST's official programaming software available for all platforms. You can find it here
Documentation is included with the download.
ST-UTIL is a program from ST that runs on Windows only. You can find it on ST.com
It works with the ST-LINKv2 and Discovery boards.
Discovery Board: The Discovery board has a 6-pin SWD header, and you can connect that pin-for-pin to the first 4 pins on the SWN's SWD header. You can use a 0.1" spaced 4-pin Jumper Wire such as this one from Sparkfun. Pay attention to Pin 1 (marked by "1" on the SWN board), or you risk damaging the ARM chip.
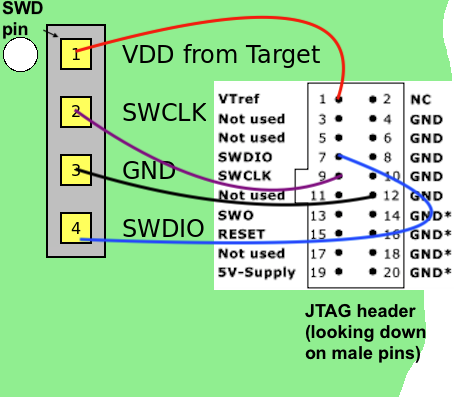
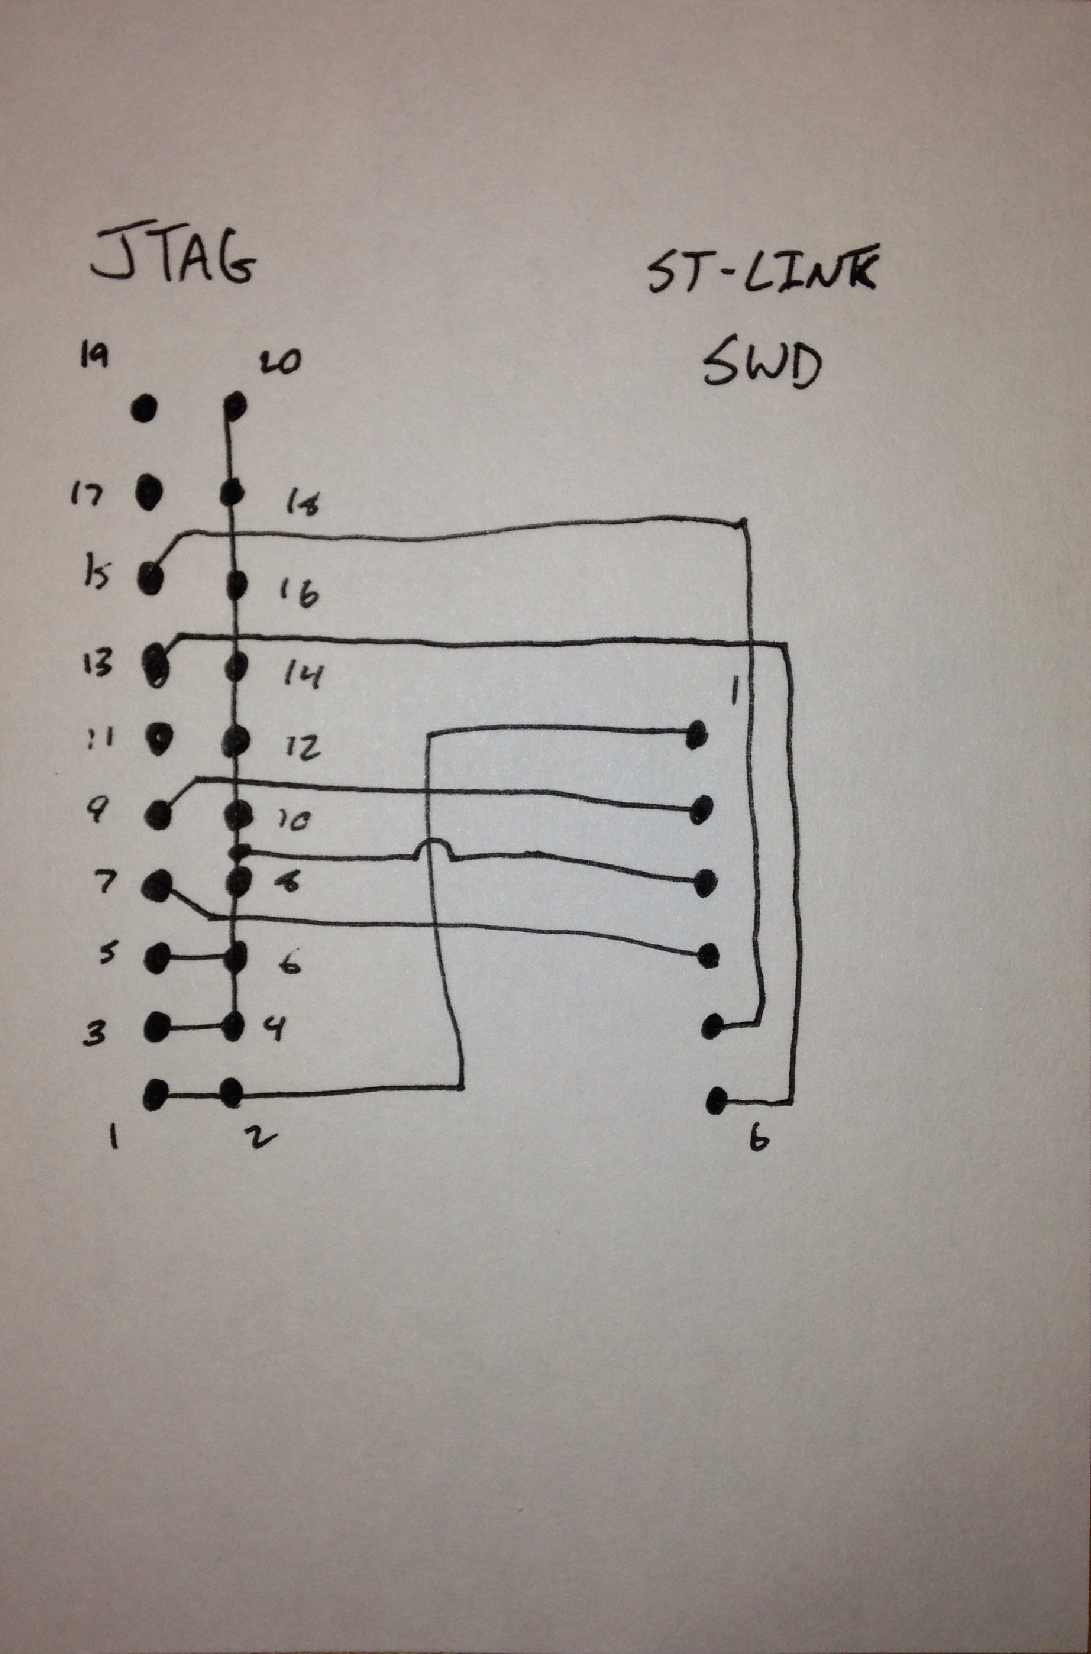
ST-LINK v2 or SEGGER J-Link: Both the ST-LINK and the SEGGER J-link have a 20-pin JTAG connector. You need to connect 4 of these pins to the SWN's 4-pin SWD connector, using 4 wires: here's a pack of 10. Pay attention to Pin 1 (marked by "1" on the SWN board), or you risk damaging the ARM chip.
Look at these images:
Then use your jumper wires to connect:
Here's more info in case you want it explained in another way:
The bootloader is in a folder called bootloader/.
It's based on the stm-audio-bootloader from pichenettes.
The bootloader is already installed on all factory-built SWN, so you don't need to mess with this project if you're just planning on modifying your SWN code. The bootloader allows you to replace the firmware by playing a compiled audio file into the Waveform In jack.
Doing make from within the bootloader/ directory will build the bootloader and also use the main SWN app's main.hex file to create a combined hex file. This file is a complete flash dump of a factory SWN. After building the SWN first, and then the bootloader, the file will be in SWN/bootloader/build/bootloader-app-combo/. There is a hex and a bin version in that folder.
Oops, I overwrote the bootloader and now it won't boot...
The bootloader lives at 0x08000000, so if you overwrite that sector you will overwrite the bootloader. And then it won't boot. The best way is to re-flash the bootloader. Do this:
st-flash write bootloader/build/bootloader-app-combo/SWN_combo.bin 0x08000000Or if the combo is not working, you could try just the bootloader:
st-flash write bootloader/build/bootloader/bootloader.bin 0x08000000The code (software) is licensed by the MIT license.
The hardware is licensed by the CC BY-NC-SA license (Creative Commons, Attribution, NonCommercial, ShareAlike).
See LICENSE file.
I would like to see others build and modify the SWN and SWN-influenced works, in a non-commercial manner. My intent is not to limit the educational use nor to prevent people buying hardware components/PCBs collectively in a group. If you have any questions regarding the license or appropriate use, please do not hesitate to contact me!
Do not include the text "4ms" or "4ms Company" or the graphic 4ms logo on any derivative works. This includes faceplates, enclosures, PCBs, and front-panels. It's OK (but not required) to include the text "Spherical Wavetable Navigator" or "SWN" if you wish.
| Qty | Value | Footprint | References |
|---|---|---|---|
| 137 | 1k | 4ms-footprints:R0603 | R10, R11, R100, R101, R102, R105, R106, R107, R108, R109, R110, R111, R112, R113, R114, R117 +121 |
| 104 | 0.1uF | 4ms-footprints:C0603 | C1, C10, C11, C12, C13, C107, C110, C112, C113, C115, C116, C121, C122, C127, C128, C133 +88 |
| 33 | LED-RGB-CA-HEBEI | 4ms_LED:LED_PLCC-4 | CLKLED1, LED-INCLIP1, LED-LFO1, LED-WTO1, LED-WTO2, LED-WTO3, LED-WTO4, LED-WTO5, LED-WTO6, LED1, LED10, LED11, LED12, LED13, LED14, LED15 +17 |
| 30 | 10k | 4ms-footprints:R0603 | R26, R28, R199, R263, R264, R267, R272, R273, R274, R275, R276, R277, R278, R279, R280, R281 +14 |
| 24 | 150 | 4ms-footprints:R0603 | R20, R118, R120, R122, R251, R252, R253, R254, R255, R256, R257, R258, R259, R260, R261, R262 +8 |
| 21 | BAT54S | 4ms-footprints:SOT23 | D1, D2, D3, D4, D10, D11, D12, D14, D15, D16, D17, D18, D20, D21, D22, D23 +5 |
| 18 | 10nF | 4ms-footprints:C0603 | C44, C45, C111, C114, C117, C118, C119, C120, C123, C124, C125, C126, C129, C130, C131, C132 +2 |
| 17 | 100k | 4ms-footprints:R0603 | R1, R80, R81, R84, R86, R88, R127, R128, R130, R169, R172, R189, R190, R194, R201, R295 +1 |
| 17 | PJ301-M12 | 4ms-footprints:PJ301M-12 | BROWSE1, CHORDCV1, DISPERSION1, DISPPATT1, ENV1, ENV2, ENV3, ENV4, ENV5, ENV6, LAT1, LFO1, OUT-1, OUT-2, RADIUS1, SPHERE1 +1 |
| 16 | 1nF | 4ms-footprints:C0603 | C7, C19, C43, C48, C49, C84, C85, C88, C89, C90, C136, C168, C169, C170, C171, C172 |
| 14 | 4k7 | 4ms-footprints:R0603 | R16, R25, R34, R35, R36, R37, R65, R66, R92, R93, R104, R115, R116, R129 |
| 11 | 1uF | 4ms-footprints:C0603 | C87, C97, C98, C100, C101, C105, C106, C108, C109, C158, C160 |
| 11 | 49.9 | 4ms-footprints:R0603 | R103, R167, R188, R244, R245, R246, R250, R290, R291, R292, R293 |
| 10 | 49k9 | 4ms-footprints:R0603 | R17, R18, R19, R74, R75, R76, R124, R125, R183, R200 |
| 10 | PCA9685 | 4ms-footprints:TSSOP-28_4.4x9.7mm_Pitch0.65mm | U2, U3, U4, U5, U6, U9, U10, U11, U12, U13 |
| 9 | 1M | 4ms-footprints:R0603 | R38, R39, R40, R41, R42, R43, R166, R186, R296 |
| 9 | 330 | 4ms-footprints:R0603 | R232, R233, R234, R235, R236, R237, R238, R239, R240 |
| 9 | 68k | 4ms-footprints:R0603 | R61, R62, R82, R83, R85, R87, R89, R91, R191 |
| 9 | STEREO-GREEN | 4ms-footprints:PJ301M-12 | CLOCKIN1, IN-1, TRANSPOSE1, VOCTCH1, VOCTCH2, VOCTCH3, VOCTCH4, VOCTCH5, VOCTCH6 |
| 8 | SPST-ILLUM-RGB | 4ms-footprints:RGB-SPST-LED-TC002 | LFOGATERGBBUT1, LFOVCARGBBUT1, LOCK1, LOCK2, LOCK3, LOCK4, LOCK5, LOCK6 |
| 8 | TLV171 | TO_SOT_Packages_SMD:SOT-23-5 | IC11, U14, U16, U18, U19, U20, U21, U24 |
| 7 | 1.5nF | 4ms-footprints:C0603 | C2, C94, C95, C96, C102, C103, C104 |
| 7 | 20 | 4ms-footprints:R0603 | R2, R241, R242, R243, R247, R248, R249 |
| 6 | 100k | 4ms-footprints:POT-SLIDER-LED-ALPHA-RA2045F-20 | SLIDE1, SLIDE2, SLIDE3, SLIDE4, SLIDE5, SLIDE6 |
| 6 | 2k7 | 4ms-footprints:R0603 | R9, R32, R52, R54, R56, R58 |
| 6 | 47uF | 4ms-footprints:CP_Elec_5x5.3 | C4, C8, C21, C47, C56, C58 |
| 5 | ENCODER | 4ms_Encoder:ENC_SPST_12mm_NUDGED | Fine/Scale1, LFO_Shape/Phase1, LFO_Speed/Range1, Load_Preset/Save1, Transpose/Chord1 |
| 5 | TL082 | 4ms-footprints:TSSOP-8_4.4x3mm_Pitch0.65mm | IC6, IC8, IC9, IC12, IC13 |
| 4 | 18pF | 4ms-footprints:C0603 | C32, C33, C54, C55 |
| 4 | NJM2068 | 4ms-footprints:TSSOP-8_4.4x3mm_Pitch0.65mm | IC2, IC3, IC4, IC5 |
| 4 | ~ | 4ms-footprints:PAD-06 | PAD1, PAD2, PAD3, PAD4 |
| 3 | 2.2uF | 4ms-footprints:C0603 | C14, C28, C29 |
| 3 | RGBENC | 4ms_Encoder:ENC_RGB_SPST_12mm_NUDGED | Latitude/Dispersion_Pat1, Longitude/WT_Spread1, Radius/Dispersion1 |
| 2 | 10uF/10V | 4ms-footprints:C0603 | C51, C79 |
| 2 | ADS8634 | Housings_DFN_QFN:QFN-24-1EP_4x4mm_Pitch0.5mm | U15, U17 |
| 2 | B140-E3 | 4ms-footprints:SMA_Standard | D13, D19 |
| 2 | MCP1703x-3302E/MB | TO_SOT_Packages_SMD:SOT-89-3 | IC7, U23 |
| 1 | 10uF/25V | 4ms-footprints:C1206 | C78 |
| 1 | 16MHz | 4ms-footprints:FA-238-Pins1and2diag | X1 |
| 1 | 17k4 | 4ms-footprints:R0603 | R187 |
| 1 | 470k | 4ms-footprints:R0603 | R197 |
| 1 | 680 | 4ms-footprints:R0603 | R185 |
| 1 | 78E-3.3-0.5 | 4ms-footprints:RECOM-DCDC | VR4 |
| 1 | ADR381ARTZ | 4ms_Package_SOT:SOT23-3_PO132 | V2 |
| 1 | BEAD | 4ms-footprints:R0603 | L2 |
| 1 | Conn_02x04_Odd_Even | 4ms_Connector:Pins_2x04_2.54mm_TH | J3 |
| 1 | HEADER-1X3-TH | 4ms_Connector:Pins_1x03_2.54mm_TH | J1 |
| 1 | HEADER-1X4 | 4ms_Connector:Pins_1x04_2.54mm_TH_SWD | SWD_1 |
| 1 | HEADER-2X8-TH | 4ms-footprints:HEADER-2X8-TH_eagle_pinout | J2 |
| 1 | KA78L05 | TO_SOT_Packages_SMD:SOT-89-3 | V1 |
| 1 | LD1117ADT33TR | Package_TO_SOT_SMD:TO-252-2 | IC10 |
| 1 | ROTENC-BUTTON-A | 4ms_Encoder:ENC_SPST_12mm_NUDGED | ENC1 |
| 1 | S25FL127 | 4ms_Package_SOIC:SOIC-8_5.28x4.9mm_Pitch1.27mm | U8 |
| 1 | STM32F765ZG | 4ms-footprints:LQFP-144_ARM_20x20mm_Pitch0.5mm | U7 |
| 1 | TRACE-20 | 4ms-footprints:CONN-2x10-SMT-127 | H1 |
| 1 | WM8731 | 4ms-footprints:SSOP-28 | U1 |
| 1 | submini-2T | 4ms-footprints:SPDT-SUB | SW2 |
| 1 | submini-3T | 4ms_Switch:Switch_Toggle_SPST_SubMini | SW1 |
It measures 130.6 × 112 mm and has 2 copper layers, 1.6 mm thick.
614 parts, built around the STM32F765ZGT6, TLV171ID, PCA9685PW and TL082. The full list of its parts is on this page, with links to each part's symbol and footprint where PCBKit's library has them.
From the 4ms/SWN repository on GitHub, at the commit this page was made from: the board is hardware/Kicad project/SWN v1.1/SWN.kicad_pcb. PCBKit opens the board in the browser, with nothing to install.
Its repository states no licence, so its author keeps all rights: ask 4ms before reusing the design.


